
User Manual

INSTALLATION(INSTRUCTIONS
1240 Instructions 6-26-14.docx Page 4 of 4
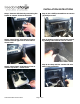
Step 13: Route black connector of Charging
Module through 1/2" hole and place module
in bin.
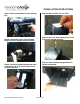
Step 14: Flip tray over and insert the (4)
3/8” Pan Head T-15 Torx Screws through
tray into module.
Step 15: Splice Red wire of Power Harness to
the Red (12v ignition) wire of the power
point plug and Splice Black wire of Power
Harness to the Black (ground) wire of the
power point plug.
RECOMMENDED: Solder wires and cover with Heat
Shrink Tubing.
Step 16: Connect Power Harness to Charging
Module.
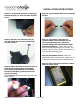
Step 17: Test system. LED light will
illuminate Blue once accessories are on.
Once Qi equipped device is placed on
Freedom Charge LED will illuminate Green
and charging begins. *Please note on some
devices syncing may take up to 15 seconds. Coil
locations vary on various devices; move device on
mat until LED illuminates green.
Step 18: Reassemble vehicle. Follow your
disassembly steps in reverse order, taking care not
to bind the harness wiring when reinstalling trim.
Step 19: Place removable consumer product
label on center of mat.