BN_DF-7050-8050SLT_DE.qxd 12.10.2010 18:08 Uhr Seite 1 DEUTSCH Inhaltsverzeichnis 1. Produktdarstellung ...........................................2 1.1 Fernbedienung ...........................................2 1.2 Drucktasten ...............................................3 1.3 Rechte Seite des Rahmens .........................3 1.4 Linke Seite des Rahmens ...........................3 2. Einsetzen & Austauschen der Batterie................3 3. Erste Schritte ...........................................
BN_DF-7050-8050SLT_DE.qxd 2 12.10.2010 18:08 Uhr Seite 2 DEUTSCH 1 Produktdiagramm 1.1 Fernbedienung 8050 SLT 1. POWER_ Einschalten/Ausschalten 2. BGM _Drücken Sie die Taste BGM, um die Hintergrundmusik abzuspielen. 3. MUTE _ Drücken Sie die Stummtaste, um den Ton vorübergehend auf lautlos zu schalten. 4. MENU _ Auf die Maske kopieren & löschen zugreifen. 5. _ Funktionale Auswahltaste, Cursor nach oben. 6. RETURN _ Zurück zur vorherigen Seite. 7. _ Funktionale Auswahltaste, Cursor nach links. 8.
BN_DF-7050-8050SLT_DE.qxd 12.10.2010 18:08 Uhr Seite 3 DEUTSCH 1.2 Drucktasten 1. 2. 3. 4. 5. 6. 7. 8. Power (Ein/Aus) Menu (Menü) Up (Auf) Down (Ab) Play / Pause/OK (Abspielen/Pause/OK) Left (Links) Right (Rechts) Return (Enter) 1.3 Rechte Seite des Rahmens 1. SD/SDHC/MS/MMC 3 2.
BN_DF-7050-8050SLT_DE.qxd 4 12.10.2010 18:08 Uhr Seite 4 DEUTSCH 3. Erste Schritte 3.1 Stecken Sie ein Ende des mitgelieferten Wechselstromadapters in eine elektrische 110-240V Wechselstrom-Standardsteckdose und das andere Ende in die rechte Seite des Rahmens. Hinweis: Für den Ständer des digitalen Bilderrahmens beziehen Sie sich bitte auf »Anleitung Ständer« (siehe Abschnitt 8). 4.1 Karte und USB Unterstützt werden SD/SDHC/MMC/MS und USB 2.0.
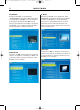
BN_DF-7050-8050SLT_DE.qxd 12.10.2010 18:08 Uhr Seite 5 DEUTSCH 5 Drücken Sie OK ( II), um die Bilder in einer Slideshow im ausgewählten Slidemodus abzuspielen. Ändern Sie den Slidemodus wie folgt: Wählen Sie EINSTELLUNGEN, um den SLIDEMODUS (ein Fenster/dreifaches Fenster/vier Fenster) auszuwählen, wählen Sie mit aus. Drücken Sie auf OK ( II), um zu bestätigen.
BN_DF-7050-8050SLT_DE.qxd 6 12.10.2010 18:08 Uhr Seite 6 DEUTSCH 4.4 Videomodus Drücken Sie RETURN, um im Hauptmenü „SPEICHERKARTE“ auszuwählen. Wählen Sie Video aus und drücken Sie OK ( II), um in die Videomaske zu gelangen, drücken Sie dann , um das Video aus der Abspielliste auszuwählen und drücken Sie OK ( II), um zu bestätigen. Drücken Sie VOL+/-, um die Lautstärke zu erhöhen/zu reduzieren.
BN_DF-7050-8050SLT_DE.qxd 12.10.2010 18:08 Uhr Seite 7 DEUTSCH 6. Kalender Wählen Sie aus dem Hauptmenü Kalender aus und drücken Sie OK ( II), um darauf zuzugreifen. Die Zeit wird in der oberen linken Seite angezeigt. Unter der Zeit werden die Bilder der Speicherkarte automatisch als Slideshow abgespielt. 7 7.
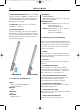
BN_DF-7050-8050SLT_DE.qxd 12.10.2010 18:08 Uhr 8 Seite 8 DEUTSCH 7.15 Einstellungen zurücksetzen: Drücken Sie OK ( II) Eingabe, verwenden Sie , um zu markieren oder die Markierung aufzuheben, um alle Einstellungen auf die Standardwerte zurückzusetzen. Drücken Sie OK ( II), um zu bestätigen. 7.16 Verlassen: Drücken Sie hier, um die Einstellungsmaske zu verlassen. 8. Anleitung Ständer Führen Sie den Bügel in die Schlitze des digitalen Bilderrahmens ein.
BN_DF-7050-8050SLT_GB.qxd 12.10.2010 18:09 Uhr Seite 1 ENGLISH CONTENTS 1. Product Diagram............................................10 1.1 Remote Control........................................10 1.2 Touch-Buttons .........................................11 1.3 Right Side of Frame .................................11 1.4 Left Side of Frame....................................11 9 Introduction: Thank you for your purchase of the Digital Photo Frame.
BN_DF-7050-8050SLT_GB.qxd 10 12.10.2010 18:09 Uhr Seite 2 ENGLISH 1 Product Diagram 1.1 Remote Control 8050 SLT 1. POWER_ Switch On/Off 2. BGM _ Press BGM button to play the background music. 3. MUTE _ Press Mute button to silence the voice temporarily. 4. MENU _ Enter copy & delete interface. 5. _ Functional selection button - top cursor. 6. RETURN _ Return to upper page. 7. _ Functional selection button - left cursor 8. _ Functional selection button - right cursor 9.
BN_DF-7050-8050SLT_GB.qxd 12.10.2010 18:09 Uhr Seite 3 ENGLISH 1.2 Touch Buttons 1. 2. 3. 4. 5. 6. 7. 8. Power Menu Up Down Play / Pause/OK Left Right Return 1.3 Right Side of Frame 1. SD/SDHC/MS/MMC 11 2. Installing & Replacing the Battery Place the upside of the remote control down, press down on the ridged area of the battery cover and pull towards you to remove the tray. Place one CR2025 lithium button-cell battery on the tray with the positive “+”side facing you. Reinsert the tray. 1.
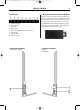
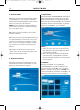
BN_DF-7050-8050SLT_GB.qxd 12 12.10.2010 18:09 Uhr Seite 4 ENGLISH 3. Getting Started 3.1 Extend the digital photo frame bracket on the back of the frame to the widest position for greatest stability, and then plug one end of the included AC adapter into a standard 110-240V AC electrical outlet and the other end into the right side the frame. Note: There are different positions for the digital photo frame stand. Please refer to "Stand Instruction". 4.1 Card and USB It supports SD/SDHC/MMC/MS and USB 2.
BN_DF-7050-8050SLT_GB.qxd 12.10.2010 18:09 Uhr Seite 5 ENGLISH 13 Change slide mode as follows: press SETUP to choose SLIDE MODE (single /triple/ four windows), select with , press OK ( II) to confirm. Copy & Delete function In 9-picture mode (8050SLT)/6-picture mode (7050SLT), use to select the picture you want to copy to the built-in memory, press OK ( II) to enter the single-picture mode, then press SETUP to enter copy interface, press OK ( II) to confirm. 4.3.
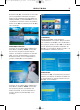
BN_DF-7050-8050SLT_GB.qxd 14 12.10.2010 18:09 Uhr Seite 6 ENGLISH 4.4 Video Mode Press RETURN to choose "MEMORY CARD" in the main menu. Choose Video, press OK ( II) to enter the video interface, press to select the video from the playlist, then press OK ( II) to confirm. Press VOL+/- to turn up/ down the volume. Delete function Use to select the video you want to delete, then press MENU to enter delete interface, press OK( II) to confirm. 5.
BN_DF-7050-8050SLT_GB.qxd 12.10.2010 18:09 Uhr Seite 7 ENGLISH 6. Calendar Select Calendar from the main menu, press OK ( II) to enter. The time is displayed on the top of left side.under the time,the pictures in the momory card slidshow automatically. 15 7.6 Photo mode: Auto fit, Optiomal, Full 7.7 Music Play Mode: Single Repeat, Circular, No Repeat, Single 7.8 Video Mode: Original, Screen 7.9 Display Contrast: Use to select between 00 (lowest) and 40 (highest).
BN_DF-7050-8050SLT_GB.qxd 12.10.2010 18:09 Uhr 16 Seite 8 ENGLISH 8. Stand Instruction Insert the bracket into the slots of the digital photo frame. Please check and make sure the bracket is locked in place before standing the photo frame up. Please refer to the illustration shown below Screen Parameter: DigiFrame 8050 SLT: Screen Size: 20 cm (8 inch) TFT Aspect Ratio: 4:3 Resolution:800X600 Pixel DigiFrame 7050 SLT: Screen Size: 17cm (7inch) TFT Aspect Ratio: 16:10 Resolution: 768x480 Pixel 10.
BN_DF-7050-8050SLT_FR.qxd 12.10.2010 18:10 Uhr Seite 1 FRANÇAIS Table des matières 1. Schéma du produit..........................................18 1.1 Télécommande.........................................18 1.2 Touches...................................................19 1.3 Côté droit du cadre ..................................19 1.4 Côté gauche du cadre...............................19 2. Insertion & échange de la pile .........................19 3. Premiers pas ......................................
BN_DF-7050-8050SLT_FR.qxd 18 12.10.2010 18:10 Uhr Seite 2 FRANÇAIS 1 Diagramme du produit 1.1 Télécommande 1. POWER _ Mise en marche/arrêt. 2. BGM _Appuyez sur la touche BGM pour jouer la musique de fond. 3. MUTE _ Appuyez sur cette touche pour mettre temporairement au mode silence. 4. MENU _ Entrez l'interface copier & supprimer. 5. _ Touche de sélection fonctionnelle, curseur vers le haut. 6. RETURN _ Retournez à la page supérieure. 7. _ Touche de sélection fonctionnelle, curseur vers la gauche.
BN_DF-7050-8050SLT_FR.qxd 12.10.2010 18:10 Uhr Seite 3 FRANÇAIS 1.2 Touches 1. 2. 3. 4. 5. 6. 7. 8. Power (marche/arrêt) Menu (menu) Up (vers le haut) Down (vers le bas) Play/Pause/OK (lecture/pause/OK) Left (gauche) Right (droite) Return (entrée) 1.3 Côté droit du cadre 1. SD/SDHC/MS/MMC 19 2.
BN_DF-7050-8050SLT_FR.qxd 20 12.10.2010 18:10 Uhr Seite 4 FRANÇAIS 3. Premiers pas 3.1 Écartez au maximum les bras situés sur la face arrière du cadre photo numérique, ceci afin d'atteindre une stabilité élevée. Enfichez alors au bout de l'adaptateur pour courant alternatif une prise électrique standard de 110-240 V et l'autre bout dans le côté droit du cadre. Indication : De différentes positions sont possibles pour le support du cadre photo numérique.
BN_DF-7050-8050SLT_FR.qxd 12.10.2010 18:10 Uhr Seite 5 FRANÇAIS 21 Appuyez sur OK ( II), pour visualiser les images sélectionnées au mode dia. Vous pouvez modifier le mode dia comme suit : sélectionnez RÉGLAGES, afin de sélectionner le mode dia (une fenêtre, fenêtre triple), fenêtre quadruple). Procédez à la sélection avec et appuyez sur OK ( II), pour confirmer.
BN_DF-7050-8050SLT_FR.qxd 22 12.10.2010 18:10 Uhr Seite 6 FRANÇAIS 4.4 Mode vidéo Appuyez sur RETURN pour sélectionner la « CARTE MÉMOIRE » du menu principal. Sélectionnez Vidéo, appuyez sur OK ( II) pour entrer l'interface vidéo, ensuite sur pour sélectionner la vidéo de la liste, puis sur OK ( II) pour confirmer. Appuyez sur VOL+/- pour régler le volume.
BN_DF-7050-8050SLT_FR.qxd 12.10.2010 18:10 Uhr Seite 7 FRANÇAIS 6. Calendrier Sélectionnez le calendrier dans le menu principal et appuyez sur OK ( II) pour y accéder. L'heure est affichée au haut sur le côté gauche. Les images de la carte mémoire sont automatiquement affichés sous forme de diaporama sous l'heure. 23 7.
BN_DF-7050-8050SLT_FR.qxd 12.10.2010 18:10 Uhr 24 Seite 8 FRANÇAIS 7.15 Remise à zéro des réglages : Appuyez sur OK entrée, procédez au marquage ou annulez-le avec la touche , afin de remettre toutes les valeurs standard à zéro. Appuyez ensuite sur OK pour confirmer. 7.16 Quitter : Appuyez ici pour quitter le masque des réglages. 8. Mode d'emploi support Passez l'étrier dans les fentes du cadre photo numérique.
BN_DF-7050-8050SLT_IT.qxd 12.10.2010 18:11 Uhr Seite 1 ITALIANO Indice 1. Descrizione del prodotto .................................26 1.1 Telecomando ...........................................26 1.2 Tasti da premere ......................................27 1.2 Lato destro della cornice ..........................27 1.3 Lato sinistro della cornice ........................27 2. Inserimento e sostituzione della batteria ..........27 3. Operazioni preliminari .....................................
BN_DF-7050-8050SLT_IT.qxd 12.10.2010 18:11 Uhr 26 Seite 2 ITALIANO 1 Presentazione del prodotto 1.1 Telecomando 8050 SLT 1. POWER _ On/Off 2. BGM _ Premi BGM per sentire la musica di sottofondo 3. MUTE _ Premi MUTE per impostare temporaneamente su Silenzioso. 4. MENU _ Interfaccia di Copia e Cancellazione. 5. _ Tasto freccia, cursore verso l’alto. 6. RETURN _ Torna alla pagina principale. 7. _ Tasto feccia, cursore a sinistra. 8. _ Tasto freccia, cursore a destra. 9.
BN_DF-7050-8050SLT_IT.qxd 12.10.2010 18:11 Uhr Seite 3 ITALIANO 1.2 Tasti da premere 1. 2. 3. 4. 5. 6. 7. 8. Power (on/off) Menu (Menu) Up (su) Down (giù) Play / Pause/OK (Riproduzione /Pausa/OK) Left (a sinistra) Right (a destra) Return (Enter) 1.3 Parte destra della cornice 1. SD/SDHC/MS/MMC 27 2.
BN_DF-7050-8050SLT_IT.qxd 28 12.10.2010 18:11 Uhr Seite 4 ITALIANO 3. Operazioni preliminari 3.1 Tirare le braccia sul retro della cornice digitale alla massima distanza possibile per ottenere la massima stabilità. Poi collegare un'estremità dell'alimentatore fornito ad una presa di corrente standard 110-240V a muro e l'altra estremità sul lato destro della cornice. Nota: per i piedistalli della cornice digitale sono disponibili varie posizioni. Si prega di fare riferimento a " Istruzioni piedistalli".
BN_DF-7050-8050SLT_IT.qxd 12.10.2010 18:11 Uhr Seite 5 ITALIANO 29 Premere OK ( II) per riprodurre le immagini nella modalità di presentazione selezionata . Modificare la modalità di presentazione come segue: scegliere IMPOSTAZIONI, per selezionare la modalità di presentazione (finestra singola / tripla finestra / quadrupla finestra), selezionare con . Premere OK ( II) per confermare.
BN_DF-7050-8050SLT_IT.qxd 30 12.10.2010 18:11 Uhr Seite 6 ITALIANO 4.4 Video Premi RETURN per selezionare la "MEMORY CARD" all’interno del menu principale. Seleziona Video, premi OK ( II) per accedere alla corrispondente interfaccia, quindi premi per selezionare una voce dalla playlist, e infine OK ( II) per confermare. Premi VOL+/- per regolare il volume. Funzione di Cancellazione Usa per selezionare il video da cancellare, quindi MENU per accedere all’interfaccia di cancellazione.
BN_DF-7050-8050SLT_IT.qxd 12.10.2010 18:11 Uhr Seite 7 ITALIANO 6. Calendario Selezionare Calendario dal menu principale e premere OK ( II) per accedervi. L’ora verrà visualizzata nella parte superiore a sinistra. Sotto l’ora verranno riprodotte automaticamente le immagini della scheda di memoria in modalità presentazione. 31 7.
BN_DF-7050-8050SLT_IT.qxd 12.10.2010 18:11 Uhr 32 Seite 8 ITALIANO 7.15 Reset delle impostazioni: Premere OK, utilizzare i tasti per selezionare o deselezionare, per ripristinare le impostazioni predefinite. Premere OK per confermare. 7.16 EXIT: Premere qui per uscire dalla schermata delle impostazioni. 8. Manuale piedistalli Inserire la staffa nelle fessure della cornice digitale. Si prega di controllare e assicurarsi che il braccio sia fissato bene, prima di inserire la cornice.
BN_DF-7050-8050SLT_ES.qxd 12.10.2010 18:12 Uhr Seite 1 ESPAÑOL ÍNDICE 1. Presentación ...................................................34 1.1 Mando a distancia ....................................34 1.2 Botenes ...................................................35 1.3 Parte derecha del marco ..........................35 1.4 Parte izquierda del marco.........................35 2. Introducción y cambio de la batería .................35 3. Primeros pasos...............................................
BN_DF-7050-8050SLT_ES.qxd 34 12.10.2010 18:12 Uhr Seite 2 ESPAÑOL 1 Diagrama de producto 1.1 Mando a distancia 8050 SLT 1. POWER _ Conexión/Desconexión. 2. BGM _Pulsar el botón BGM para reproducir la música de fondo. 3. MUTE _ Pulsar el botón Mute para eliminar temporalmente el sonido. 4. MENU _ Entrar en el interfaz para copiar y borrar. 5. _ Tecla de selección funcional, cursor a arriba. 6. RETURN _ Volver a la página superior. 7. _ Tecla de selección funcional, cursor a izquierda. 8.
BN_DF-7050-8050SLT_ES.qxd 12.10.2010 18:12 Uhr Seite 3 ESPAÑOL 1.2 Botones 1. 2. 3. 4. 5. 6. 7. 8. Power (activar/desactivar) Menu (menú) Up (arriba) Down (abajo) Play / Pause/OK (reproducir/pausar/OK) Left (izquierda) Right (derecha) Return (intro) 1.3 Parte derecha del marco 1. SD/SDHC/MS/MMC 35 2.
BN_DF-7050-8050SLT_ES.qxd 36 12.10.2010 18:12 Uhr Seite 4 ESPAÑOL 3. Primeros pasos 3.1. Separe tanto como sea posible los brazos en la parte trasera del marco digital, para alcanzar la máxima estabilidad. Coloque un extremo del adaptador de corriente alterna suministrado en un enchufe estándar de corriente alterna de 110-240 V y el otro extremo en la parte derecha del marco. Indicación: Para el soporte del marco digital existen diferentes posiciones. Por favor consulte "Instrucciones de soporte". 4.
BN_DF-7050-8050SLT_ES.qxd 12.10.2010 18:12 Uhr Seite 5 ESPAÑOL 37 Pulse OK ( II) para reproducir las imágenes en el modo de presentación seleccionado en una presentación. Cambie el modo de presentación de la siguiente manera: Seleccione CONFIGURACIÓN para seleccionar el MODO DE PRESENTACIÓN (una ventana /tres ventanas/cuatro ventanas), seleccione mediante . Pulse OK ( II) para confirmar.
BN_DF-7050-8050SLT_ES.qxd 38 12.10.2010 18:12 Uhr Seite 6 ESPAÑOL 4.4 Modo vídeo Pulsar RETURN para seleccionar "MEMORY CARD" en el menú principal. Escoger Video, pulsar OK ( II) para entrar en el interfaz de vídeo, pulsar para seleccionar el vídeo de la lista de reproducción, después pulsar OK ( II) para confirmar. Pusar VOL+/- para subir/bajar el volumen.
BN_DF-7050-8050SLT_ES.qxd 12.10.2010 18:12 Uhr Seite 7 ESPAÑOL 6. Calendario Seleccione Calendario del menú principal y pulse OK ( II), para acceder. La hora aparece en la columna superior izquierda. Debajo se muestran automáticamente imágenes de la tarjeta de memoria como presentación. 39 7.
BN_DF-7050-8050SLT_ES.qxd 12.10.2010 18:12 Uhr 40 Seite 8 ESPAÑOL 7.15 Restablecer configuración: Pulse OK ( II), utilice __, para marcar o para resaltar la selección, para restablecer los valores predeterminados. Pulse OK ( II) para confirmar. 7.16 Salir: Pulse aquí para abandonar la máscara de configuración. 8. Instrucciones de soporte Introduzca el estribo en las ranuras del marco digital. Por favor, compruebe y asegúrese de que el brazo está encajado antes de montar el marco.
BN_DF-7050-8050SLT_NL.qxd 12.10.2010 18:15 Uhr Seite 1 NEDERLANDS Inhoudsopgave 1. Productpresentatie..........................................42 1.1 Afstandsbediening ...................................42 1.2 Druktoetsen .............................................43 1.3 Rechterkant van de lijst ............................43 1.4 Linkerkant van de lijst ..............................43 2. Plaatsen & vervangen van de batterij ...............43 3. Beginnen ...............................................
BN_DF-7050-8050SLT_NL.qxd 42 12.10.2010 18:15 Uhr Seite 2 NEDERLANDS 1 Productdiagram 1.1 Afstandsbediening 8050 SLT 1. POWER _ Inschakelen/uitschakelen. 2. BGM _ Druk op BGM om achtergrondmuziek af te spelen. 3. MUTE _ Druk op Mute om tijdelijk het geluid te onderdrukken. 4. MENU _ Ga naar copy & delete interface. 5. _ Functionele keuzetoets, cursor naar boven. 6. RETURN _ Ga terug naar bovenliggende pagina. 7. _ Functionele keuzetoets, cursor naar links.. 8.
BN_DF-7050-8050SLT_NL.qxd 12.10.2010 18:15 Uhr Seite 3 NEDERLANDS 1.2 Druktoetsen 1. 2. 3. 4. 5. 6. 7. 8. Power (aan / uit) Menu (menu) Up (omhoog) Down (omlaag) Play / Pause / OK (afspelen / pause / OK) Left (links) Right (rechts) Return (enter) 1.3 Rechterkant van de lijst 1. SD / SDHC / MS / MMC 43 2.
BN_DF-7050-8050SLT_NL.qxd 44 12.10.2010 18:15 Uhr Seite 4 NEDERLANDS 3. Beginnen 3.1. Trek de armen aan de achterkant van het digitale fotolijst zo ver mogelijk uit elkaar om de grootst mogelijke stabiliteit te bereiken. Vervolgens steekt u het ene uiteinde van de meegeleverde ACadapter in een elektrische 110-240V AC-standaard stopcontact en het andere uiteinde in de rechterkant van de lijst. Opmerking: Er staan meerdere posities ter beschikking voor de standaard van de digitale fotolijst.
BN_DF-7050-8050SLT_NL.qxd 12.10.2010 18:15 Uhr Seite 5 NEDERLANDS 45 Druk op OK ( II) om de foto's in een slideshow in de gekozen slidemodus weer te geven. Wijzig de slidemodus als volgt: Sekecteer INSTELLINGEN om de SLIDEMODUS (één venster/ drievoudig venster / vier vensters) uit te kiezen, kies met behulp van . Druk op OK ( II) om te bevestigen.
BN_DF-7050-8050SLT_NL.qxd 46 12.10.2010 18:15 Uhr Seite 6 NEDERLANDS 4.4 Videomodus Druk op RETURN om "MEMORY CARD" in het hoofdmenu te kiezen. Kies Video, druk op OK ( II) om naar de video interface te gaan, druk om een video uit de lijst te kiezen, druk dan op OK ( II) om te bevestigen. Druk VOL+/- om het volume te verhogen/verlagen. Delete functie Gebruik om de te wissen video te kiezen, druk dan op MENU om naar de wissen- functie te gaan, druk op OK ( II) om te bevestigen. 5.
BN_DF-7050-8050SLT_NL.qxd 12.10.2010 18:15 Uhr Seite 7 NEDERLANDS 6. Kalender Kies in het hoofdmenu Kalender en druk op OK ( II) om toegang tot de kalender te krijgen. De tijd wordt weergegeven in de linkerbovenhoek. Onder de tijd worden de foto's van de geheugenkaart automatisch weergegeven als slideshow. 47 7.
BN_DF-7050-8050SLT_NL.qxd 12.10.2010 18:15 Uhr 48 Seite 8 NEDERLANDS 7.15 Instellingen resetten: Druk op OK ( II) invoer, gebruik __ om deze te markeren of de markering op te heffen of om alle instellingen te resetten. Druk op OK ( II) om te bevestigen. 7.16 Exit: Druk hier om het instellingsmenu te verlaten. 8. Handleiding standaard Plaats de beugel in de gleuven van de digitale fotolijst. Controleer en verzeker u ervan, dat de beugel is vastgeklikt, voordat u de fotolijst neerzet.
BN_DF-7050-8050SLT_PT.qxd 12.10.2010 18:16 Uhr Seite 1 PORTUGUÉS Índice 1. Apresentação do produto ................................50 1.1 Telecomando ...........................................50 1.2 Botões de comando .................................51 1.3 Lado direito da moldura ...........................51 1.4 Lado esquerdo da moldura.......................51 2. Colocação & substituição da pilha ...................51 3. Primeiros passos ............................................52 4.
BN_DF-7050-8050SLT_PT.qxd 50 12.10.2010 18:16 Uhr Seite 2 PORTUGUÉS 1 Diagrama do produto 1.1 Telecomando 8050 SLT 1. POWER_ Ligar / Desligar. 2. BGM_ Prima o botão BGM para reproduzir música de fundo. 3. MUTE _ Prima o botão Mute para silenciar a voz temporariamente. 4. MENU _ Iniciar a interface de copiar & apagar. 5. _ Botão de selecção funcional, cursor para cima. 6. RETURN _ Regressar à página principal. 7. _ Botão de selecção funcional, cursor para a esquerda. 8.
BN_DF-7050-8050SLT_PT.qxd 12.10.2010 18:16 Uhr Seite 3 PORTUGUÉS 1.2 Botões de comando 1. 2. 3. 4. 5. 6. 7. 8. Power (ligar/desligar) Menu Up (p/cima) Down (p/baixo) Play/Pause/OK (reproduzir/pausa/OK) Left (esquerda) Right (direita) Return (enter) 1.3 Lado direito da moldura 1. SD/SDHC/MS/MMC 51 2.
BN_DF-7050-8050SLT_PT.qxd 52 12.10.2010 18:16 Uhr Seite 4 PORTUGUÉS 3. Primeiros passos 3.1. Abra os braços no lado anterior da moldura de imagem digital o máximo possível para fora, a fim de se obter uma máxima estabilidade. Depois insira uma extremidade do adaptador de corrente alterna juntamente fornecido numa tomada eléctrica standard de corrente alternada 110-240V e a outra extremidade no lado direito da moldura.
BN_DF-7050-8050SLT_PT.qxd 12.10.2010 18:16 Uhr Seite 5 PORTUGUÉS 53 Prima OK ( II), para reproduzir as imagens numa apresentação de diapositivos, no modo de diapositivo.Altere o modo de diapositivo da seguinte forma: Seleccione CONFIGURAÇÕES, para escolher o MODO DE DIAPOSITIVO (uma janela/quatro janelas/três janelas), seleccione com . Prima OK ( II) para confirmar.
BN_DF-7050-8050SLT_PT.qxd 54 12.10.2010 18:16 Uhr Seite 6 PORTUGUÉS 4.4 Modo de vídeo Press RETURN to choose "MEMORY CARD" in the main menu. Choose Video, press OK ( II) to enter the video interface, press to select the video from the playlist, then press OK ( II) to confirm. Press VOL+/- to turn up/ down the volume. Função de apagar Use to select the video you want to delete, then press MENU to enter delete interface, press OK ( II) to confirm. 5.
BN_DF-7050-8050SLT_PT.qxd 12.10.2010 18:16 Uhr Seite 7 PORTUGUÉS 6. Calendário Seleccione Calendário no menu principal e prima OK ( II), para ter acesso à opção. A hora é indicada no lado superior esquerdo. Por baixo da hora são apresentados automaticamente as imagens conti-das no cartão de memória sob a forma de apresentação de diapositivos. 55 7.
BN_DF-7050-8050SLT_PT.qxd 56 12.10.2010 18:16 Uhr Seite 8 PORTUGUÉS 7.15 Desfazer as configurações: carregue aqui, para regressar às configurações básicas. 7.16 Sair: carregue aqui, para abandonar a opção das configurações. 8. Indicações para os suportes Encaixe os suportes nas ranhuras da moldura de imagem digital. Verifique e certifique-se de que os suportes estão encaixados, antes de proceder à disposição da moldura de imagem digital.
BN_DF-7050-8050SLT_SE.qxd 12.10.2010 18:17 Uhr Seite 1 SVERIGE INNEHÅLLSFÖRTECKNING 1. Produktredovisning.........................................58 1.1 Fjärrkontroll .............................................58 1.2 Knappar ...................................................59 1.2 Ramens högra sida ..................................59 1.3 Ramens vänstra sida ................................59 57 Inledning: Tack för köpet av vår digitala fotoram.
BN_DF-7050-8050SLT_SE.qxd 58 12.10.2010 18:17 Uhr Seite 2 SVERIGE 1 Produktdiagram 1.1 Fjärrkontroll 8050 SLT 1. POWER_ Påkoppling/Avstängning. 2. BGM _Tryck BGM knappen för att spela bakgrundsmusik. 3. MUTE _ Tryck mute knappen för att tillfälligt stänga av ljudet. 4. MENY _ Enter kopiera & radera gränssnitt. 5. _ Funktionell valknapp, markör och upp. 6. RETURN _ Tillbaka till översta sidan. 7. _ Funktionell valknapp, markör till vänster. 8. _ Funktionell valknapp, markör till höger. 9.
BN_DF-7050-8050SLT_SE.qxd 12.10.2010 18:17 Uhr Seite 3 SVERIGE 1.2 Knappar 1. 2. 3. 4. 5. 6. 7. 8. Power (Till/från) Menu (Meny) Up (Upp) Down (Ned) Play / Pause/OK (Uppspelning/Paus/OK) Left (Vänster) Right (Höger) Return (Enter) 1.3 Ramens högra sida 1. SD/SDHC/MS/MMC 59 2. Att sätta i & byta batteri Placera fjärrkontrollen med ovansidan nedåt, tryck batterilockets räfflade del nedåt och dra facket mot dig för att ta av det. Sätt i ett CR2025 litium-knappcellsbatteri i facket.
BN_DF-7050-8050SLT_SE.qxd 60 12.10.2010 18:17 Uhr Seite 4 SVERIGE 3. De första stegen 3.1. Dra isär armarna på den digitala fotoramens baksida så långt som möjligt för att uppnå så stor stabilitet som möjligt. Sätt i änden på den medföljande växelströmadaptern i ett standard 110-240V växelström vägguttag och andra änden på ramens högra sida. Hänvisning: Den digitala fotoramens stativ, kan ställas in på ett flertal olika sätt. Titta i ”Handledning stativ“. 4.
BN_DF-7050-8050SLT_SE.qxd 12.10.2010 18:17 Uhr Seite 5 SVERIGE 61 Tryck OK ( II), för att spela upp bilderna i ett selekterat slideläge i en slideshow. Ändra slideläge enligt följande: Selektera ”EINSTELLUNGEN” (INSTÄLLNINGAR), för att selektera SLIDELÄGE (ett fönster/tre fönster/fyra fönster), selektera med och tryck på OK ( II), för att bekräfta.
BN_DF-7050-8050SLT_SE.qxd 62 12.10.2010 18:17 Uhr Seite 6 SVERIGE 4.4 Videoläge Tryck RETURN för att välja "MEMORY CARD" (minneskort) i huvudmenyn. Välj video, tryck OK ( II) för att komma till gränssnittet video, tryck för att välja video i uppspelningslistan, tryck sedan OK ( II) för att bekräfta. Tryck VOL+/- för att skruva upp/ned volymen.
BN_DF-7050-8050SLT_SE.qxd 12.10.2010 18:17 Uhr Seite 7 SVERIGE 6. Kalender Selektera Kalender i huvudmenyn och tryck på OK ( II), för åtkomst. Tiden visas uppe till vänster. Under tiden spelas bilderna på minneskortet automatiskt upp i en slideshow. 63 7.5 Slideeffekt: tillfällig, till/från horisontal delning, persienn, till/från vertikal delning, strålar, surround, blekna, aktualisera från höger, aktualisera nästa, on pan, scrolla nerifrån och upp, scrolla uppifrån och ned, komponent 7.
BN_DF-7050-8050SLT_SE.qxd 12.10.2010 18:17 Uhr 64 Seite 8 SVERIGE 7.16 Lämna: Tryck här för att lämna inställningsbilden. 8. Handledning stativ För in bygeln i den digitala fotoramens slitsar. Kontrollera och säkerställ att stativets klicklås har arreterat, innan du ställer upp fotoramen. Se även illustrationen nedan USB: USB värd (High Speed 2.