
Product Description


4
5
DO NOT apply the cu over a wound as this can cause further injury.
It is not recommended to use the device while simultaneously using other medical electrical (ME)
equipment on the same limb.
Key rules for accurate blood pressure measurement
Always take readings at the same time of day, under the same conditions.
Do not take a measurement within 30 minutes of smoking, drinking coee or tea or any form of
exertion. These factors will inuence the measurement.
Always measure on the same arm. The left arm is recommended. Do not move or speak. Sit
comfortably, keep your legs uncrossed and feet at on the oor, back and arm supported.
Place the cu in direct contact with the skin. Do not wrap the cu over a jacket, sweater or shirt.
If you want to take multiple measurements, wait approximately 3 minutes before repeating a
measurement.
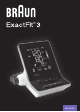
Product description (See page 1-2, Fig. 1)
1. Start button
2. Memory button
M
3. Date / time adjust button
4. Set button
5. Average button
6. User A / B switch
7. LCD display
8. Hose port
9. Connector
10. Arm cu (supplied with 2 cus)
11. Air hose
12. Battery compartment cover (4 X 1.5V type AA (LR6) batteries)
Inserting batteries (See Fig. 2-3)
• Remove the battery compartment cover at the bottom of the unit and
insert 4 AA LR6 alkaline batteries with correct polarity (see symbol in
the battery compartment).
• Note: always re-set date and time after replacing new batteries to
make sure the measurement results are stored with correct date and
time.
Only discard empty batteries.
They should not be disposed of in the household waste, but at
appropriate collection sites or at your retailer.
Fig. 2
Fig. 3
Choosing the right cu
For accurate measurement, it is important to choose the correct size cu which best ts your upper
arm. Choose the cu size according to your arm circumference and make sure the bottom of the cu is
2~3cm above your elbow.
• Small/Medium Cu = 22~32cm arm circumference
• Large/XLarge Cu = 32~42cm arm circumference
Applying the arm cu
1. Slide the end of arm cu furthest from the tube through the metal ring to a loop.
The smooth cloth should be on the inside of the cu.
2. Plug the air hose into the connector (Fig. 4).
3. If the cu is located correctly, the velcro will be on the outside of the cu and the metal ring will
not touch the skin (Fig. 5).
4. Put your left arm through the cu loop. The bottom of the cu should be approximately (2~3 cm)
above elbow. The tube should lie over the brachial artery on the inside of the arm (Fig. 6).
5. Pull the cu so that the top and bottom edges are tightened around your arm (Fig. 7).
6. When the cu is positioned properly, press the Velcro rmly against the pile side of the cu.
7. This cu is suitable for use if the <<index>> mark falls within the <<ok range>> marked by two
arrows when the cu is tightened around your arm (Fig. 8).
8. Sit on a chair and place your arm on the table so that the cu is at the same level as your heart
(Fig. 9).
Fig. 5
Pile side material
Velcro
Smooth
cloth
Metal ring
Fig. 4
Fig. 6
Index
Left arm
Main
arteries
Fig. 7 Fig. 9Fig. 8
22~32 cm / 32~42 cm
OK
OK
Index
English