
Product Description


6
7
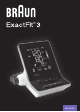
Display BUA6150
Heart rate symbol
Memory record
Month
Minute
Date
Hour
User A/ user B
symbol
Average symbol
Irregular heart beat
symbol
Low battery indicator
Measuring error display
Ante or Post Meridiem
Deation sign
Ination sign
WHO indicator
How to select user A /user B
• Make sure the Product is in power o mode.
• Slide the user switch to user A or user B, the current user mode will ash on the LCD display.
The WHO/ESH indicator to evaluate blood pressure data
This device has a blood pressure level indicator established according to WHO
and the European Hypertension Society Guidelines (ESH). For every measurement
displayed on the screen, the cursor will indicate the blood pressure level with the
corresponding color code, from green to red. You can use this classication daily
to guide you to understand your blood pressure level. If you are really concerned
by the classication level, you should consult your doctor as soon as possible.
If your blood pressure reading is in the severe hypertension range with values of
180 mmHg systolic or above, and/or 110 mmHg diastolic and above, and if you
nd you have one or two readings in this range - please see your doctor straight
away.
RED >
ORANGE >
YELLOW >
GREEN >
Setting month, date and time
a. Switch o the device for the date/time setting.
b. Press set button
(4) to start the year setting, then the
“year” will blink on display. Press (3) to adjust year by
1 step.
c. Press set button
(4) to start the month setting, then the
“month” will blink on display, user can press adjust (3) to
adjust month by 1 step.
d. Press set button
(4) to start the day setting, then the
“day” will blink on display, user can press adjust (3) to
adjust day by 1 step.
e. Press set button
(4) to start the hour setting, then the
“hour” will blink on display, user can press adjust (3) to
adjust hour by 1 step.
f. Press set button
(4) to start the minute setting, then the
“minute” will blink on display, user can press adjust (3)
to adjust minute by 1 step.
g. Press set button
(4) to end all the date/time setting, all
blinking stops.
Note: Holding the adjust button will scroll the value.
Taking a measurement
Wrap the cu around the arm (see “applying the arm cu” section above).
1. Sit upright on the chair to have a correct posture.
2. Press and release start button
(1), date/time and current user will be displayed.
3. Set user A/B switch (6) to A for user A or B for user B, LCD display will show user A or B symbol.
4. Press and release the start button
(1), all icons on display will be shown for 2 seconds. Air
pressure will automatically pump up to certain pressure level and start measurement.
Do not move or talk in the midst of taking blood pressure measurement. During the measurement,
keep your legs uncrossed and feet at on the oor.
5. After the air pressure has increased, the pulse is detected, the heart rate symbol
will start
ashing.
6. LCD Display will show the results and WHO indicator arrow after measurement.
After using the device, turn it o by pressing the start button
(1) or automatically after
1 minute.
Memory function
Your blood pressure monitor can store the latest 40 readings for each user.
Storing measurement data
After each blood pressure measurement, the systolic pressure, diastolic pressure, pulse rate and the
time & date of specic day will be automatically stored. Memory #01 is always the most recent one.
Once the memory is full, the oldest values will be overwritten.
Press memory button
M
(2) to review the stored data. The last memory data (sys/dia/pul) with
measurement date/time, IHB and WHO indicator will show on LCD. Press memory button
M
(2) again
to show the previous data. Ensure that the correct user; A or B, is selected before use.
This device is not intended as a substitute for regular check-ups by your doctor, please continue to
visit your doctor on a regular basis for a professional reading.
A
B
A
P
MD
A
B
A
P
MD
A
P
c.
MD
A
P
d.
MD
A
P
MD
e.
A
P
MD
f.
A
P
MD
g.
English