
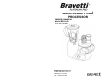
User Guide


OPERATING INSTRUCTIONS OPERATING INSTRUCTIONS
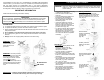
Main Blade
Double
Blade
Using The Double Chopping Blade
Always disconnect unit from power
source before cleaning or changing
accessories.
WARNING: USE EXTREME CAUTION
WHEN HANDLING THE BLADES.
THEY ARE EXTREMELY SHARP
Note: The double chopping blades are
stainless steel TiN coated.
Always remove the chopping blade
protective cover(s) before using.
The double chopping
blade may be
used with one
blade or with
two blades.
1. To use as
a double
blade, carefully
slip the separate
blade over the
shaft of the
main blade.
(Fig. 3 & Fig. 4)
Operating the Food Processor
Setting up:
1. CAUTION: Make sure that the unit is
unplugged from the power source and
the the Speed control dial is in the
"Off" position before inserting or
removing any attachments and before
cleaning.
2. Place the food processor bowl onto
the processor body. There is no need
to turn the bowl. (Fig. 2)
3. When fitted correctly, the handle will
fit into the slot at the base of the unit.
2. Then insert onto the shaft of the
processor bowl. Always hold the
chopping blade by the upper plastic
part. (Fig. 5)
Fig. 2
Fig. 3
Fig. 4
Fig. 5
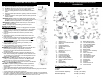
Fig. 1
Speed Control Dial
The food processor and blender
speed control dial has speeds settings
as follows: (Fig. 1)
Off/Slow Start - 9 +
Max
Pulse/Turbo
The speed can be
adjusted while the
food processor is
in use.
Use of the Pulse/Turbo button allows
greater control over the texture of the
food being processed. Use "Pulse"
when the unit is in the "Off" position.
Use "Turbo" when the unit is in the
"On" position and you need a burst of
power. Please note that the "Pulse"
and "Turbo" is only intended to be
used for short "bursts" of processing.
Two Blades
Together
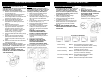
Using the Whisk Head & Whisk
Beater
CAUTION: Make sure that the unit is
unplugged from the power source
and the operating button is “OFF”
before inserting or removing
attachments.
1. Make sure that the blade storage
cover is closed during use.
2. Fit the processor bowl and spindle as
described previously on page 4.
3. Click the whisk beater into the short
extension of the whisk head. (Fig. 15)
4. Place the long extension of the
whisking head onto the motor shaft.
(Fig. 16)
5. Add ingredients to the bowl.
6. Fit the lid and click into place as
detailed in the “Setting Up” section
(page 4). (Fig. 17)
7. Plug the processor into the wall outlet.
8. Turn the processor on selecting
maximum speed.
For your safety, the pusher must stay
in its place while operating the
appliance. Keep hands, hair, clothing
as well as spatulas and other utensils
away from beaters during operation to
reduce the risk of injury and/or
damage to the appliance.
IMPORTANT WARNING: NEVER USE
THE WHISK ATTACHMENT FOR
DOUGH KNEADING.
DO NOT IMMERSE THE WHISK
HEAD IN ANY LIQUID.
To clean the whisk beater, remove it
from the whisk head and wash.
Wipe the whisk head clean with a
damp cloth.
Fig. 15
Fig. 16
Fig. 18
Whipper Attachment
CAUTION: Make sure that the unit is
unplugged from the power source
and the speed control dial is in the
“OFF” position before inserting or
removing attachments.
1. Fit the processor bowl on the unit.
2. Insert the whipper attachment and
press firmly into place. (Fig. 18)
3. Place the ingredients into the bowl.
4. Fit the lid and click into place as
described in the “Setting Up” section
(page 4).
5. Insert the food pusher and then plug
in the food processor.
6. Turn the food processor on selecting
high speed.
7. Recommended speed
for whipping is high.
8. Remove the whipper
attachment from
the bowl before
removing the
whipped ingredients.
FOR SAFETY, ALWAYS
LEAVE THE PUSHER IN
PLACE WHILE OPERATING THE
PROCESSOR.
Operating the Coffee Grinder
CAUTION: Make sure that the unit is
unplugged from the power source
and the Speed Control Dial is in
the "Off" position before inserting
or removing any attachments and
before cleaning.
1. Place the food processor bowl onto
the processor body. When fitted
correctly, the handle will fit into the
slot at the base of the unit.
2. Place the food processor lid on the
bowl and lock into place by turning
counter clockwise. Make sure that
no attachments are inside the food
processor bowl when you are using
the coffee grinder.
3. Open the safety cover by pressing
on the safety cover release button.
(Fig. 19)
Fig. 19
4. Now you are ready to use any of the
attachments that come with the unit;
i.e. the double chopping blade, dough
blade, etc.
Fig. 17
4
9