
User manual

OPERATING INSTRUCTIONS
Familiarisez-Vous Avec Votre Autocuiseur Programmable
Fig. 10
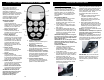
Using the “Keep Warm” Feature
This function can keep cooked foods
warm for up to 24 hours. The pressure
cooker will go into “Standby” mode for one
minute and then the “Keep Warm” mode
will automatically be engaged after the
cooking process has been completed.
The “Keep Warm” light will illuminate
when this feature is engaged. (Fig. 10)
Fig. 11
Using the Advance Timer
WARNING: DO NOT USE THE
ADVANCE TIMER FEATURE WHEN
COOKING PERISHABLE FOODS
THAT MAY SPOIL IF LEFT OUT AT
ROOM TEMPERATURE.
You can prepare your food to cook in
the removable cooking pot and set the
timer to begin cooking at a later time:
1. Place the cooking pot into the unit.
Add the food to the cooking pot.
2. Place the cover on the pressure
cooker and turn it clockwise to lock
in place.
3. Plug the power cord into the unit
and then into the electrical outlet.
4. Lower the pressure release valve
so that steam may not escape.
5. Press the advance timer button.
The time will increase in half hour
increments, (i.e. 0.5, 1.0, 1.5, etc.)
6. The advance timer indicator light
will illuminate. (Fig. 11)
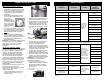
Keep Warm
Light
Advance Timer
Light
Vapor
Collector
7. Select the desired preset button
depending on food to prepare. (See
Cooking Guide or Features).
8. Ensure that the indicator light on the
preset button is lit.
9. The pressure cooker will beep three
(3) times to let you know that the
cooking process is complete.
10. Then wait for unit to beep to signal
end of cooking process.
11. The pressure cooker will automatically
go into “Standby” mode for one (1)
minute and then into “Keep Warm”
mode for up to 24 hours.
12. Slowly rotate the pressure release valve
to the “Open” position to release the
steam.
13. After the safety float valve has fallen
down, remove the cover and remove
the food.
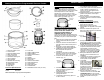
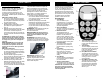
1. Couvercle de l’autocuiseur
2. Poignée du couvercle
3. Soupape de pression
4. Jauge flottante de sécurité
5. Tige de blocage du couvercle
6. Pot de cuisson amovible
7. Collecteur de vapeur
8. Poignées de transport
9. Boîtier d’acier inoxydable
10. Thermostat
11. Plaque chauffante
12. Panneau de commande
13. Anneau supérieur
14. Réservoir interne
15. Support de joint d’étanchéité
16. Joint d’étanchéité
17. Rondelle plate flottante
18. Diffuseur
19. Spatule
20. Tasse à mesurer
21. Témoin de la minuterie
22. Bouton de minuterie avancée
23. Bouton « Garde Chaud » -
Annulation (Keep Warm/Cancel)
24. Affichage de la minuterie
25. Témoin de réchaud
26. Boutons préréglés
27. Cordon d’alimentation détachable
(non illustré)
26
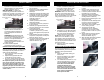
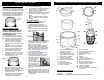
Cleaning & Storage
1. Always leave the pressure to cool
completely before you take the
components apart for cleaning.
2. Unplug and remove the power cord
from the appliance and the electrical
outlet.
3. Remove the vapor collector by pulling
it down and rinse under warm, soapy
water. (Fig. 12)
Fig. 12
4. Wipe the outer housing of the pressure
cooker with a damp cloth. Do NOT use
any abrasive cleaners or immerse in
water or any other liquid.
5. The removable cooking pot, pressure
cooker cover and sealing gasket are
washable. Wash them in warm, soapy
water. The removable cooking pot and
the cover are dishwasher safe. The
sealing gasket is NOT.
6. Use a sponge or a non-metallic soft
brush to clean the diffuser.
7. The pressure release valve does not
have to be cleaned after each use
unless it has become clogged.
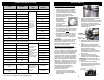
8. The sealant washer
may need to be
cleaned. Remove it
from the safety floating
valve and clean with
warm, soapy water. To
replace, hold the safety float
valve with your finger and push it in.
(Fig. 13)
9. Store the pressure cooker with the cover
upside down over the main housing. Do
NOT store with the cover closed to avoid
compressing the sealing gasket for long
periods of time.
Fig. 13
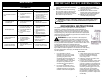
Spécifications techniques
Tension : 120 V, 60 Hz
Intensité : 900 watts
REMARQUE : * Les illustrations peuvent différer du produit lui-même.
149