Pressure Washer Operator’s Manual This pressure washer is rated in accordance to the Pressure Washer Manufacture Association (PWMA) standard PW101 (Testing and Rating Performance of Pressure Washers). BRIGGS & STRATTON POWER PRODUCTS GROUP, LLC JEFFERSON, WISCONSIN, U.S.A. Manual No.
Thank you for purchasing this quality-built Briggs & Stratton pressure washer. We are pleased that you’ve placed your confidence in the Briggs & Stratton brand. When operated and maintained according to the instructions in this manual, your Briggs & Stratton pressure washer will provide many years of dependable service. This manual contains safety information to make you aware of the hazards and risks associated with pressure washers and how to avoid them.
Table of Contents Operator Safety . . . . . . . . . . . . . . . . . . . . . . . . . . . . . . . . . 4 Equipment Description. . . . . . . . . . . . . . . . . . . . . . . . . . . . . . . . . . . . . . . . . 4 Safety Rules. . . . . . . . . . . . . . . . . . . . . . . . . . . . . . . . . . . . . . . . . . . . . . . . . 4 Assembly . . . . . . . . . . . . . . . . . . . . . . . . . . . . . . . . . . . . . 8 Unpack Pressure Washer. . . . . . . . . . . . . . . . . . . . . . . . . . . . . . . . . . . . . . .
Operator Safety Equipment Description Read this manual carefully and become familiar with your pressure washer. Know its applications, its limitations, and any hazards involved. This pressure washer operates at a max of 3,000 PSI and a flow rate of up to 2.8 gallons per minute.
WARNING The engine exhaust from this product contains chemicals known to the State of California to cause cancer, birth defects, or other reproductive harm. WARNING Certain components in this product and related accessories contain chemicals known to the State of California to cause cancer, birth defects or other reproductive harm. Wash hands after handling. WARNING Running engine gives off carbon monoxide, an odorless, colorless, poison gas.
WARNING Starter cord kickback (rapid retraction) can result in bodily injury. Kickback will pull hand and arm toward engine faster than you can let go. Broken bones, fractures, bruises, or sprains could result. • NEVER pull starter cord without first relieving spray gun pressure. • When starting engine, pull cord slowly until resistance is felt and then pull rapidly to avoid kickback.
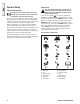
WARNING Starter and other rotating parts can entangle hands, hair, clothing, or accessories. • NEVER operate pressure washer without protective housing or covers. • DO NOT wear loose clothing, jewelry or anything that may be caught in the starter or other rotating parts. • Tie up long hair and remove jewelry. WARNING Risk of eye injury. Spray can splash back or propel objects. • Always wear safety goggles when using this equipment or in vicinity of where equipment is in use.
Assembly Read entire operator’s manual before you attempt to assemble or operate your new pressure washer. Your pressure washer requires some assembly and is ready for use after it has been properly serviced with the recommended oil and fuel. If you have any problems with the assembly of your pressure washer, please call the pressure washer helpline at (800) 743-4115. If calling for assistance, please have the model, revision, and serial number from the identification label available.
Add Engine Oil 1. Place pressure washer on a flat, level surface. 2. Clean area around oil fill and remove yellow oil fill cap. 3. Using oil funnel (optional), slowly pour contents of provided oil bottle into oil fill opening. NOTICE Improper treatment of pressure washer can damage it and shorten its life. • DO NOT attempt to crank or start the engine before it has been properly serviced with the recommended oil. This may result in an engine failure. 4. Replace oil fill cap and fully tighten.
Connect Hose and Water Supply to Pump NOTICE DO NOT run the pump without the water supply connected and turned on. • Damage to equipment resulting from failure to follow this instruction will void warranty. NOTE: Remove and discard the shipping caps from the pump’s high pressure outlet and water inlet before attaching hoses. 1. Uncoil high pressure hose and attach one end of hose to base of spray gun. Tighten by hand. 4. Run water through your garden hose for 30 seconds to clean out any debris.
Features and Controls Read this Operator’s Manual and safety rules before operating your pressure washer. Compare the illustrations with your pressure washer, to familiarize yourself with the locations of various controls and adjustments. Save this manual for future reference. A U B C T D S E P , R F N G M H J L K L A - Project Pro™ Nozzles — Detergent, 0°, 15° and 40°: for various high pressure cleaning applications.
Operation WARNING If you have any problems operating your pressure washer, please call the pressure washer helpline at (800) 743-4115. Pressure Washer Location Clearances and Air Movement WARNING Exhaust heat/gases can ignite combustibles, structures or damage fuel tank causing a fire. Running engine gives off carbon monoxide, an odorless, colorless, poison gas. Breathing carbon monoxide can cause headache, fatigue, dizziness, vomiting, confusion, seizures, nausea, fainting or death.
How to Start Your Pressure Washer To start your pressure washer for the first time, follow these instructions step-by-step. This starting information also applies if you have let the pressure washer sit idle for at least a day. 1. Place pressure washer near an outside water source capable of supplying water at a flow rate greater than 3.8 gallons per minute and no less than 20 PSI at pressure washer end of garden hose. DO NOT siphon supply water. 2.
WARNING Starter cord kickback (rapid retraction) can result in bodily injury. Kickback will pull hand and arm toward engine faster than you can let go. Broken bones, fractures, bruises, or sprains could result. • NEVER pull starter cord without first relieving spray gun pressure. • When starting engine, pull cord slowly until resistance is felt and then pull rapidly to avoid kickback.
How to Use Accessory Tray How to Use ProjectPro® Nozzles The unit is equipped with an accessory tray with places to store your spray gun, nozzle extension and ProjectPro® nozzles. There is also a hook at the front of the accessory tray to hold your high pressure hose. NOTE: The extra hole in the tray is for storing a utility brush. The extra clip in the tray is for storing a turbo nozzle. The brush and turbo nozzle are NOT included with your pressure washer.
2. Select desired ProjectPro® nozzle: • For delicate rinse (lower pressure and higher flow), for gentle cleaning of cars/trucks, boats, RV’s, patio furniture, lawn equipment, etc., select yellow Delicate ProjectPro® nozzle. • For general rinsing (medium pressure and medium flow), ideal for most all purpose cleaning such as home siding, brick patios, wood decks, driveways and sidewalks, garage floors, etc., select orange General ProjectPro® nozzle.
5. Make sure garden hose is connected to water inlet. Check that high pressure hose is connected to spray gun and pump. Turn on water. NOTICE You must attach all hoses before you start the engine. • Starting the engine without all the hoses connected and without the water turned ON will damage the pump. • Damage to equipment resulting from failure to follow this instruction will void warranty. 6. Start engine following instructions How to Start Your Pressure Washer. 7.
Maintenance Maintenance Schedule Follow the hourly or calendar intervals, whichever occurs first. More frequent service is required when operating in adverse conditions noted below.
Check High Pressure Hose The high pressure hose can develop leaks from wear, kinking, or abuse. Inspect the hose each time before using it. Check for cuts, leaks, abrasions or bulging of cover, damage or movement of couplings. If any of these conditions exist, replace the hose immediately. WARNING The high pressure stream of water that this equipment produces can cut through skin and its underlying tissues, leading to serious injury and possible amputation. • NEVER repair high pressure hose. Replace it.
Engine Maintenance WARNING Unintentional sparking can result in fire or electric shock. WHEN ADJUSTING OR MAKING REPAIRS TO YOUR PRESSURE WASHER • Disconnect the spark plug wire from the spark plug and place the wire where it cannot contact spark plug. WHEN TESTING FOR ENGINE SPARK • Use approved spark plug tester. • DO NOT check for spark with spark plug removed. Checking Oil Level Oil level should be checked prior to each use or at least every 8 hours of operation. Keep oil level maintained. 1.
4. Remove oil drain plug and drain oil completely into a suitable container. 5. Reinstall oil drain plug and tighten securely. Remove oil fill cap. 6. Slowly pour oil (about 20 oz.) into oil fill opening (B) to the point of overflowing (C) at oil fill cap. DO NOT overfill. 7. Reinstall oil fill cap. Finger tighten cap securely. 8. Wipe up any spilled oil. Service Spark Plug Change the spark plug every 100 hours of operation or once each year, whichever comes first.
Air Cooling System Over time debris may accumulate in cylinder cooling fins and cannot be observed without partial engine disassembly. For this reason, we recommend you have a qualified service dealer clean the cooling system per recommended intervals (see Maintenance Schedule in beginning of Maintenance section). Equally important is to keep top of engine free from debris. See Clean Debris. Keep areas within heavy line clear of debris.
Winter Storage NOTICE You must protect your unit from freezing temperatures. • Failure to do so will permanently damage your pump and render your unit inoperable. • Freeze damage is not covered under warranty. To protect the unit from freezing temperatures: 1. Follow steps 1-4 in the previous section After Each Use. 2. Use pump saver, Model 6039, to treat pump. This minimizes freeze damage and lubricates pistons and seals. 3.
Troubleshooting Problem Pump has following problems: failure to produce pressure, erratic pressure, chattering, loss of pressure, low water volume. Detergent fails to mix with spray. Engine runs good at no-load but "bogs" when load is added. Engine will not start; or starts and runs rough. Engine shuts down during operation. Engine lacks power. 24 Cause 1. 2. 3. 4. 5. 6. 7. Low pressure nozzle installed. Water inlet is blocked. Inadequate water supply. Inlet hose is kinked or leaking.
Warranties Emissions Control System Warranty Briggs & Stratton Corporation (B&S), the California Air Resources Board (CARB) and the United States Environmental Protection Agency (U.S. EPA) Emissions Control System Warranty Statement (Owner’s Defect Warranty Rights and Obligations) California, United States and Canada Emissions Control Defects Warranty Statement The California Air Resources Board (CARB), U.S.
2. Length of Coverage B&S warrants to the initial owner and each subsequent purchaser that the Warranted Parts shall be free from defects in materials and workmanship which caused the failure of the Warranted Parts for a period of two years from the date the engine is delivered to a retail purchaser. 3.
BRIGGS & STRATTON POWER PRODUCTS GROUP, LLC PRESSURE WASHER OWNER WARRANTY POLICY Effective December 1, 2005 replaces all undated Warranties and all Warranties dated before December 1, 2005 LIMITED WARRANTY Briggs & Stratton Power Products Group, LLC will repair or replace, free of charge, any part(s) of the pressure washer that is defective in material or workmanship or both. Transportation charges on product submitted for repair or replacement under this warranty must be borne by purchaser.
Pressure Washer Product Specifications Max Outlet Pressure . . . . . . . . . . . .3,000 PSI (206.8 BARS) Max Flow Rate . . . . . . . . . . . . . . .2.8 GPM (10.6 liters/min) Water Supply Temperature . . . . . . . . . . .100ºF (38ºC) MAX Displacement . . . . . . . . . . . . . . . . . . .12.57 cu. in. (206 cc) Spark Plug Gap . . . . . . . . . . . . . . . . . . .0.030 in. (0.76 mm) Fuel Capacity . . . . . . . . . . . . . . . . . . . . .3.0 Qt. (2.84 Liters) Oil Capacity . . . . . . . . . . . . . . . . . . . .
Limpiadora a presión Manual del Operario Esta limpiadora a presión está clasificada conforme a la norma PW101 (comprobación y clasificación de rendimiento de limpiadoras a presión) de la Asociación de fabricantes de bombas a presión (Pressure Washer Manufacture Association, PWMA). BRIGGS & STRATTON POWER PRODUCTS GROUP, LLC JEFFERSON, WISCONSIN, U.S.A.
Muchas gracias por comprar este limpiadora a presión Briggs & Stratton de gran calidad. Nos alegra que haya depositado su confianza en la marca Briggs & Stratton. Siempre que sea utilizado de acuerdo con las instrucciones de este manual, su limpiadora a presión Briggs & Stratton le proporcionará muchos años de buen funcionamiento. Este manual contiene información sobre seguridad para hacerle consciente de los riesgos asociados a los limpiadora a presións y mostrarle cómo evitarlos.
Tabla de Contenido Seguridad de Operario . . . . . . . . . . . . . . . . . . . . . . . . . . . . 4 Derscripción del equipo . . . . . . . . . . . . . . . . . . . . . . . . . . . . . . . . . . . . . . . . 4 Reglas de seguridad . . . . . . . . . . . . . . . . . . . . . . . . . . . . . . . . . . . . . . . . . . 4 Montaje . . . . . . . . . . . . . . . . . . . . . . . . . . . . . . . . . . . . . . 8 Desembale la limpiadora a presión . . . . . . . . . . . . . . . . . . . . . . . . . . . . . . .
Seguridad de Operario Derscripción del equipo Lea este manual de manera cuidadosa y familiarícese con su limpiadora a presión. Conozca sus usos, sus limitaciones y cualquier peligro relacionado con el mismo. Este manual contiene información sobre una limpiadora a presión que funciona a 3.000 PSI con un caudal de 10.6 litros por minuto (2.8 GPM).
ADVERTENCIA ADVERTENCIA El escape del motor de este producto contiene elementos químicos reconocidos en el Estado de California por producir cáncer, defectos de nacimiento u otros daños de tipo reproductivo. La gasolina y sus vapores son extremadamente inflamables y explosivos. El fuego o una explosión pueden causar quemaduras severas e inclusive la muerte.
ADVERTENCIA El retroceso (repliegue rápido) del cable del arrancador puede producir lesiones. El retroceso impedirá que el usuario suelte el cable a tiempo y tirará de su mano y brazo hacia el motor. Como resultado, podrían producirse fracturas, contusiones o esguinces. • NUNCA tire del cable del arrancador sin eliminar previamente la presión de la pistola rociadora.
ADVERTENCIA AVISO El arrancador y otras piezas que rotan pueden enredar las manos, el pelo, la ropa, o los accesorios. El rociado de alta presión puede dañar elementos frágiles, incluyendo el vidrio. • NUNCA utilice la limpiadora a presión sin sus carcasas o tapas de protección. • NO use ropa suelta, joyas o elementos que puedan quedar atrapados en el arranque o en otras partes rotatorias. • Ate para arriba el pelo largo y quite la joyería. ADVERTENCIA Riesgo de lesiones oculares.
Montaje Lea totalmente el manual del operario antes que intente ensamblar u operar su limpiadora a presión. Su limpiadora a presión requiere de ciertos procedimientos de montaje y solo estará listo para ser utilizado después de haberle suministrado servicio con el combustible y aceite recomendados. Si usted tiene problemas con el montaje de su limpiadora a presión, por favor llame a la línea de ayuda para limpiadora a presión al (800) 743-4115.
Agregar aceite al motor 1. Coloque la limpiadora a presión en una superficie plana y nivelada. 2. Limpie la zona de alrededor del orificio de llenado de aceite y quite el tapón amarillo. 3. Con la ayuda de un embudo (opcional), vierta lentamente todo el contenido de la botella de aceite por el orificio de llenado de aceite. AVISO El tratamiento inadecuado del limpiadora a presión puede dañarlo y acortar su vida productiva.
Conecte la manguera y el suministro de agua a la bomba AVISO NO haga funcionar la bomba si no tiene el suministro conectado y abierto. • El daño a la limpiadora a presión, resultado de la desatención a esta precaución, no será cubierto por la garantía. NOTA: Antes de conectar las mangueras, retire y deseche los tapones de transporte de la salida de alta presión y de la entrada de agua de la bomba. 1. Retroceda la manguera a alta presión y conecte a la base de la pistola rociadora. Apriete con la mano. 4.
Características y mandos Lea el Manual del Operario y las reglas de seguridad antes de poner en marcha su máquina limpiadora a presión. Compare las ilustraciones con su máquina limpiadora a presión para familiarizarse con las ubicaciones de los diferentes controles y ajustes. Guarde este manual para referencias futuras.
Operando Si tiene problemas operando su máquina limpiadora a presión, por favor llame a la línea de ayuda para máquinas limpiadora a presión al (800) 743-4115. Ubicación del limpiadora a presión Espacio libre alrededor del limpiadora a presión ADVERTENCIA Los gases y el calor de escape pueden inflamar los materiales combustibles y las estructuras o dañar el depósito de combustible y provocar un incendio.
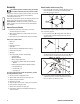
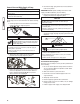
9. Mueva el control de la válvula de admisión (A) a la posición "Rápido" ("Fast") , que se distingue con la figura de un conejo. 11. Cuando arranque el motor, colóquese en la posición que se recomienda. Sujete la manija y hale ligeramente la manija del arranque hasta que sienta cierta resistencia. Después hálela rápidamente. A 10. Mueva la palanca del ahogador (B) a la posición "Ahogado" ("Choke") .
13. Cuando arranque el motor, mueva lentamente la palanca del ahogador a la posición "En marcha" ("Run") . Si el motor falla, mueva la palanca a la posición "Ahogado" ("Choke") , y después a la posición "En marcha" ("Run") . 14. Después de cada intento de arranque, cuando el motor no consiga arrancar, apunte con la pistola rociadora hacia una dirección segura, pulse el botón rojo y apriete el gatillo para descargar la presión.
Utilización de la bandeja de accesorios Cómo usar las boquillas ProjectPro® La unidad está equipada con una bandeja de accesorios con habitáculos para guardar la pistola rociadora, el prolongador de la boquilla y las boquillas de ProjectPro®. La parte delantera de la bandeja también incluye un gancho para sujetar la manguera de alta presión. NOTA: El orificio adicional de la bandeja permite guardar un cepillo. La pinza adicional de la bandeja permite guardar una boquilla turbo.
2. Elija la boquilla ProjectPro® que desee: • Para un enjuagado suave (baja presión y mayor caudal), para una limpieza suave de coches/camiones, barcos, RVs, muebles de jardín, cortacéspedes, etc., seleccione la boquilla ProjectPro® amarilla de suave. • Para un enjuagado general (media presión y medio caudal), idóneo para la mayoría de las limpiezas, como revestimientos exteriores, patios de ladrillo, suelos de madera, entradas, aceras, suelos de garaje, etc.
4. Aplique un rociado de alta presión en un área pequeña, después revise si la superficie presenta daños. Si no encuentra daños, puede continuar con el trabajo de limpieza. 5. Comience en la parte superior del área que va a enjuagar, dirigiéndose hacia abajo con los mismos movimientos superpuestos que utilizó para el limpieza. 4. Asegúrese de que la boquilla de detergente ProjectPro® negra está montada. NOTA: NO se puede aplicar detergente con las boquillas de alta presión (Amarilla, Naranja y Roja). 5.
Mantenimiento Plan de mantenimiento Siga los intervalos de horas o de calendario, los que sucedan antes. Si opera en condiciones adversas (señaladas más abajo) es necesario un mantenimiento más frecuente.
Revise y limpie el colador de entrada Examine el colador de entrada de la manguera de jardín. Límpielo si está tapado o remplacelo si está roto. ADVERTENCIA Revise la manguera de alta presión Las mangueras de alta presión pueden desarrollar fugas debido al desgaste, dobleces o abuso. Revise la manguera antes de cada uso. Revise si existen cortes, fugas, abrasiones, levantamiento de la cubierta, daño o movimiento de los acoplamientos.
Mantenimiento de los anillos 'o' Compre una O–Juego de Mantenimiento de Anillo, el modelo 6048, en avisando el más cercano servicio autorizado central. No se incluye con la arandela de la presión. Este juego incluye los anillos del reemplazo O, arandela de caucho y filtro de cala de agua. Refiérase a la hoja de la instrucción proporcionada en el juego para atender a su unidad’los anillos de s O.
Cambio de aceite del motor Cambie el aceite después de las primeras 5 horas de operación. Cambie el aceite cada 50 horas de ese momento en adelante. Si está utilizando su generador bajo condiciones de extrema suciedad o polvo, o en un clima demasiado caliente, haga el cambio de aceite más frecuentemente. PRECAUCIÓN Evite el contacto prolongado o repetido de piel con aceite usado de motor. • El aceite usado del motor ha sido mostrado al cancer de la piel de la causa en ciertos animales del laboratorio.
4. Cambie la bujía si los electrodos están picados o quemados o si la porcelana está agrietada. Utilice la bujía de repuesto recomendada. Consulte Especificaciones. 5. Instale la bujía y apriete firmemente. Servicio del apagachispas El motor de su unidad no viene equipado de fábrica con un apagachispas. En ciertas áreas, es ilegal operar motores que no tengan apagachispas. Revise las leyes y regulaciones locales. Si necesita apagachispas, lo puede comprar en su centro de servicio más cercano.
Almacenamiento para invierno Cambio de aceite Con el motor todavía caliente, drene el aceite de la caja del cigüeñal. Vuelva a llenarlo con el grado de aceite recomendado. Vea Cambio de Aceite del Motor en la sección Mantenimiento del Motor. AVISO Usted deberá proteger su unidad de las temperaturas de congelamiento. • Si no lo hace, dañará permanentemente la bomba y la unidad no podrá funcionar. • La garantía no cubre el daño de la unidad ocasionado por congelamiento.
Resolución de problemas Problema La bomba presenta los siguientes problemas: no produce presión o produce una presión errada, traqueteo, pérdida de presión, bajo volumen de agua. Causa 1. Está usando la boquillas de baja presión (negra). 1. Cambie la boquillas a una de las boquillas de alta presión. 2. La entrada de agua está bloqueada. 2. Limpie la entrada. 3. Suministro de agua inadecuado. 3. Proporcione flujo de agua adecuado. 4. La manguera de entrada está doblada o presenta fugas. 4.
GARANTÍAS Garantía del sistema de control de emisiones Briggs & Stratton Corporation (B&S), el California Air Resources Board (CARB, Consejo de recursos de aire de California) y la United States Environmental Protection Agency (U.S.
2. 3. 4. 5. 6. 26 e. Elementos diversos utilizados en los sistemas anteriores • Válvulas y conmutadores de aspiración, temperatura, posición y temporizados • Conectores y unidades Duración de la cobertura B&S garantiza al propietario inicial y a cada comprador posterior que las piezas garantizadas no tendrán defectos de materiales ni de mano de obra que provoquen su fallo durante un período de dos años a partir de la fecha de entrega del motor a su comprador.
POLÍTICA DE GARANTÍA PARA EL PROPIETARIO DE UNA LAVADORA A PRESION BRIGGS & STRATTON POWER PRODUCTS GROUP, LLC Fecha de entrada en vigor:1 de Diciembre de 2005. Sustituye a todas las garantías sin fecha y a las de fecha anterior al 1 Diciembre de 2005. GARANTÍA LIMITADA Briggs & Stratton Power Products Group, LLC reparará o sustituirá sin cargo alguno cualquier componente de la lavadora a presión que presente defectos de materiales y/o mano de obra.
Limpiadora a Presión Especificaciones del producto Presión de salida máxima . . . . . . .206,8 BARS (3,000 PSI) Caudal máximo . . . . . . . . . . . . . .10,6 liters/min (2,8 GPM) Temperatura del suministro de agua . . . . . . . . . . . . . . . . . . . . . . . . . .38ºC (100ºF) MAX Desplazamiento . . . . . . . . . . . . . . . . . .206 cc (12,57 cu. in.) Bujía Separación . . . . . . . . . . . . .0,76 mm (0,030 pulgadas) Capacidad de Gasolina . . . . . . . . . .2,84 litros (3,0 cuartos) Capacidad de Aceite . .