Video Doorbell DB12 (XenBell series) User Manual May 2019 www.brilong.com Based on app version: 0.10.6 DOC. version 1.
Copyright © 2018 - 2019 Brilong CO. All rights reserved. All trademarks and brands mentioned in this user manual are the property of their respective owners. No part of this user manual may be reproduced, distributed, republished, downloaded, displayed, posted, stored in a retrieval system or transmitted in any form or by any means without prior written permission from Brilong CO. Though Brilong CO. has made every effort to ensure the accuracy of this document at the time of publication, Brilong CO.
Table of Contents ABOUT THE XENBELL VIDEO DOORBELL ........................................................................................................................ 4 OVERVIEW ........................................................................................................................................................................... 4 ACCESSORIES................................................................................................................................................
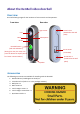
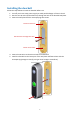
About the XenBell video doorbell Overview See the following images for the locations of main controls and components: Front view Rear view Light sensor Lens Reset Screw hole 1 (attached to the wall plate) Microphone IR LED Doorbell button (with LED indicators) (During live view, the visitor can AC terminals (12-24 VAC) press the button to amplify sound for clearer communication.) Speaker Accessories The following accessories are available for installing with the doorbell: 1.
Installing the doorbell Follow the steps below to install the doorbell before use. 1. Turn off your home main power supply to avoid possible danger of electric shock. 2. Pass the two AC wires (for doorbell use) through the hole of the doorbell wall plate. 3. Fasten the wall plate with the accompanying two screws. Fasten screw here. Pass AC wires through this hole. Fasten screw here. 4. Fasten the two wires to the AC terminals of the doorbell. 5.
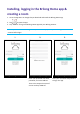
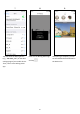
Installing, logging in the Brilong Home app & creating a room 1. Go to the App Store or Google Play to download and install the Brilong Home app. 2. Tap to open the app. 3. Tap “SIGN IN” to log in the Brilong Home app with your Brilong account. Note: If you do not have a Brilong account, follow the steps (1 and 2) below to register a new account before login. 1 2 Enter your preferred username, password, and email address. Then tick to accept the terms of service and tap “SIGN UP”.
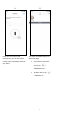
4 Enter the room name (and descriptions; you can also take a custom room thumbnail) and then tap “Done”. 5 The room you added displays on the home page. If you want to add more rooms, tap > “Add/Edit Room”. To add a device, tap > “Add Device”.
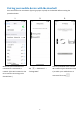
Pairing your mobile device with the doorbell Press and release the reset button (by using a paper clip end) on the doorbell before starting the procedure below: 1 Make sure your mobile device is connected to a 2.4 GHz Wi-Fi network. (This Wi-Fi network is also to be used for connecting to the 2 Tap > “Add Device” > “Brilong DB12”. 3 Enter the password of the 2.4 GHz Wi-Fi network (you selected on Step 1) to which your mobile device is connected. Then tap doorbell later.) 8 .
4 Enter the doorbell name in the “Device Name” column. 5 6 Tap OK. Tap .
7 Tap and select the Brilong device (e.g., “BRILONG_XXX”) on the Wi-Fi settings page of your mobile device. Then, return to the Brilong Home app. 8 Return to the Brilong Home app and tap . 10 9 Once pairing is complete, you will see the default device thumbnail in the Devices list.
LED indicators Indications of commonly seen LED indicators are shown below: Device Status / User Action LED Status Power on Red LED lights gradually from dark to bright. Connecting to the network Blue LED flashes twice. Connected to the cloud Blue LED flashes once every 10 seconds. Press the doorbell button. Blue LED flashes three times. Failed to connect to the cloud service Purple LED flashes once every 10 seconds. Firmware upgrade Press the reset button (by using a paper clip end).
Using the Brilong Home app Once you have completed installing the doorbell, open the Brilong Home app. Next, select the room where the doorbell is installed, and then tap the doorbell thumbnail to watch the live view and use other functions as needed. (If there are other devices installed in this room, they will also appear on this page.) Menu Show/Hide rooms Current room Other rooms (if any) Settings See the Settings page for details. Doorbell thumbnail (Tap to see the live view.
Live view The live view supports both horizontal and vertical views. Available controls are shown below: Return to the app home page Settings Live view Mute on/off Maximize screen on/off Take a snapshot Start/Stop recording live view video Microphone on/off Green: on Black: off Notes: All recorded live view videos and snapshots are saved on your mobile device. In the horizontal view, tap anywhere on the screen to view the above controls.
Menu page Tap to access the following options: Manage Account: View and edit your account information. History: View recorded event videos (saved on the XenBell device). Sort by trigger type: Motion Detection / Chime Select a date to display. Device name Event date Select or deselect a video clip. Event time Trigger type Delete selected videos Add/Edit Room: Create a room or edit room information. Add Device (set up a new device): Add a device to the current room you have selected.
Settings page Adjust the doorbell settings and check doorbell info here. Device Information View or edit device name and password. You can also check and upgrade the firmware version. Notifications Turn on/off the notifications sent by the Brilong Home app. When this option is on, your mobile device will receive notifications whenever someone presses the doorbell button, or the doorbell detects motions. Wi-Fi Reset Reset the Wi-Fi connection.
FCC warning Federal Communications Commission Statement This device complies with FCC Rules Part 15. Operation is subject to the following two conditions: This device may not cause harmful interference. This device must accept any interference received, including interference that may cause undesired operation. This equipment has been tested and found to comply with the limits for a class B digital device, pursuant to Part 15 of the Federal Communications Commission (FCC) rules.