
Manual

DOCUMENT ID 994406
Page 3 of 4
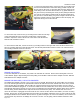
room for the removal of the headers. Remove all eight (8) of the mounting nuts holding the four primaries to the head.
Remove the two (2) bolts mounting the catalytic converter to the frame and the four (4) bolts securing the brackets to
the catalytic converter. Drop the catalytic converter down to clear the frame, move the system forward to disengage the
primary pipes from the cylinder head and remove from the bike.
Be careful not to hit the flanges of the pipes on the
radiator or oil cooler,
place a piece of cardboard over the radiator and oil cooler to protect them.
Check to make sure the exhaust gaskets are still in the head, do not remove, you will reuse these.
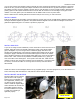
INSTALL FLANGES
Remove the flanges from the headers. Using the eight (8) 12-point nuts from the original flanges, attach the flanges with
the larger flared side against the gaskets in the cylinder head and aligned as shown. Make sure flanges are flat to the
gaskets and tighten flanges to 10-15 ft-lbs to promote a proper seal.
INSTALL HEAD PIPES
If you are not using a Power Commander, remove the stock O
2
sensors from the stock
headers, apply anti-seize to the threads, install in the bungs of the primary header
pipes, and tighten. If you are using a Power Commander, apply anti-seize to the
threads of the supplied plugs, insert with the supplied copper gaskets into the bungs,
and tighten. Apply a small amount of Permatex Ultra Copper to inside of the header
pipes. Install the head pipes onto the flanges while making sure not to hit the radiator
and oil cooler. After one side of the primaries is installed, attach one (1) spring to
each of the tabs on the header pipes. Then repeat to the other side. Make sure the
radiator as well as other hoses have clearance from the head pipes. If using the stock
O
2
sensors, reconnect the cables. If not using stock O
2
sensors, leave the sensors
disconnected.
Install the collector to the head pipes with the two (2) supplied springs. Once the springs are on, move the collector in a
side to side and up and down motion to fully seat the collector and the header pipes.
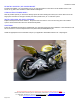
INSTALL BRACKET AND MUFFLER
Slip the muffler onto the collector
pipe and secure with a spring.
Fasten to the stock bracket using
the supplied bolt, washers, and
nut with the stock outer billet
washer. Install the supplied large
washer between the stock mount
and muffler bracket as shown.
Re-check all fasteners of system
to make sure everything is
tightened properly.
LARGE WASHER