
Grill Head Manual
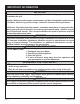

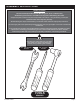
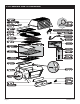
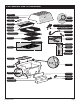
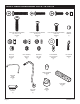
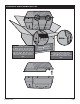
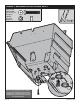
Table Of Contents
- ASSEMBLY INSTRUCTIONS
- P3X SERIES PARTS DIAGRAM
- P4X SERIES PARTS DIAGRAM
- GRILL HEAD HARDWARE PACK - B102155
- UNPACK AND REMOVE LID
- INSERT BURNER HOLD-DOWN BOLT
- WIND DEFLECTOR PLACEMENT
- INSERT CONTROL PANEL
- ATTACH IGNITOR WIRE
- INSTALL BURNER ASSEMBLY
- CONNECT IGNITOR LEADS
- KNOB and battery PLACEMENT
- INSTALL LID STOP
- HANDLE INSTALLATION
- REINSTALL LID
- P3XF(N), P4XF(N) FLARE BUSTERS AND RACKS
- P3SX(N) FLARE BUSTERS,SMOKER SHUTTER AND RACKS
- P3X(N) AND P4X(N) BRIQUETS AND RACKS
- INSTALL WARMING RACK
- PROPANE GAS GRILLS
- CONNECTING NATURAL GAS GRILL
- NATURAL GAS GRILLS
- COMPLETED ASSEMBLY
- OWNER’S MANUAL FOR P3X AND P4X GRILLS
- P3X SERIES PARTS DIAGRAM

B102268-1-0615 Page 5
BEFORE YOU BEGIN
This Grill Head requires Broilmaster Mounting (Cart, Post, or a Built-In Kit).
See Mounting Instructions to assemble mounting before Assembling Grill Head.
Compare the parts in the box to the parts list provided in this manual. If any are missing, contact your
Broilmaster dealer before beginning assembly.
All Broilmaster grills require some assembly. For the best results, follow the step-by-step instructions.
For natural gas grills and for permanently mounted LP grills, have your gas supplier run service to the desired
location first.
If you purchased an accessory with your Broilmaster, follow the instructions provided. Assemble your base
options before assembling your Broilmaster grill head. Refer to the Broilmaster Cart, Base, and Post
instructions provided with each accessory for assembly, installations, and mounting procedures.
TOOLS
REQUIRED
3/8”, 7/16” and 3/4”
REQUIRED
3/8” and 7/16”
REQUIRED
3/8” and 7/16”
REQUIRED
3/8” and 7/16”
REQUIRED
CAUTION:
Parts may have sharp edges. For your safety
wear leather work gloves and handle parts
carefully during unpacking and assembly.
ASSEMBLY INSTRUCTIONS