
Instructions / Assembly


6
Installation
PRODUCT INSTALLATION
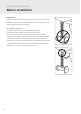
Installing the Bidet Attachment
1. Install Adjustable Mounting Brackets into the Bidet
Attachment. Place circular mounting brackets into the
circular openings of the bidet attachment.
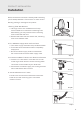
2. Install Bidet Attachment on Toilet
a. Place bidet attachment on the toilet so the
nozzle is as close to the back of the toilet bowl
as it will go. This will vary by toilet.
b. Make sure the adjustable brackets line up with
the holes in the toilet fixture. You may need to
rotate the adjustable brackets accordingly to line
them up properly.
c. Replace the toilet seat on top of bidet attachment
and secure using original toilet seat hardware.
Make sure to tighten so that the bidet attachment
and seat do not move.
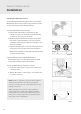
3. Connect Bidet Hose to Bidet Attachment
Connect the open end of bidet hose to the Cold
connection under the bidet attachment.
4. Turn on Water Supply & Check for Leaks
a. Open the main water supply valve slowly and
check for leaks.
b. Wait 5-10 minutes, check again, and if there are
no leaks, continue.
Step 1
Step 2b
Step 2c
Step 3
NOTE: If there is any leaking, check all rubber washers
and make sure all water connections are tight and
secure. If necessary, you can use plumbers tape for any
leaking connections.
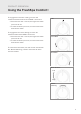
TIP: If spray direction is off-center after installation,
unscrew the bolts, reposition the attachment slightly
forward, and secure back in place. Depending on your
preferences or body composition, the perfect position
may require some readjustment.