Thank you for purchasing the P-touch 580C! Your new P-touch will allow you to design and print labels and stamps for any use. Your labels and stamps can contain characters of many sizes and styles as well as bar codes and graphics imported from other Windows applications. In addition, by using the variety of tape and ink cartridges available, you can print labels with different widths and exciting colors. You no longer have to worry about urgent tasks that require professional printing.
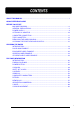
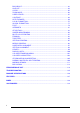
ABOUT THIS MANUAL.................................................................................................................1 QUICK REFERENCE GUIDE BEFORE YOU START MACHINE DIAGRAM......................................................................................................6 GENERAL PRECAUTIONS ............................................................................................8 POWER SUPPLY ...............................................................................................
BACKSPACE ................................................................................................................ 63 LINE OUT...................................................................................................................... 64 CLEAR .......................................................................................................................... 65 ZOOM MODE................................................................................................................
Although this machine is easy to use, we suggest that you read this manual carefully before starting. This manual consists of a reference guide and three main sections: QUICK REFERENCE GUIDE This section provides a quick, simple guide to setting up and using the machine. BEFORE YOU START This section provides basic information concerning the machine itself, tape cassettes, and power supplies.
2
3
4
6
7
h Use only Brother TZ tapes with this machine. Do not use tapes that do not have the TZ mark. h Five TZ tape widths are available: 1/4” (6 mm), 3/8” (9 mm), 1/2” (12 mm), 3/4” (18 mm), and 1” (24 mm). h Do not pull on the tape. This may damage the tape cassette. h Avoid using the machine in extremely dusty places. Keep it out of both direct sunlight and rain. h Do not expose the machine to high temperatures or high humidity. Never leave it on the dashboard or in the back of your car.
This is a lightweight and portable machine. It can be used anywhere by installing six (6) AA alkaline batteries. When you change the batteries, always replace all six at the same time. + Be sure to insert the new batteries within five minutes of removing the old ones, otherwise the message in the working area and any messages stored in the memory will be lost (unless the machine is plugged into an AC outlet with the AC adaptor).
The AC adaptor (model AD-30) allows you to use this machine anywhere a standard electrical outlet is available. TO ATTACH THE AC ADAPTOR: (1) Insert the small plug on the adaptor into the jack marked DC IN 7V on the right side of the machine. (2) Insert the large plug into the nearest standard electrical outlet. + Only use the AC adaptor designed exclusively for this machine. Remove the batteries and disconnect the AC adaptor if you do not intend to use your machine for an extended period of time.
This machine is equipped with a jack which allows you to print stamp and labels that you create with the P-touch EDITOR software installed on your IBM or compatible PC. TO CONNECT THE COMPUTER: (1) Be sure both the P-Touch 580C and the computer are turned off. (2) Insert the small plug on the connection cable into the jack marked INTERFACE on the right of the P-Touch 580C. (3) Insert the large plug into the COM port of your IBM computer.
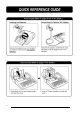
A single TZ tape cassette is supplied with this unit. However, since TZ tape cassettes and multi-color ink and tape cassettes are available for this machine in a wide variety of colors and sizes, it is possible to make distinctive color-coded and stylized labels. In addition, this machine has been designed to allow you to change the tape cassettes quickly and easily. TO INSERT A TZ TAPE CASSETTE (1) Press down on the cover release button and lift open the compartment cover.
TO INSERT MULTI-COLOR INK AND TAPE CASSETTES: (1) Press down on the cover release button and lift open the compartment cover. (2) If there is a cassette already in the compartment, remove it by pulling it straight up. (3) If the ribbon in the ink cassette is loose, use your finger to wind the toothed wheel in the direction of the arrow on the ink cassette until the ribbon is taut. Then, insert the ink cassette straight down into the tape cassette.
If too much of the tape is rewound back into the cassette: 14
The enclosed stick enables you to remove the label backing from the tape easily. (1) Hold the tape in your left hand, with the printed surface facing up, and hold the stick in your right hand. (2) Pass the tape halfway through the long narrow hole in the stick. (3) After turning the stick three quarters of a turn towards you, pull the stick away from you as shown below. INSERT LETTERING TAPE (RUB-ON TRANSFERS) Insert lettering tapes act as rub-on character transfers.
Occasionally, specks of dust or dirt become attached to the machine’s print head and rollers. This is particularly likely when you are using the unit outdoors or in a very dusty environment. If a section of the print head is covered with dust, a blank horizontal streak may appear through the label message. Therefore, as with a tape recorder, the machine’s head may need to be cleaned from time to time. TO CLEAN THE PRINT HEAD: (1) Turn off the machine.
In Learning the Ropes, you will find a series of label-making examples. As the featured label designs become increasingly more complex, you will learn how to use the more advanced features of the machine. The first exercise consists of creating a simple one-line door sign. The second, an equipment instruction label, takes advantage of several additional machine capabilities. The third is a fourline address label. Finally, the storage shelf label shows you how to use the unit’s more expert functions.
Let’s begin by turning on the power to the machine. The power button is located in the top right-hand corner of the keyboard. The text entry mode on this machine is WYSIWYG (What You See Is What You Get) mode, which allows you to see the label as it will appear after it is printed. The flashing mark resembling bracket is called a “cursor”. The mark is like a pointer which shows your current position and lets you select certain characters in your text.
turned on for the first time have been preprogrammed into the machine and represent the most common style settings for labels. However, you can create your own formats and can even define local formats, which are special style settings for portions of text within the label. Detailed explanations for creating and editing global and local formats can be found in the Global Formatting and Local Formatting sections of For Your Information.
Once you have created a message, you can easily edit it by correcting mistakes or simply adjusting the text or style. For detailed explanations of text editing methods, see pages 63 to 65. Now, let’s revise this label using the BACKSPACE key to delete the lowercase letters in our message and use the Caps mode, which allows us to enter a string of capital letters without holding down the SHIFT key, to enter uppercase characters which are mode appropriate for a door sign.
Finally, suppose we would like to add a no smoking symbol, just one of many available on this machine, to our door sign. A detailed explanations of symbol entry can be found in the Symbols section on page 52.
+ You can press the CANCEL key at any time to return to text entry mode from Symbol mode. Since our message is finished, we can now print it. Though several print settings are available, we will use the default settings preprogrammed into the machine.
+ The label this example can be printed on 3/4” (18-mm)- or 1” (24-mm)-wide tape. Although the entered characters may not seen to align properly in the LCD display, they will line up correctly on the printed label. In this practice session, we will make a multi-line equipment instruction label. Let’s assume we want to make an instruction label for an office photocopier. First, we will enter four lines of text containing both uppercase and lowercase letters, then edit it into a three-line label.
In our multi-line message, we will be using the RETURN key to end one line and start the next. This key operates like the Return on a typewriter by ending the current line and moving the cursor to the next line.
Press the FORMAT key at any time to view the current label formats. These settings can only be applied globally, i.e. to the entire message. For detailed explanations of the global format settings, see pages 93 to 103 of For Your Information. Any time you wish to return to text entry mode from Format mode without changing any of the settings, simply press the CANCEL key. A detailed explanation of the CANCEL key can be found on page 60 of For Your Information.
Now, let’s edit the message, changing it from four to three lines and adjusting some of the text.
The message has been created and edited. If it were printed now, the standard default settings would be used. The text would be aligned at the left margin and would not be framed or underlined. In addition, the characters would be autosized and printed using font F1 (Helsinki) and a normal style. For more details concerning format settings, please see pages 75 to 103 of For Your Information.
Since we wish to put a frame around the entire label and center the text, we will use the FORMAT key to enter these global format settings.
Now, let’s take a look at how to store text files for future use and how to recall them when desired. Detailed explanations of the machine’s memory can be found in the Storing/Recalling/Deleting section on pages 105 to 108.
Clearing removes all text from the working area. If you have not saved the information in the machine’s memory, it will be lost. Since we have saved it, we can clear the working area without losing our work. Now, even though it is no longer displayed on the LCD, we can recall our copier instruction text file and print it.
Finally, let’s assume that we have three photocopier machines onto which we want to attach the same label. Therefore, we need to print three copies of the same text. A detailed explanation of the repeat printing function can be found in the Printing & Special printing section on pages 109 to 110. The TAUSE setting in Special print mode can be used to set whether or not the Machine will pause while printing copies of labels so the tape can be cut.
If we now wished to print three copies of the label, we could simply press the RETURN key. Three framed and horizontally-centered labels with characters using font F2 (Brussels) would be printed. If the cut pause setting is turned off, the three copies would be printed continuously. If the cut pause setting and been turned on, the machine would pause between the three copies so the tape could be cut.
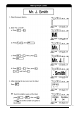
+ The label in this example can be printed on 3/4” (18-mm)- or 1” (24-mm)wide tape. Although the entered characters may not seem to align properly in the LCD display, they will line up correctly on the printed label. In this quick practice session, we will make a multi-line address label with local formatting. The local formatting will be used to emphasize a certain portion of the message.
Using the local format settings, we can now highlight a certain portion of our text by putting it in italics and underlining it. A detailed explanation of local formatting can be found on pages 79 to 92 and in the Local Formatting section on pages 75 to 76.
Now, let’s assume we wish to print one copy of this label to attach to a package.
+ The label in this example can be printed on 3/4” (18-mm)- or 1” (24-mm)wide tape. Although the entered characters may not seem to align properly in the LCD display, they will line up correctly on the printed label. In this final example, we will make a storage shelf label. This label would be used to describe the parts stored on a shelf. WYSIWYG text entry mode is very convenient when making complex, multi-block labels since it allows you to see the label as it will appear after it is printed.
In this practice session, we will use local formatting and the multi-block applications as well as more specialized features, such as bar coding and numbering. Now, we will enter the storage shelf label text. We now want to change from a one-line to a four-line block. In this case, we will not use a regular return, instead we will use the NEW BLOCK key. A detailed explanation of multi-block labeling can be found in the New Block section of For Your Information.
40
Now, we must enter the bar code information, the last portion of our message. Though many options exist for bar codes, let’s assume you wish to use CODE 39 protocol with an undetermined (free) number of digits. A detailed explanation of bar coding can be found on pages 113 to 115. However, this explanation covers only the basics of this machine’s bar coding function and is not intended as a comprehensive introduction to bar coding.
42
Next, we will practice using the numbering function. This feature is particularly useful for serial numbers and other codes which require sequential numbering. In this example, let’s assume that we would like to increase the “1” in our parts code while the bar code information remains the same.
With the numbering feature, the numbers or letters included in the field will automatically increase when each labels is printed. A detailed explanation of this function can be found in the Sequential Numbering section on pages 58 to 59. Congratulations! This completes the fourth and final practice session in Learning the Ropes. We hope that these exercises, which cover most of this machine’s features, have been both informative and enjoyable.
In For Your Information, you will find detailed explanations of all the machine’s features. Each topic is given its own page, making this reference section easy to use. Operational examples of most features can also be found in the Learning the Ropes practice sessions. If you are a first time P-Touch user, we suggest that you work through these exercises before starting to make labels on your own. This For Your Information section provides supplementary information.
This For your Information reference guide gives detailed explanations of all of this machine’s features. The following list shows which topics are covered and on which page an explanation of their operation can be found.
The power button is located in the top right-hand corner of the machine’s keyboard. When the power is turned on, the previous session’s information is displayed. The machine will automatically turn off if no key is pressed within 5 minutes. In Interface mode, however, the machine will automatically turn off if it is not used for 10 minutes.
This machine has two different types of cursors. The first, which resembles a bracket ([) in text entry mode or an underline in Auto Format or Bar Code mode, makes your current position in the text. Its operation is nearly identical to that of cursors on electronic typewriter or word processors. You can review and edit different parts of your message by moving the cursor backwards, forwards, up and down. Eight keys (3, 4, 5, 6, HOME, END, 33 and 44) let you move this cursor.
Most characters can be entered simply by pressing their keys. However, to enter uppercase letters, accented characters and some common symbols, three special keys are necessary. SHIFT KEY: This key allows you to type symbols located on the upper part of the keys and capital letters; however, capital letters of characters written in red must be entered using the ALT key in Caps mode. To type a capital “A”, hold down the SHIFT key and press the A key.
While the SHIFT, CAPS, and ALT keys allow you to select various characters and symbols, the CODE key allows you to choose various functions. Functions written in green can be selected by pressing the CODE key.
This machine has many special marks and symbols that can be entered into your text. When entered, they act like normal characters and can be both edited and deleted. Though several symbols can be found on the machine’s key tops, 126 additional marks are available in Symbol mode. TO ENTER A NON=KEYTOP SYMBOL: (1) Hold down the CODE key and press the SYMBOL key to enter Symbol mode. (2) Press the 5 and 6 keys until the symbol you wish to enter appears on the display.
53
In alphabets other then the English alphabet, composite characters, which consist of a letter and a diacritical mark, are often used. This machine can also display and print there characters. The diacritical makes available ate ¨, ´, `, ˆ, ˜ and ¸. Several composite characters can be found on the key tops. Characters such as á, é, and ü can be entered in the same way as other characters. Before inputting a composite character as described below, check whether it is already available as a keytop character.
The RETURN key is located on the right side of the keyboard. It is the largest, and one of the most often used keys. The RETURN key has three basic functions: TO END A LINE: Line the RETURN key on a typewriter or word processor, this machine’s RETURN key lets you end one line of the text and begin another. While entering the message, press the RETURN key when you have finished entering one line and wish to start the next. The cursor moves to the next line on the LCD display. Press the RETURN key.
TO ENTER AND CHOOSE ITEMS: The RETURN key can also be used to enter and choose items. For example, in Symbol mode, a large group of symbols are displayed. After you have chosen the symbol that you want to appear in your message, it will be highlighted, signifying that it is the “active” symbol. If the RUTURN key is pressed, that symbol will be entered into your text message. In addition, after creating a text format, pressing RETURN key applies the currently displayed settings to the current label.
Any time the number of lines in a section of the label changes, a new block must be created. Creating a new block is different from local formatting, which change the type style within that line or those groups of lines. Compare these two labels: This is simply a single-block, single-line label with local formatting. After all the text has been typed in, the position “(123) 456-7890” is assigned a smaller character size. This is a multi-block label.
This machine’s numbering feature allows you to designate a group of numbers and letters or a bar code as a “numbering” field and print a set number of label in which the numbering field automatically increases by 1 after a label is printed. For example, a numbering field of 124 becomes 125. This type of automatic increment is very useful for printing serial number labels, production control labels or other labels requiring ascending codes.
• Letters and numbers automatically increase in the following manner: è 1 è … 9 è 0 è … A è B è … Z è A è … è b è … z è a è … 0 a • Spaces (shown as “_” in the table below) can be used to control the number of digits printed: 0 0 è 1 è … 9è è 0 è … _0 _0 è _1 è … 99è è _9 è … A0 A0 è A1 è … A9è è B0 è … Spaces between letters in the numbering field simply adjust the space between them on the printed labels.
The CANCEL key is located in the bottom row of the keyboard. It has two basic functions. TO LEAVE AN OPERATION MODE WITHOUT TAKING ANY ACTION: In general, the CANCEL key returns you to the previous screen or activity. For example, if you enter an operation mode but decide you want to return to text entry or editing, you can press the CANCEL key. Press the FORMAT key to enter Format mode. ê To escape from Format mode without changing any settings, press the CANCEL key.
TO ANSWER “NO”: Prompt questions sometimes appear on the LCD display, especially when the function that you wish to perform will delete or affect files. In these cases, pressing the CANCEL key is like answering negatively. To answer “yes”, press the RETURN key. If “no”, press the CANCEL key. If “yes”, press the RETURN key. + When an error message is displayed, pressing the CANCEL key allows you to return to what you were doing previously.
After you have created a message, moving the cursor allows you to view or edit different parts of the text. In general, pressing this key moves the cursor one space or character to the left. If the cursor is positioned at the beginning of a line when this key is pressed, the cursor moves to the end of the previous line. Holding down the CODE key and pressing this key moves the cursor just before the first character of the current text block.
The BACKSPACE key allows you to remove unwanted characters from your message. It differs from the 3 key, which simply moves the cursor without changing the message. The BACKSPACE key, however, removes the character preceding the cursor. TO DELETE A CHARACTER: (1) Using the cursor movement keys, position the cursor immediately to the right of the character you want to delete. (2) Press the BACKSPACE key.
The LINE OUT key allows you to remove unwanted lines of text from your 64
The CLEAR key allows you to remove all text and symbols from the display and return the text formats to their default settings. In other words, the current text files is completely emptied. You can then begin entering an entirely new text message. TO CLEAR A TEXT FILE: (1) Hold down the CODE key and press the CLEAR key. (2) Press the RETURN key. + The cursor can be located anywhere in the message.
Zoom mode allows you to see how a label will appear when it is printed by zooming out from the text, or to see parts of the message in detail by zooming in. The cursor keys can be used to move the cursor so different parts of the message can be seen. TO ENTER ZOOM MODE: (1) Press the ZOOM key and the display zooms in to enlarge the message. (2) Press the ZOOM key again and the display zooms out to show the message as it will appear when it is printed.
This mode briefly displays the length of the label in either inches or centimeters depending on the UNIT setting. For more information on changing the units that are displayed, see Display Unit on page 100. TO ENTER LABEL LENGTH MODE: Hold down the CODE key and press the LABEL LENGTH key. The length of the label is displayed briefly.
This mode is used to adjust the contrast of the LCD display. Contrast mode can be entered from text entry mode or Auto format mode. TO CHANGE THE CONTRAST: (1) Hold down the CODE key and press the CONTRAST key. (2) Press the 4 and 3 keys to adjust the contrast. (3) Press the RETURN key. + 68 Press the SPACE key to reset the contrast to its default setting.
The AUTO FORMATS key is located in the lower left-hand corner of the keyboard. This mode allows you to enter text quickly into layout templates so that labels can be created easily using the preset formats. TO PRINT A LABEL USING AUTO FORMAT MODE: (1) Press the AUTO FORMATS key. + If text has already been entered in the display, a confirmation message appears. Press the RETURN key to delete the text. (2) Press the 5 and 6 keys until your desired layout is displayed and press the RETURN key.
The following chart lists the entries for the label templates, allowing you to easily select the appropriate preset layout.
I J K Label templates NAME PLATE (3/4” (18 mm)), (1” (24 mm)) ADDRESS (3/4” (18 mm)), (1” (24 mm)) EQUIPMENT (3/4” (18 mm)), (1” (24 mm)) L EQUIPMENT (1/2” (12 mm)) M SLIDE (1/2” (12 mm)) N PRICE (3/4” (18 mm), (1’ (24 mm) SALE PRICE O P Q (3/4” (18 mm)), (1” (24 mm)) FILE LONG (3/4” (18 mm)) (1” (24 mm)) FILE LONGV (3/4” (18 mm)) (1” (24 mm)) Entries • NAME? ‚ COMPANY? • ‚ • ‚ • ‚ • ‚ • • ‚ ƒ ADDRESS2? „ ADD.
72
73
74
LOCAL FORMAT FONT SIZE WIDTH STYLE UNDL / FRM COLOR The local format settings, shown in the table at the left, determine how the text is printed. After the text is entered, use the AREA and cursor keys to select the characters to be emphasized, then change the format using the local format keys ( FONT, SIZE, etc. ) below the LCD display. If the entire text is selected, the font, size, width, style, underlining or framing, and color print formats can be applied globally.
76
GROBAL FORMAT FRAME FEED VERT MIRROR H. ALI V. ALI LENGTH The global format settings, shown in the table at the left, determine how the label is printed by establishing the orientation and alignment of the entire text message. Press FORMAT to enter the Format mode and change there formats at any time before, during or after you enter your test.
78
Eight different typeface, or fonts, are available on this machine. The fonts are: F1 (Helsinki) TITLE F2 (Calgary) F2 (Brussels) TITLE F3 (Florida) F3 (Bermuda) TITLE F4 (Istanbul) TITLE F1 (San Diego) TITLE F5 (US) The default setting is font F1. + The TITLE fonts are only available if the message consists of only one line or if 1/2” (12-mm)-, 3/4” (18-mm)-or 1” (24-mm)-wide tape is installed. In addition, letters entered using a TITLE font will only appear in uppercase.
80
There are two character size settings: size and width. Usually, you will want to use the largest characters possible for the given tape and message. With the size set to AUTO, the machine compares your inputted message with the tape width and automatically uses the largest characters possible. Sometimes, however, you will want to assign a particular character size and width. To do so, six point sizes are available and each can be printed in narrow, medium or wide characters.
TO APPLY A SIZE/WIDTH TO THE SELECTED AREA: (1) Press the AREA key, then use the cursor keys to select the text to which you want to apply a new character size or width. (2) Press the SIZE key until the text is displayed in the character size you wish to use and press the WIDTH key until the text is displayed in the desired width. (3) Press the RETURN key to apply the chosen size or width to the selected test.
Six single styles, which can all be combined with the italic style, are available. The styles are: The default setting is the normal style. (No indicators appear in the display.) + Characters printed using the smaller sizes may be difficult to read if certain style settings (e.g. Italic & Shadow) are applied. TO ENTER TEXT WITH A DIFFERENT STYLE/ITALIC: (1) Insert the cursor where you wish to begin using a new character style.
84
85
Selected characters in your message can be highlighted by framing them with a box or a rounded box, underlining them, crossing them out, or putting them in front of a shading pattern. The types of highlights are: The default setting is no underline, frame or shading. + When the entire text message is removed from the display with the CLEAR key, this format will return to its default setting (no underline/frame/shading).
With the multi-color printing function, you can create colorful labels using different ink colors. This function is useful when part of your message must be more noticeable or when color-coded labels are needed. The default color is COLOR1. + When a message is stored in the memory, the order in which the characters will be printed are also saved. The color print settings assigned using this function are the same settings used with the global format C. FRAME and C. CHAR settings.
(4) Use the color keys to highlight the string of characters which you wish to print using the second color. (5) Press the COLOR key located below the LCD display, until COLOR2 is displayed and the C2 indicator comes on, then press the RETURN key. These characters will be printed using the second ink color. (6) Repeat steps (2) and (3) to highlight the string of characters which you wish to print using the third color.
89
90
91
92
Unique labels can be created by flaming your entire message using one of the many flames available. The types of frames are: + This framing setting can only be applied to the entire label. It cannot be applied to just part of the text. However, the box, rounded box or the shading pattern can be applied locally using the AREA and cursor keys to select the text, then pressing the UNDL/FRM key until the highlight you wish to use is displayed. TO SELECT THE FRAMING STYLE: (1) Press the FORMAT key.
This machine can be set to leave equal margins of between 1/6” (4 mm) and 1” (24 mm) on the left and right sides of your label. The tape feed settings are: FULL (1” (24 mm)) NONE (1/6” (4 mm)) NARROW (1/3” (8 mm)) MEDIUM (1/2” (12 mm)) + Since reducing the tape feed may decrease bar code readability, full tape feed is recommended when messages include bar code. If instant (rubon) lettering tape is installed, this setting will be ignored and the message will be printed with full margins.
Characters in your message can be printed in a vertical orientation. + The vertical printing setting cannot be turned on if a TITLE font is used. Vertical printing can only be applied to the entire label. It cannot be applied to just part of the text. TO SET THE VERTICAL PRINTING FUNCTION: (1) Press the FORMET key. (2) Press the 4 and 3 keys until the vertical printing setting (VERT) is highlighted. (3) Press the 5 and6 keys until the setting you wish to use is displayed.
Your message can be printed as if it is seen in a mirror. When these labels (printed on clear tape) are affixed to glass, such as showroom windows, they can be correctly read from the opposite side. + Use clear tape when using the mirror printing setting to make a label. Mirror printing can only be applied to the entire label. It cannot be applied to just part of the text. TO SET THE MIRROR PRINTING FUNCTION: (1) Press the FORMAT key.
Characters in the blocks of your message can be horizontally aligned in any one of four ways: LEFT CENTER RIGHT JUSTIFY + The horizontal alignment setting can only be applied to the entire label. It cannot be applied to just part of the text. If a tape length has been set, multi-block message are assigned the JUSTIFY setting and spaces between the blocks are adjusted so that the text spreads out evenly the tape. TO SELECT A HORIZONTAL ALIGNMENT: (1) Press the FORMAT key.
The blocks of your message can be vertically aligned in three ways: BOTTOM CENTER TOP + The vertical alignment setting can only be applied to the entire label. It cannot be applied to just part of the text. TO SELECT A VERTICAL ALIGNMENT (1) Press the FORMAT key. (2) Press the 4 and 3 keys until the vertical alignment setting (V.ALI) is highlighted. (3) Press the 5 and 6 keys until the setting you wish to use is displayed. + The default setting (BOTTOM) can be selected by pressing the SPACE key.
The label length can be set using two different methods. With the size set to AUTO, the machine compares your inputted message with the tape size and automatically adjusts the label length to fit your message. Sometimes, however, you will want to assign a label length regardless of the message’s size. The label length can be set from 1.5” (3.8 cm) to 11.3” (28.7 cm). The label lengths are: In inches: AUTO 1.5 1.6 … 11.3 AUTO… In centimeters: AUTO 3.8 3.9 … 28.
The measurements on the display are shown in either inches (inch) or centimeters (cm). + This setting is applied to all the measurements displayed. It is not available in local formatting. TO SELECT THE UNITS OF THE MEASUREMENTS: (1) Press the FORMAT key. (2) Press the 4 and 3 keys until the display units setting (UNIT) is highlighted. (3) Press the 5 and 6 keys until the setting you wish to use is displayed. + The default setting (inch) can be selected by pressing the SPACE key.
The frame or shading in your label can be assigned one of the three ink colors used during multi-color printing. COLOR1 + COLOR2 COLOR3 Before printing the label using the multi-color printing function, be sure that there is enough tape in the tape cassette, otherwise the label may not be printed properly. Also, check that the setting for the C.FRAME function has been chosen. The color print settings assigned using this function are the same settings used in multi-color printing and with the C.
102
When printing multi-colored labels with character styles such as outline, solid or shadow, the part of the character that is left blank can be filled in using an ink color that is different from the one assigned to the character. OFF + COLOR1 COLOR2 COLOR3 Before printing the label, be sure that there is enough tape in the tape cassette, otherwise the label may not be printed correctly. Also check that the setting for the C.CHAR function has been chosen.
104
The machine’s memory can be used to save and recall your most frequently used text messages. These messages remain in the memory, even of you clear the working area by holding down the CODE key and pressing the CLEAR key. When stored, each file is given a number to make recall easier. File numbers are between 0 and 99. This machine’s memory can store up to 3,400 characters. If the memory becomes full, subsequent storage attempts will cause the message “MEMORY FULL!” to be displayed.
+ If there is no text in the working area, the file is now recalled. If there is some text in the working area, you will now be asked whether you want to join or overwrite the text with the recalled file. To replace the working area text with the recalled file. (4) Press the 5 and 6 keys until OFF is displayed in the JOIN selection area. (5) Press the RETURN key. The stored text file is recalled and overwrites the message in the working area.
107
TO DELETE A FILE FROM THE MEMORY: (1) Hold down the CODE key and press the M.DEL key. (2) Press the 5 and 6 keys until the file you want to delete is displayed. + Hold down the CODE key and press the SPACE key to select all the files in the memory. If you then decide not to delete all of the files in the memory, hold down the CODE key and press the CLEAR key. (3) Press the RETURN key. The message “OK TO DELETE?” or “CLEAR ALL?” will be displayed. (4) To confirm, press the RETURN key again.
The PRINT key lets you print your text on the installed tape. The SPECIAL PRINT key allows you to set the number of copies of the label that will be printed, set whether the machine will pause between copies so that the tape can be cut, and turn the split printing function on and off. PARAMETER SETTINGS Copies (COPIES) ___________ 1 to 99 Tape cut pause (PAUSE) _____ ON, OFF Split printing (SPLIT) _________ OFF, ON COPIES - This parameter determines how many copies of the current label will be printed.
by 1. However, if either of these keys are held down, the setting will continue changing in step of 5 until the key is released. + The default setting of the highlighted parameter can be selected by pressing the SPACE key or all special print settings can be returned to their default settings by holding down the CODE key and pressing the SPACE key. (4) Repeat step (2) and (3) until your desired settings are displayed. (5) Press the RETURN key.
This mode allows you to quickly and easily make pre-inked stamps for any need. After printing the stamp, affix the cut tape to a stamp holder for immediate and frequent use. Since the stamp holder is reusable, just make a new stamp tape and replace the one in the holder. TO MAKE A STAMP: (1) Type in your text, open the tape compartment cover insert a stamp cassette, then close the cover. (2) Hold down the CODE key and press the STAMP key. The message “STAMP FORMAT” is displayed.
112
The bar coding function, which enables bar codes to be printed as part of labels, is one of this machine’s most advanced features. + This section will explain how to enter a bar code into your text message. It is not intended as a comprehensive introduction to the concept of bar coding. For more detailed information, please consult one of the many reference books available.
TO ENTER A BAR CODE INTO YOUR MESSAGE: (1) Hold down the CODE key and press the BARCODE key. If the cursor is located in a bar code that has already been entered, the current bar code settings will be displayed. (2) Enter the bar code data. If you wish to edit an existing bar code, enter the new data. To edit the bar code settings: (3) Press the FORMAT key. (4) Press the 4 and 3 keys until the first setting you wish to change is highlighted. (5) Press the 5 and 6 keys until the desired setting is displayed.
VALUE CHARACTER VALUE CHARACTER VALUE CHARACTER 68 69 70 EOT ENQ ACK 86 87 88 SYN ETB CAN 102 FNC1 The following symbols can only be entered when using protocols CODE 39 or CODEBAR. SYMBOL 1 2 CHARACTER + $ (9) When you have finished, press the RETURN key. TO DESIGNATE A BAR CODE AS A NUMBERING FIELD: (1) Position the cursor immediately before the bar code mark which you wish to select as the numbering field. (2) Hold down the CODE key and press the SEQ.NUMBERING key.
116
117
ERROR MESSAGE 4 DIGIT MIN. 5 BARS LIMIT! 5 LINE LIMIT! 5 BLOCK LIMIT! 118 CAUSE REMEDY •A minimum of four digits must be entered in a bar code. This message appears when less then four digits are entered. •Each label can contain no more then five bar codes. This message appears if five bar codes already exist when you press the BARCODE key or if you attempt to join a text file recalled from the memory to the current message, causing the number of bar codes to exceed the limit.
ERROR MESSAGE BATTERIES WEAK BUFFER EMPTY! BUFFER FULL! CAUSE REMEDY •This message appears when the installed alkaline batteries become weak. •This message appears if the LABEL LENGTH, AREA or SEQ. NUMBERING key is pressed when the working area buffer is empty. •Replace the batteries or use the AC adaptor. •This message appears if you try to print, but no text has been entered in to the working area. •Enter text before printing.
ERROR MESSAGE CANCELED DATA! PRESS ANY KEY CAN’T DELETE TAPE EDGE! CAN’T HERE CHANGE ADAPTOR CLOSE THE COVER! 120 CAUSE •This message appears if the CANCEL key is pressed while data is being transmitted from the computer to this unit in Interface mode. •This message appears if the end of the tape cannot be detected during multi-color printing. •This message appears if a character, symbol, return or new block is entered while the cursor is located in a bar code field.
ERROR MESSAGE CUT NOW EJECT CUT TAPE & PRESS RETURN ERROR! ERROR! UL/FRM FIXED SIZE! INPUT ABCD AT BEING & END INPUT WHOLE CODE CAUSE REMEDY •This message appears after a label has been printed with the Cut pause mode on or before multi-color printing if the end of the tape is incorrectly positioned. •This message appears when the tape has been cut, but it not removed. •This message appears if you try printing in Interface mode without installing the correct tape cassette.
ERROR MESSAGE INSTALL COLOR TAPE! INTERFACE ERROR! INVAL. CHRS! KEY ERROR -XX- 122 CAUSE REMEDY •This message appears if a multi-color cassette is not installed while assigning the color settings or during multicolor printing. •This message appears if a error occurs while data is being transmitted from the computer to this unit in interface mode. •Numbering fields must be located within a single line. This message appears if characters in different lines are selected as the numbering field.
ERROR MASSAGE LENGTH LIMIT! LINE LIMIT! MEMORY FULL! NO FILES! NO TAPE! CAUSE REMEDY •The length of one label message is limited to one meter. This message appears if a character, symbol, diacritical mark, bar code, space, return or new block is entered, causing the text to exceed the one meter limit. •Delete some of the text or reduce the character size. •This message appears if the entered text exceeds the one meter limit when the power is turned on or while trying to print.
ERROR MESSAGE NUMBERING BUFFER FULL OPEN THE COVER! RAM PROBLEM! REPLACE BATTERIES! ROM PROBLEM! SYSTEM ERROR! TOO HIGH! TOO LONG! WRONG SELECT 124 CAUSE •This message appears if the RETURN key is pressed in Seq. numbering mode when the working area buffer is already full. •This message appears when the tape compartment cover is closed while rewinding the tape during multi-color printing. •This message appears if there is a problem with the machine’s random access memory.
PROBLEM 1. The display stays blank after you have turned on the machine or abnormal characters are displayed. REMEDY •Check that the AC adaptor is attached properly. •If you are using alkaline batteries, check that they are properly inserted. •If the batteries are low, replace them. 2. The machine does not print or the printed characters are blurred. •Hold down CODE and R keys and press the ON/OFF key twice to reset the machine. The display and all contents of the memory are also deleted.
HARDWARE Input device: KEYBOARD - 63 keys LCD 112 x 32 dots 19 indicators Print tape Pressure-sensitive, adhesive-based 5 widths available: 1/4” (6 mm) 3/8” (9 mm) 1/2“ (12 mm) 3/4” (18 mm) 1” (24 mm) Power supply: 6 AA alkaline batteries (optional AC adaptor model AD-30) Auto power off not key if pressed within 5 minutes or if the machine is not used for 10 minutes during Interface mode.
The P-touch 580C features the following: • WYSIWYG display • Multi-color printing • Stamp creating • Auto format • Multi-line printing (up to 5 lines) • Multi-block printing (up to 5 blocks) • 6 sizes & 14 styles • Text and label framing • Text underlining • Vertical printing • Mirror printing • Horizontal & vertical alignment adjustment • Adjustable tape feed • Label length setting • Repeat printing • Split printing • Numbering function • Bar code generation • Zooming in and out 127
A AC adaptor ...................................... 8, 10, 48 Accented characters ..................................54 Accessories............................................. 132 Alignment Horizontal .............................................97 Vertical .................................................98 ALT key.....................................................50 AREA key..................................................75 AUTO FORMATS key................................69 Automatic backup ..........
Vertical printing .....................................95 Width....................................................81 Deleting Stored labels....................................... 108 Symbols ...............................................64 Text................................................ 63, 64 Working area text..................................65 Diacritical marks ........................................54 Displaying Final layout ...........................................66 Label length.............
Bar codes ..................................... 58, 115 Symbols ...............................................58 O On/Off button.............................................19 Outline character style ...............................83 Overwriting with recalled text.................... 106 P Pause printing ...........................................32 Power button ....................................... 19, 48 Precautions .................................................8 Print head........................
Units ....................................................... 100 Uppercase letters ......................................20 V Vertical alignment ......................................98 Vertical printing..........................................95 Viewing Final layout ...........................................66 Label length..........................................67 W Width ........................................................81 Working area text Joining.............................................
Obtain tape cassettes and AC adaptors from your nearest authorized dealer Brother cannot be held responsible for trouble caused by use of unauthorized supplies. Use only Brother TZ tapes with this machine. Do not use tape that do not have the TZ mark. Stock No.
Stock No.
SUPPLIES ORDER FORM Dear Customer: Please send this order, along with proper payment, to the address below, OR, Visa, MasterCard or Discover holders, call toll free, 1-800-284-4357, or fax your completed order form to 1-800-947-1445 Stock No.
SUPPLIES ORDER FORM Dear Customer: Please send this order, along with proper payment, to the address below, OR, Visa, MasterCard or Discover holders, call toll free, 1-800-284-4357, or fax your completed order form to 1-800-947-1445 Stock No.
GUÍA DEL USUARIO
¡Muchas gracias por la adquisición del P-Touch 580C! Su nuevo P-Touch le permitirá diseñar e imprimir etiquetas para cuaquier aplicación. Como es extremadamente versátil, usted podrá crear caracters de muchos tamaños y estilos. Además, utilizando la amplia variedad de cassettes de cinta disponnibles, podrá imprimir etiquetas con anchuras diferentes y hermosos colores. Usted ya no tendrá que preocuparse por tareas urgentes que requieran impresión profesional.
PRECAUCIONES GENERALES .....................................................................................2 FUENTE DE ALIMENTACIÓN/ADAPTADOR DE CA (OPCIONAL) ...............................3 CONEXION CON UN ORDENADOR ..............................................................................4 CASSETTES DE CINTA..................................................................................................5 LIMPIEZA DEL CABEZAL DE IMPRESIÓN .............................................................
• Utilice solamente cintas TZ Brother con esta máquina. No use cintas que no posean la marca TZ. • Exiten cinco anchuras de cintas TZ disponibles: 1/4” (6 mm), 3/8” (9 mm), 1/ 2” (12 mm), 3/4” (18 mm), y 1” (24 mm). • No tire de la cita. Esto podría dañar el cassette. • Evite utilizar la máquina en lugares extremadamente polvorientos. Manténgala alejada de la luz solar directa y de la lluvia. • No exponga la máquina a altas temperaturas ni a gran humedad.
Ésta es una máquina ligera y portátil. Podrá utilizarse en cualquier parte insertándole seis (6) pilas alcalinas AA. Cuando cambie las pilas, reemplácelas todos simpre al mismo tiempo.
Esta máquina está provista de una toma que permite imprimir sellos y etiquetas que usted haya creado con le programa P-Touch EDITOR instalado en su ordenador IBM o compatible. PARA CONECTAR EL ORDENADOR: (1) Asegúrese de que el P-Touch 580C y el ordenador tengan la alimentación desconectada. (2) Inserte la clavija pequeña del cable de conexión en la toma marcada con la palabra INTERFACE del lado derecho del P-Touch 580C. (3) Inserte la clavija grande en el acceso COM de su orrdenador IBM.
Con esta unidad se suministra un solo cassette de cinta TZ. Como las cintas para esta máquina están disponibles en una amplia variedad de colores de fondo, colores de caracteres, y tamaños de cintas, podrá hacer rápida y fácilmente los cassettes de cinta. PARA INSERTAR UN CASSETTE DE CINTA TZ: (1) Presione hacia abajo el botón liberador de la cubierta y levante la tapa del compartimiento para abrirlo. (2) Si ya hay un cassette de cinta en el compartimiento, extráigalo tirando de él hacia arriba.
PARA INSERTAR CASSETTES DE CINTA Y DE TINTA DE COLORES MÚLTIPLES: (1) Presione hacia abajo el botón liberador de la cubierta y levante la tape del compartimiento para abrirlo. (2) Si ya hay un cassette de cinta enel compartimiento, extráigalo tirando de el hacia arriba. (3) Si la cinta del cassette de tinta está floja, bobine con el dedo la rueda dentoda en la dirección de la flecha del cassette de cinta hasta que la cinta esté tensa.
Si se rebobina demasiada cinta en el cassette: (1) Extraiga la cinta y los cassettes de cinta de la máquina y extraiga luego el cassette de tinta del cassette de la cinta. (2) Use el dedo para guiar la cinta en la caja del cassette. + Si queda poca cinta en el cassette, tire un poco de la cinta y póngala en la ranura con los dedos. (3) Use el dedo para guiar el extremo de la cinta por la ranura y en torno a la caja del cassette. (4) Deslice la cinta por debajo de las guías de cinta.
Es posible que a veces se adhieran motas de polvo y suciedad al cabezal de inpresión o a los rodillos de la máquina. Esto puede suceder especialmente cuando utilice la unidad en exteriores o en un ambiente muy polvoriento. Cuando ocurra esto, el elemento de impresión obscurecido por el polvo no pordá imprimir, causando una línea sin imprimir (en blanco) a lo largo de la etiqueta.
La mayoría de los caracteres podrán introducirse pulsando simplemente sus teclas. Sin embargo, para introducir mayúsculas, caracteres con acentos, y algunos de los Símbolos más comunes, son necesarias ares teclas especiales. TECLA SHIFT: Esta tecla el permitirá escribir los símbolos situados en la parte Superior de las teclas y letras mayúsculas. Sin embargo, los símbolos y las mayúsculas indicados en rojo tendrán que introducirse en el modo ALT.
Esta máquina posee muchas y símbolos especiales que podrá introducir en su texto. Cuando los introduzca, actuarán como los caracteres normales y podrán editar y borrarse. Aunque puede encontrar varios símbolos escritos en las teclas, en el modo SYMBOL están disponibles 126 marcas adicionales. PARA INTRODUCIR UN SÍMBOLO NO ESCRITO EN UNA TECLA: (1) Mantenga presionada la tecla CODE y pulse la tecla SYMBOL para entrar en el modo SYMBOL.
La función de numeración de esta máquina le permitirá designar un grupo de números y letras o un código de barras como campo de “numeración” e imprimir un juego de etiquetas en el que campo de numeración aumentará automáticamente en 1 después de haberse impreso una etiqueta. PARA DESIGNAR UNA PARTE DE TEXTO COMO CAMPO DE NUMERACIÓN: (1) Coloque el cursor frente al primer carácter (número o letra) o el código de barras que desee incluir en el campo.
Después de haber creado un mensaje, moviendo el cursor podrá ver o editar diferentes partes del texto. En general, al pulsar esta tecla, el cursor se moverá un espacio o un carácter hacia la izquierda. Si el cursor está colocado al comienzo de una línea cuando pulse esta tecla, se moverá al final de la línea anterior. Si mantiene presionada la tecla CODE y presiona esta tecla, el cursor se moverá hasta antes del primer carácter del bloque de texto actual.
RETROCESO La tecla BACKSPACE le permitirá eliminar caracteres innecesarios de su mensaje. Difiere de la tecla 3, que simplemente mueve el cursor sin cambiar el mensaje. Sin embargo, la tecla BACKSPACE eliminará el carácter anterior al cursor. PARA BORRAR UN CARÁCTER: (1) Utilizando las teclas de movimiento del cursor, coloque éste inmediatamente a la derecha del carácter que desee borrar. (2) Pulse la tecla BACKSPACE.
El modo ZOOM le permitirá ver cómo aparecerá una etiqueta cuando se imprima alejándolo del texto, o ver con detalle partes del mansaje acercándolas. Usted podrá utilizar las teclas del cursor para mover éste ha fin de poder ver diferentes partes del mensaje. PARA ENTRAR EN EL MODO ZOOM: (1) Pulse la tecla ZOOM y la visualización utilizará el acercamiento con zoom para ampliar el mensaje.
La tecla AUTO FORMATS se encuentra en la esquina inferior izquierda del teclado. Este modo le permitirá introducir rápidamente texto en plantillas de composición a fin de poder imprimir fácilmente etiquetas utilizando los formatos preajustados. PARA IMPRIMIR UNA ETIQUETA UTILIZANDO EL MODO DE FORMATO AUTOMÁTICO: (1) Pulse la tecla AUTO FORMATS. + Si ha se ha introducido texto en el visualizador, aparecerá un mensaje de confirmación. Presione la tecla RETURN para borrar el texto.
Esta máquina dispone de ocho tipos de caracteres, o juegos tipográficos. Los juegos tipográficos son: El ajuste por defecto es el juego tipográfico F1. + Los juegos tipográficos TITLE solamente estarán disponibles si el mensaje consta de una sola línea o si está instalada una cinta de ½” (12 mm), ¾” (18 mm), o de 1” (24 mm). Además, las letras introducidas utilizando un juego tipográfico TITLE solamente aparecerán en mayúsculas.
Existen dos ajustes de tamaño de caracteres: tamaño y anchura. Normalmente, usted deseará utilizar caracteres lo más grandes posible para la cinta y el mensaje dados. Con el tamaño ajustado a AUTO, la máquina comparará su mensaje introducido con el tamaño de la cinta y utilizará automáticamente caracteres lo más grandes posible. Sin embargo, algunas veces, usted deseará asignar un tamaño y una anchura de caracteres particulares.
Existen seis estilos únicos, que pueden combinarse todos con el estilo letra cursiva. Los estilos son: El ajuste por defecto es el estilo normal. (No aparecerá ningún indicador en el visulizador.) + Los caracteres impresos utilizando los tamaños más pequeños pueden ser difíciles de leer si apica ciertos (p. ej., Cursiva y Perfilado + Sombreado). PARA INTRODUCIR TEXTO CON UN ESTILO/CURSIVA DIFERENTE: (1) Inserte el cursor donde desee comenzar a utilizar un nuevo estilo de caracteres.
Los caracteres seleccionados de su mensaje podrán resaltarse enciadrándolos con un recuadro, con un recuadro redondeado, subrayándolos, techándolos o poniéndolos delante de un patrón sombreado. Los tipos de resulte son: El ajuste por defecto es ausencia de subrayado y de encuadre. + Cuando elimine todo el mensaje de texto del xisualizador con la tecla CLEAR, este formato volverá a su ajuste por defecto (sin subrayado y sin encuadre).
Con la función de impresión en colores múltiples, podrá imprimir etiquetas usando hasta tres tintas de colores distintos. La función es útil cuando parte de su mensaje debe resaltar o cuando se requieren etiquetas de codificación por colores. El color de ajuste por defecto es el COLOR 1. + Cuando se almacena un mensaje en la memoria, el orden en el que se imprimen los caracteres también se almacenará.
(5) Repita los pasos (2) y (3) para resaltar la serie de caracteres que desee imprimir usando el tercer color. (6) Presione la tecla COLOR hasta que se visualice COLOR3 y se encienda el indicador C3, y presione entonces la tecla RETURN. Estos caracteres se imprimirán usando la tinta del tercer color. + Los indicadores C2 y C3 muestran el color que ha sido asignado al carácter que está a la izquierda del cursor. Si no hay ningún indicador encendido, significa que se ha asignado el primer color.
Usted podrá crear etiquetas exclusivas encuadrando todo su mensaje utilizando uno de los muchos encuadres disponibles. Los tipos de encuadres son: + Este ajuste de encuadre solamente podrá aplicarse a toda la etiqueta. No podrá aplicarse solamente a una parte de texto.
Esta máquina podrá ajustarse para que deje márgenes iguales o entre 1/6” (4 mm) y 1” (24 mm) a los lados izquierdo y derecho de su etiqueta. Los ajustes de avance de cinta son: FULL 1”(24 mm) NONE 1/6”(4 mm) NARROW 1/3”(8 mm) MEDIUM 1/2”(12 mm) + Como la reducción del avance de la cinta puede disminuir la legibilidad del código de barras, se recomienda el avance completo de la cinta cuando los mensajes incluyan códigos de barras.
Los caracteres de su mensaje pueden imprimirse con orientación vertical. + La impresión vertical no podrá utilizarse cuando se esté usando un juego de caracteres TITLE. La impresión vertical solamente podrá aplicarse a toda la etiqueta. No podrá utilizarse en una parte solamente del texto. PARA AJUSTAR LA FUNCIÓN DE IMPRESIÓN VERTICAL: (1) Pulse la tecla FORMAT. (2) Pulse las teclas 4 y 3 hasta que se realce el ajuste de impresión vertical (VERT).
Los caracteres de los bloques de su mensaje podrán alinearse horizontalmente en cualquieera de las cuatro formas siguientes: LEFT (Izquierda) CENTER (Centro) RIGTH (Derecha) JUSTIFY (Justificación) + La alineación horizontal solamente podrá aplicarse a toda la etiqueta.No podrá utilizarse en una parte sollamente del texto.
La longitud de la etiqueta podrá ajustarse utilizando dos métodos diferentes. Con le tamaño en AUTO, la máquina comparará el menaje introducido con el tamaño de la cinta y ajustará automáticamente la longitud de la etiqueta para que quepa su menaje. Sin embargo, algunas veces usted puede desear asignar una longitud de etiqueta específica independientemente del tamaño del mensaje. La longitud de la etiqueta podrá ajustarse de 1,5” (3,8 cm) a 11,3” (28,7 cm).
El encuadre o sombreado de la etiqueta podrá asignarse en una de las tres tintas de colores usadas durante la impresión en colores múltiples. COLOR1 COLOR2 COLOR3 + Antes de imprimir la etiqueta, asegúrese de que haya cinta suficiente en el cassette y que se haya seleccionado el ajuste para la función C. FRAME. Los ajustes de impresión en color asignados usando esta función son los mismos ajustes usados en la inpresión de colores múltiples y con la función C. CHAR. El ajuste de C.
Cuando se impriman etiquetas de colores múltiples con estilos de caracteres tales como perfilado, sólido o sombreado, los resaltes de los caracteres podrán rellenarse usando una tinta de un color que sea distinto al asignado para el carácter. OFF COLOR1 COLOR2 COLOR3 + Antes de imprimir la etiqueta, asegúrese de que haya cinta suficiente en el cassette y que se haya seleccionado el ajuste para la función C. CHAR.
La memoria de la máquina podrá utilizarse para almacenar e invocar los mensajes de texto más frecuentemente utilizados. Estos mensajes permanecerán en la memoria, incluso aunque borre el área de trabajo manteniendo presionada el tecla CODE y pulsando la tecla CLEAR. Cuando almacene, a cada archivo se le asignará un número para facilitar su invocación. Los números de archivo son entre 0 y 99. La memoria de esta máquina puede almacenar hasta 3.400 caracteres.
+ Si no hay texto en el área de trabajo, el archivo se invocará. Si hay cierto texto en el parea de trabajo, la máquina le preguntará si desea enlazar o reescribir el texto con el del archivo invocado. Para reemplazar el texto del área de trabajo por el del archivo invocado: (4) Pulse las teclas 5 y 6 hasta que en el área de selección JOIN se visualice OFF. (5) Pulse la tecla RETURN. El archivo de texto almacenado se invocará y reescribirá sobre el mensaje del área de trabajo.
La tecla PRINT le permitirá imprimir su texto en la cinta instalada. La tecla SPECIAL PRINT le permitirá indicar el número de copias de la etiqueta que desea imprimir, decidir si la máquina realizará una pausa o no entre copias a fin de cortar la cinta, y activar desactivar la función de impresión dividida.
(3) Pulse las teclas 5 y 6 hasta que se visualice el ajuste deseado. Cuando esté ajustando el parámetro COPIES y presione una vez estas teclas, el ajuste cambiará a 1. Sin embargo, si mantiene presionada cualquiera de estas teclas, el ajuste continuará cambiando en pasos de 5 hasta que la suelte.
Este modo le permite hacer sellos de forma rápida y fácil para cualquier aplicación. Después de imprimir el sello, coloque la cinta cortada a un portasellos para poderlo emplear con frecuencia. Puesto que el portasello es reutilizable, podrá hacer un sello nuevo y cambiarlo por otro que haya en el portasellos. PARA HACER UN SELLO: (1) Escriba el texto, abra la cubierta del compartimiento de la cinta, inserte un cassette de sello, y cierre la cubierta.
La función de código de barras, que permite imprimir códigos de barras como parte de etiquetas, es una de las características más avanzadas de esta máquina. + En esta sección se exlica cómo introducir un código de barras en su mensaje de texto. No se pretende ofrecer una introducción al consepto de codificación con barras. Para más información, consulte uno de los muchos libros de referencia existentes.
PARA INTRODUCIR UN CÓDIGO DE BARRAS EN SU MENSAJE: (1) Mantenga presionada la tecla CODE y pulse la tecla BAR CODE. Si el cursor se encuentra en un código de barras ya introducido, se visualizaràn los ajustes del código de barras actual. (2) Introduzca los datos del código de barras. Si desea editar un código de barras existente, introduzca los nuevos datos. Para editar ajustas de códigos de barras: (3) Pulse la tecla FORMAT. (4) Pulse las teclas 4 y 3 hasta que se realce el ajuste que desee cambiar.
VALOR CARÁCTER VALOR CARÁCTER 70 ACK 88 CAN VALOR CARÁCTER Lo símbolos siguientes solamente podrán introducirse utilizando protocolos CODE 39 o CODABAR. VALOR CARÁCTER 1 2 + $ (9) Cuando haya finalizado, pulse la tecla RETURN. PARA DESIGNAR UN CÓDIGO DE BARRAS COMO CAMPO DE NUMERACIÓN: (1) Coloque el cursor inmediatamente antes de la marca de código de barras que desee seleccionar como campo de numeración. (2) Mantenga presionada la tecla CODE, y pulse la tecla SEQ. NUMBERING.
MENSAJE DE ERROR 4 DIGIT MIN. 5 BARS LIMIT! 5 LINE LIMIT! 5 BLOCK LIMIT! CAUSA SOLUCIÓN •En un código de barras habrá que introducir un mínimo de cuatro dígitos. Este mensaje aparecerá cuando haya introducido menos de cuarto dígitos. •Cada etiqueta no podrá contener más de cinco códigos de barras.
MENSAJE DE ERROR BATTERIES WEAK BUFFER EMPTY! BUFFER FULL! 38 CAUSA •Este mensaje aparecerá cuando las pilas alcalinas instaladas se debiliten. •Este mensaje aparecerá si pulsa la tecla LABEL LENGTH, AREA o SEQ. NUMBERING cuando la memoria intermedia del área de trabajo esté vacía. SOLUCIÓN •Reemplace las pilas o utilice el adaptador de CA. •Introduzca algún texto antes de entrar en el modo de longitud de la etiqueta, área, o numeración.
MENSAJE DE ERROR CANCELED DATA! PRESS ANY KEY CAN’T DELETE TAPE EDGE! CAUSA •Este mensaje aparecerá si se presiona la tecla CANCEL mientras se están transmitiendo datos desde el ordenador a esta unidad en el modo de interfaz. • Este mensaje aparecerá si no puede detectarse el fin de la cinta SOLUCIÓN •Presione cualquier tecla que no se CODE, SHIFT, ALT o CAPS, y vuélvalo a intenar.
MENSAJE DE ERROR CUT NOW EJECT CUT TAPE & PRESS RETURN ERROR! ERROR! UL/FRM FIXED SIZE! INPUT ABCD AT BEING & END INPUT WHOLE CODE 40 CAUSA SOLUCIÓN •Este mensaje aparecerá si después de haberse impreso una etiqueta con el modo de pausa de corte o en impresión de colores múltiples si el final de la cinta está incorrectamente situado. •Este mensaje aparecerá cuando se haya cortado la cinta, pero no se haya sacado.
MENSAJE DE ERROR INSTALL COLOR TAPE! INTERFACE ERROR! INVAL. CHRS! KEY ERROR -XX- CAUSA SOLUCIÓN •Este mensaje aparecerá si no se ha instalado un cassette de colores múltiples de colores o durante la impresión en colores múltiples. •Este mensaje aparecerá si ocurre un error mientras se están transmitiendo datos desde el ordenador a esta unidad en el modo de interfaz. •Los campos de numeración deberán encontrarse dentro de una sola línea.
MENSAJE DE ERROR LENGTH LIMIT! LINE LIMIT! MEMORY FULL! NO FILES! NO TAPE! 42 CAUSA SOLUCIÓN •La longitud de un mensaje de etiqueta está limitado a un metro. Este mensaje aparecerá si introduce un carácter, un símbolo, una merca diacrítica, un código de barras, un espacio, un retorno, o un nuevo bloque que haga que el texto sobrepase el límite de un metro. •Borre algo de texto o reduzca el tamaño de los caracteres.
MENSAJE DE ERROR NUMBERING BUFFER FULL OPEN THE COVER! RAM PROBLEM! REPLACE BATTERIES! ROM PROBLEM! SYSTEM ERROR! TOO HIGH! TOO LONG! WRONG SELECT CAUSA SOLUCIÓN •Este mensaje aparecerá si pulsa la tecla RETURN en el modo de numeración cuando la memoria intermedia del área de trabajo esté llena. •Este mensaje aparecerá cuando se cierre la cubierta del compartimiento de la cinta mientras se rebobina la cinta durante la impresión en colores múltiples.
HARDWARE Dispositivo de entrada de datos: TECLADO - 63 teclas LCD: 112 x 32 puntos 19 indicadores Cinta de impresión: Sensible a la presión con base adhesiva (cintas TZ Solamente) 8 m de longitud.
Adquiera los cassettes de cinta y los adaptadores de CA a un distribuidor autorizado. Brother no asumirá ningún tipo de responsabilidad por los problemas causados por la utilización de suministros no autorizados. Utilice solamente cintas TZ Brother con esta máquina. No use cintas que no posean la marca TZ. Num.
Num.
UN342001 Printed in Japan