
Installation Instructions

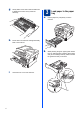
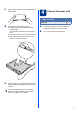

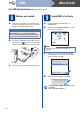
Table Of Contents
- Quick Setup Guide DCP-7055/DCP-7057/DCP-7060D/DCP-7065DN
- Start Here
- For USB Interface Users (Windows® 2000 Professional/XP/XP Professional x64 Edition/Windows Vista®/Windows® 7)
- For USB Interface Users (Mac OS X 10.4.11 - 10.6.x)
- For Wired Network Interface Users (DCP-7065DN only) (Windows® 2000 Professional/XP/XP Professional x64 Edition/Windows Vista®/Windows® 7)
- For Wired Network Interface Users (DCP-7065DN only) (Mac OS X 10.4.11 - 10.6.x)
- For Network Users (DCP-7065DN only)
- Other Information
- Consumables
- brother UK/IRE

5
c Fan the stack of paper well to avoid paper jams
and misfeeds.
d Put paper in the tray and make sure:
The paper is below the maximum paper
mark (bbb) a.
Over filling the paper tray will cause paper
jams.
The side to be printed on must be face down.
The paper guides touch the sides of the
paper so it will feed correctly.
e Put the paper tray firmly back in the machine.
Make sure that it is completely inserted into the
machine.
4
Connect the power cord
a Connect the AC power cord to the machine,
and then plug it into an electrical socket.
b Turn on the machine’s power switch.
For more information about recommended
paper, see Recommended paper and print
media in the Basic User’s Guide.
1
IMPORTANT
DO NOT connect the interface
cable yet.