
User Manual

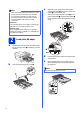
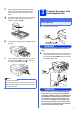
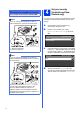
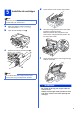
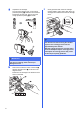
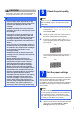
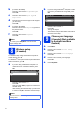
Table Of Contents
- Quick Setup Guide MFC-J6510DW MFC-J6710DW
- Start Here
- 1 Unpack the machine and check the components
- 2 Load plain A4 paper
- 3 Connect the power cord and telephone line
- 4 Set your country (Australia and New Zealand only)
- 5 Install the ink cartridges
- 6 Check the print quality
- 7 Set the paper settings
- 8 Wireless setup (if needed)
- 9 Choose your language (if needed) (Not available in Australia and New Zealand)
- 10 Choose a Receive Mode
- 11 Set the date and time
- 12 Enter personal information (Station ID)
- 13 Fax Transmission Report
- 14 Set Tone or Pulse dialling mode (Not available in New Zealand)
- 15 Set the telephone line compatibility
- 16 Manual Feed Slot
- 17 Choose your connection type
- For USB interface users (Windows® 2000 Professional/XP Home/XP Professional/Windows Vista®/Windows® 7)
- For USB interface users (Mac OS X 10.4.11, 10.5.x, 10.6.x)
- For wired network interface users (Windows® 2000 Professional/XP Home/XP Professional/Windows Vista®/Windows® 7)
- For wired network interface users (Mac OS X 10.4.11, 10.5.x, 10.6.x)
- For wireless network interface users
- 18 Before you begin
- 19 Choose your wireless setup method
- 20 Manual setup from the control panel using the Setup Wizard (Macintosh, Mobile Devices and Windows®)
- 20 One-push Setup using WPS or AOSS™ (Windows® and Macintosh)
- Troubleshooting
- Install the drivers & software (Windows® 2000 Professional/XP Home/XP Professional/Windows Vista®/Windows® 7)
- Install the drivers & software (Mac OS X 10.4.11, 10.5.x, 10.6.x)
- Install Optional Applications Windows®
- For Network Users
- Consumables
- brother ARL/ASA/NZ
- Start Here

4
4
Set your country
(Australia and New
Zealand only)
You must set your country so that the machine works
correctly on local telecommunication lines in each
country.
a Check that the power is turned on by
connecting in the power cord.
b Press a or b to choose your country
(Australia or New Zealand), and press
OK.
c
If the LCD shows the correct country, press
a
or
b
to select
Yes
, and press
OK
. Then go to step
d
.
Or press
a
or
b
to select
No
, and press
OK
. Then
go back to step
b
and choose the country again.
d
After the LCD shows
Accepted
for a few
seconds, the machine will restart automatically.
After the restart, the LCD shows
Please Wait
.
IMPORTANT
The telephone line cord MUST be connected
to the socket on the machine marked LINE.
Note
If you are sharing one telephone line with an
external telephone, connect it as shown below.
1 Extension telephone
2 External telephone
Note
If you are sharing one telephone line with an
external telephone answering machine, connect it
as shown below.
Set the receive mode to External TAD if you
have an external answering machine. See
Choose a Receive Mode on page 9. For
additional details, see Connecting an external
TAD (telephone answering device) in chapter 6 of
the Basic User’s Guide.
1
2
OK
Set Country
Set Country
Australia
New Zealand
Select & Press
OK
OK
Australia
Australia
Yes
No
Select & Press
OK