
User Manual

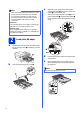
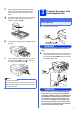
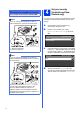
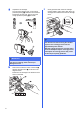
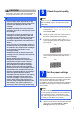
Table Of Contents
- Quick Setup Guide MFC-J6510DW MFC-J6710DW
- Start Here
- 1 Unpack the machine and check the components
- 2 Load plain A4 paper
- 3 Connect the power cord and telephone line
- 4 Set your country (Australia and New Zealand only)
- 5 Install the ink cartridges
- 6 Check the print quality
- 7 Set the paper settings
- 8 Wireless setup (if needed)
- 9 Choose your language (if needed) (Not available in Australia and New Zealand)
- 10 Choose a Receive Mode
- 11 Set the date and time
- 12 Enter personal information (Station ID)
- 13 Fax Transmission Report
- 14 Set Tone or Pulse dialling mode (Not available in New Zealand)
- 15 Set the telephone line compatibility
- 16 Manual Feed Slot
- 17 Choose your connection type
- For USB interface users (Windows® 2000 Professional/XP Home/XP Professional/Windows Vista®/Windows® 7)
- For USB interface users (Mac OS X 10.4.11, 10.5.x, 10.6.x)
- For wired network interface users (Windows® 2000 Professional/XP Home/XP Professional/Windows Vista®/Windows® 7)
- For wired network interface users (Mac OS X 10.4.11, 10.5.x, 10.6.x)
- For wireless network interface users
- 18 Before you begin
- 19 Choose your wireless setup method
- 20 Manual setup from the control panel using the Setup Wizard (Macintosh, Mobile Devices and Windows®)
- 20 One-push Setup using WPS or AOSS™ (Windows® and Macintosh)
- Troubleshooting
- Install the drivers & software (Windows® 2000 Professional/XP Home/XP Professional/Windows Vista®/Windows® 7)
- Install the drivers & software (Mac OS X 10.4.11, 10.5.x, 10.6.x)
- Install Optional Applications Windows®
- For Network Users
- Consumables
- brother ARL/ASA/NZ
- Start Here

6
g Unpack the ink cartridge.
Turn the green release lever on the orange
protective packing a clockwise until it clicks to
release the vacuum seal. Then remove the
orange protective packing a as shown.
h Take care to match the colour of the lever a
with the cartridge colour b, as shown in the
diagram below.
Install each ink cartridge in the direction of the
arrow on the label.
i Gently push the back of the ink cartridge
marked “PUSH” until it clicks. After all the ink
cartridges are installed close the ink cartridge
cover.
IMPORTANT
DO NOT shake the ink cartridges. If ink stains
your skin or clothing, wash with soap or
detergent at once.
1
11
1
2
IMPORTANT
After initial installation of the ink cartridges,
the machine will start cleaning the ink tube
system. This cleaning process will last
approximately four minutes.
DO NOT unplug the machine from the power
outlet or attempt to stop the cleaning process.
Interruption of cleaning process may cause
undesired print quality problems.