800/1810 USER’S GUIDE • Read this User’s Guide before you start using your P-touch. • Keep this User’s Guide in a handy place for future reference.
INTRODUCTION Thank you for purchasing the P-touch 1800/1810! Your new P-touch will allow you to create labels and stamps for any need. Its versatility enables you to design custom labels by choosing from a variety of frame designs and from many characters sizes and styles. In addition, the four tape widths (1/4” (6 mm), 3/8” (9 mm), 1/2” (12 mm), and 3/4” (18 mm)) and variety of tape colors allow you to print personalized labels, useful for color-coded filing.
CONTENTS Getting Started GENERAL DESCRIPTION..................................................................................... 2 GENERAL PRECAUTIONS ................................................................................... 4 BATTERIES........................................................................................................... 5 OPTIONAL AC ADAPTOR .................................................................................. 6 TAPE CASSETTE.....................................
TAPE MARGIN FUNCTION............................................................................... 61 HORIZONTAL ALIGNMENT FUNCTION.......................................................... 63 MIRROR PRINTING FUNCTION ....................................................................... 64 LENGTH FUNCTION ........................................................................................ 65 PRINT KEY & FEED FUNCTION ........................................................................
Getting Started 1
GENERAL DESCRIPTION TOP VIEW Tape cutter lever Keyboard Tape compartment cover AC adaptor connector LCD display BOTTOM VIEW Tape exit slot Battery compartment cover 2
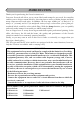
KEYBOARD & LCD DISPLAY Power key Auto Length Underline Frame Mirror Font 1 Font 2 On Off Print Memory Font Size ! 1 ¡ @ 2 Style # 3 $ 4 Tab Length Tab Q Symbol Width W Underline % 5 Tape Align E R Store Frame ¢ 6 Length Recall & 7 A.Format T Y M.Del *8 Stamp U ) 0 Repeat I ü Line out ( 9 Clear Del Number O í P ó á Accent A Alt S D F G H J ¿ K L é : ; " ú Caps Shift Z C X Ç Vç Feed Code B N Ñ M ñ / , - ? .
GENERAL PRECAUTIONS • • • • • • • • • • • • • 4 Use only Brother TZ tapes with this machine. Do not use tapes that do not have the mark. Do not pull on the tape being fed from the P-Touch. This may damage the tape cassette. Do not use the machine in dusty places, and keep it out of both direct sunlight and rain. Do not expose the machine to high temperatures or high humidity. Never leave it on the dashboard or in the back of your car.
BATTERIES This lightweight and portable machine can be used anywhere by installing six (6) AA alkaline batteries. When you change the batteries, always replace all six at the same time. To change the batteries: 1 Remove the battery compartment cover on the back of the machine. 2 If batteries are already installed, remove them. 3 Insert six new AA alkaline batteries, making sure that they face the correct direction. 4 Attach the battery compartment cover.
OPTIONAL AC ADAPTOR The AC adaptor (model AD-60) allows you to use this machine wherever there is an electrical outlet. To connect the optional AC adaptor: 1 Insert the plug on the adaptor cord into the connector marked DC IN 9.5V on the right side of the machine. 2 Insert the plug on the adaptor into the nearest standard electrical outlet. ☞ 6 Only use the AC adaptor designed exclusively for this machine.
TAPE CASSETTE A single TZ tape cassette is supplied with this unit. However, since TZ tape cassettes are available for this machine in a wide variety of colors and sizes, it is possible to make distinctive color-coded and stylized labels. In addition, this machine has been designed to allow you to change the tape cassettes quickly and easily. To change the tape cassette: 1 Lift open the tape compartment cover. The installed cassette is also released.
ATTACHING LABELS LAMINATED TAPE The enclosed stick enables you to easily remove the backing from labels printed on laminated tapes. 1 Hold the tape in your left hand, with the printed surface facing up, and hold the stick in your right hand. 2 Pass the tape halfway through the long narrow hole in the stick. 3 Turn the stick three-quarters of a turn towards you and pull the stick away from you as shown below. 4 Peel off the label backing.
PRINT HEAD & ROLLERS Occasionally, specks of dust or dirt become attached to the machine’s print head and rollers. This is particularly likely when you are using the unit outdoors or in a very dusty environment. If a section of the print head is covered with dust, a blank horizontal streak may appear through the label text. Therefore, as with a tape recorder, the machine’s head may need to be cleaned from time to time. To clean the print head and rollers: 1 Turn off the machine.
10
Learning the Ropes 11
DOOR LABEL EXAMPLE After you have inserted the batteries and the enclosed tape cassette as explained in the Getting Started chapter, let’s practice using some of the basic functions of your P-touch. We must first begin by turning on the power to the machine. To turn on the machine: 1 Press in the top right- hand corner of the keyboard. Auto Alt Caps ABCDEFGHIJKL 1: _ Length Underline Frame Font 1 Font 2 The underline in the LCD display is called the “cursor”.
ENTERING THE TEXT Since all of the text will be in capital letters, we will use the Caps mode, which allows us to type capital letters continuously without holding down Caps . To enter Caps mode: 2 Hold down and press Auto Caps once. The Caps indicator on the left side of the display lights up. Alt Caps Length Underline Frame ABCDEFGHIJKL 1: _ Font 1 Font 2 Then, let’s type in the text in the same way that you would type on a typewriter or a computer keyboard.
To add a space: 4 Press Feed . Auto Alt Caps Length Underline Frame ABCDEFGHIJKL 1: M E E T I N G _ Font 1 Font 2 Type the second word, “ROOM”, to finish the text. To type in “ROOM”: Number Align 5 Press once, twice, Auto once. then Alt ☞ Since the text is longer than the LCD display, “ME” moves off the display to the left. Caps Length Underline Frame ABCDEFGHIJKL 1: E T I N G R O O M _ Font 1 Font 2 Now that we are finished entering capital letters, we can exit Caps mode.
PRINTING THE TEXT Several format settings are available, however, in this example we will use the default settings pre-programmed into the machine and print out our label. To print the door label: Mirror 7 Press Auto once. The message “COPIES 1/1” appears while the label is being printed. Alt Caps COPIES 1/ 1 Length Underline Frame Font 1 Font 2 To cut off the door label: 8 Push down on the tape cutter lever.
ADDRESS LABEL EXAMPLE While making the multi-line address label in this example, we will learn how to create more decorative labels using the various format settings. ☞ Three-line labels, such as this address label, can only be printed on either 1/2” (12-mm)- or 3/4” (18-mm)-wide tape. Before entering the new text, we must first erase the text shown in the display from the previous time that the machine was used.
ENTERING THE TEXT Let’s begin by typing in the first row of text, the name “Bill Reynolds”. To type in “Bill Reynolds”: Caps 3 Hold down and press once, then release Auto Alt Caps . Press Caps Length Underline Frame OK TO 1: B i l l _ Repeat once, then 4 Press twice. Font 1 Font 2 Feed . Auto Alt Caps Length Underline Frame OK TO 1: B i l l _ Font 1 Font 2 5 Type in “Reynolds”. ☞ Again, the text is longer than the LCD display. So “Bil” moves off the display to the left.
Now, we can enter the address: 29 South Main St.; Los Angeles, CA 88888. To type in the address: 7 Type “29 South Main St.”, then press Auto . Alt Caps Length Underline Frame 2: 2 9 S o u t h M a 3: _ Font 1 Font 2 8 Type “Los Angeles, CA 88888”. Auto Alt Caps Length Underline Frame 2: i n S t . 3: , C A 8 8 8 8 8 Font 1 Font 2 FORMATTING THE TEXT Now the text has been entered entered as we wish. If it were printed, the standard default settings would be used.
0 While still holding down , continue pressing Auto Font Alt until BRUSSELS is disCaps played, and then release Length Underline Frame FONT BRUSSELS Font 1 Font 2 . To select the ROUND frame setting: A While holding down , Auto Frame press once, and keep held down to display the current frame setting. Alt Caps Font 1 Font 2 B While still holding down , Auto Frame continue pressing until ROUND is displayed, and then release Length Underline Frame FRAME OFF .
Different format settings can be chosen either before or after the text is entered. The procedure shown above can be used to change the other format settings. PRINTING THE TEXT Mirror If we want only one copy of the text, we could just press to print it. However, let’s assume that we have three letters onto which we wish to attach address labels. Therefore, we need to print three copies of the same text. To print three copies of the label: E Hold down and press Auto Repeat once.
H Push down on the tape cutter lever to cut the tape, then use scissors to cut ✂ ✂ along the cutting guide to separate the labels. With these examples, we have covered many of the basic features of your P-touch so that you can begin creating your own customized labels. If you have any questions about any of the functions or keys, refer to the appropriate explanation in the following section.
22
For Your Information 23
POWER KEY The power key ( ) is located in the top right-hand corner of the keyboard. If bat- teries have been installed or the machine has been plugged in using the optional AC adaptor, the previous session’s information is displayed when the machine is turned on. This feature allows you to stop work on a label, turn off the machine, and return to it later without having to re-enter the text. The machine will automatically turn off if no key is pressed within 5 minutes.
CURSOR KEYS The machine’s LCD display shows two rows of 11 characters; however, the text that you create can be up to 99 characters long. You can review and edit your text by using the cursor keys to move the cursor so that different parts are shown in the display. LEFT CURSOR KEY To move the cursor one character to the left: ● Press once. To move the cursor several characters to the left: ● Hold down until the cursor moves to the desired position.
UP CURSOR KEY To move the cursor up to the previous line: ● Press Home once. ☞ If the cursor is in the first line of text, it will move to the beginning of the line. To move the cursor up several lines: ● Hold down Home until the cursor moves to the desired position. To move the cursor to the beginning of the entire text: ● Hold down and press Home . DOWN CURSOR KEY To move the cursor down to the following line: ● Press End once.
CODE, ALT & SHIFT KEYS Most characters can be entered simply by pressing their keys. However, to use special functions or to enter capital letters, accented characters and some symbols, the following special keys are necessary. CODE KEY To use a function printed above a key: ● Hold down and press the key immediately below the desired function. EXAMPLE To start the Symbol function: Auto Alt Caps Length Underline Frame ABCDEFGHIJKL 1: A B C _ Font 1 Font 2 ● Hold down and press Auto Symbol once.
ALT KEY To type in characters printed in color on the right-hand side of the keys: Symbol ● Hold down and press the key of the desired character written in color. The Alt Symbol indicator on the left side of the display lights up while is held down. EXAMPLE To type in “–”: Symbol ● Hold down and press once. The Alt indicator lights up while Symbol is held down.
SHIFT KEY To type in a capital letter or a symbol printed in the top left-hand corner of a key: Caps ● Hold down and press the key of the desired letter or symbol. EXAMPLE To type in “%”: Auto Alt Caps Length Underline Frame ABCDEFGHIJKL 1: 5 _ Font 1 Font 2 Underline Caps ● Hold down and press . Auto Alt Caps ABCDEFGHIJKL 1: 5 % _ Length Underline Frame Font 1 Font 2 Caps The Caps mode is similar to holding down tinuously. To type in many capital letters: .
SPACE KEY Feed The Space key ( ) lets you add blank spaces between characters in your text. It is different from the right cursor key ( ), which just moves the cursor without adding blank spaces. To add a space: Feed ● Press . EXAMPLE To add a space: Auto Alt Caps Length Underline Frame ABCDEFGHIJKL 1: J . _ Font 1 Font 2 Feed ● Press . Auto Alt Caps ABCDEFGHIJKL 1: J .
RETURN KEY Like on a typewriter or word processor, this machine’s return key ( ) is used to end a line of text and start another one. When you have finished entering one line, press the return key to make a new line and move the cursor to it. ☞ A single block can only contain a maximum of three text lines. If you press when the cursor is located in the third line, the error message “3 LINE LIMIT!” will appear.
TAB FUNCTION This function allows you to separate sections of a line of text by adding tabs. This enables you to create perfectly aligned columns without having to type in several spaces. All tabs have the same length and are measured from either the beginning of the line or the previous tab if there is more than one. The tab length can be set between 0.0” and 11.8” (0.0 and 30.0 cm). ☞ The text can contain no more than 50 tabs.
the label shown below will be printed ABC DEF JKLMNOPQRST Margin Tab (2 inch) GHI U Tab (2 inch) Margin EXAMPLE To set the tab length to 1”: 1 Hold down and press Tab Length Auto once. Alt Caps Length Underline Frame TAB LENGTH 2.0inch Font 1 Font 2 2 Press End until 1.0 is displayed. Auto Alt Caps 3 Press Length Underline Frame TAB LENGTH 1.0inch Font 1 Font 2 . To add a tab: ● Hold down and press Auto Tab once. Alt Caps ABCDEFGHIJKL 1: P a r t N o .
DELETE KEY Clear The delete key ( ) allows you to remove characters to the left of the cursor’s current position. It differs from the left cursor key ( ), which only moves the cursor without deleting any characters. The delete key can also be used to quit most functions and return to the previous display without changing the text. Some questions asking you to confirm a command may appear on the LCD display, especially when the function that you have chosen will delete or affect files.
LINE OUT FUNCTION With the Line Out function, you can easily remove an entire line of text. To delete a line of text: 1 Press , , Home or End to position the cursor within the line of text that you wish to delete. Line Out 2 Hold down ☞ and press once. Line Out Each time is pressed while is held down, one line of text is deleted.
CLEAR FUNCTION When clearing the display before entering new text, the Clear function can be used to choose whether all of the text is erased and all format functions (Font, Size, Width, Style, Underline, Frame, Tape margin, Alignment, Tab length, Mirror printing, and Length) are returned to their default settings, or whether just the text is erased. To delete all of the text and return all formats to their default settings: Clear 1 2 Hold down Home Press or End .
3 Press . Auto Length Underline Frame Alt Caps 1: _ Font 1 Font 2 To delete just the text: Clear 1 Hold down 2 Press ☞ 3 and press Home or End . until TEXT ONLY is selected (flashing). Clear To return to the text without erasing anything, press Press . . EXAMPLE To clear just the text: Auto Alt Caps Length Underline Frame 1: S G a r d e n 2: 2 - 3 4 5 - 6 7 8 9 _ Font 1 Font 2 1 Hold down and press Clear .
2 Press End until TEXT ONLY is flashing. Auto Alt Caps Length Underline Frame TEXT&FORMATS TEXT ONLY Font 1 Font 2 3 Press .
ACCENT FUNCTION The Accent function can also be used to add accented characters to your text. Many of these characters can also be typed in using the Symbol function. The accented characters are grouped according to the capital or small letter that they are combined with.
EXAMPLE To add the accented character “É”: 1 Hold down and press Accent . Auto Alt Caps Length Underline Frame a-u/A-U? 1: R E S U M _ Font 1 Font 2 Caps 2 Hold down and press Tape Auto . Alt Caps Length Underline Frame ÈÉËÊ 1: R E S U M _ Font 1 Font 2 3 Press until É flashes. Auto Alt Caps Length Underline Frame ÈÉËÊ 1: R E S U M _ Font 1 Font 2 4 Press .
SYMBOL FUNCTION In addition to the letters, symbols and numerals on the key tops, there are 53 additional marks available with the Symbol function. The following symbols are available: Group Symbol 1 2 Ü Æ æ + × Ã ÷ = 3 ã Ẽ ẽ § 2 3 ☞ ☞ R Õ õ 2 3 ° 4 [ TM ] C 4 5 ♥ ★ To type in a symbol: Symbol 1 Hold down 2 Press Home and press or End . A row of symbols appear in the display. to display different rows of symbols and press or until the desired symbol flashes.
EXAMPLE To add the symbol “ ”: 1 Hold down and press Symbol Auto . Alt Caps üÆæÃã Õõ•° 1: D A N G E R _ Length Underline Frame Font 1 Font 2 2 Press Home or End until the row containing “ ” appears, then press or until Auto Alt “ ” flashes. Caps R Length Underline Frame C 1: D A N G E R _ Font 1 Font 2 3 Press .
AUTO FORMAT FUNCTION With the Auto Format function, you can select from a variety of preset formats perfect for your specific need. This function automatically adjusts the label length, tape margins and holizontal alignment without changing the text or any other formats, allowing you to create labels faster and easier. The following preset formats are available: Auto Format setting DEFAULT Label length setting OFF Tape margin setting FULL Horizontal alignment setting LEFT 3.5”FLOPPY 2.8” (7.
3 Press to apply the selected setting. The Length indicator lights up if any setting other than DEFAULT is selected. ☞ EXAMPLE To select the AUDIO setting: 1 Hold down and press A.Format . Auto Alt Caps Length Underline Frame FORMAT TYPE? DEFAULT Font 1 Font 2 2 Press Home or End until the AUDIO setting is displayed. Auto Alt Caps FORMAT TYPE? AUDIO Font 1 Font 2 3 Press 44 .
STAMP FUNCTION The Stamp function allows you to quickly and easily create your own stamp stencil films for customized stamps. Select this function to automatically center the text and adjust the tape length and margins to a perfect format for the pre-inked stamp film holders. Since the stamp holder is reusable, just make a new stamp stencil film and replace the one in the holder. To make a stamp: 1 Type in the text, and then insert a Medium (3/4” (18-mm)-wide) stamp film cassette.
3 Press . Auto 1: J . S m i t h 2: 1 2 3 4 M a i n S _ Alt Caps Length Underline Frame Font 1 Font 2 Mirror 4 Press . Auto Alt Caps COPIES 1/ 1 Length Underline Frame Font 1 Font 2 5 Push down on the tape cutter lever to cut the stamp stencil film. To affix a stamp: 6 Remove the stamp frame from around the stamp film holder ink pad, one side at a time, then remove the protective seal covering the ink pad and the backing paper from the stamp stencil film.
8 Hold the end of the stamp stencil film in place with your thumb, then pass the tape through the guides while pulling it tight. Guides 9 Fold the other end of the stamp stencil film over the other side of the stamp film holder and hold it in place with your finger. Fold over 0 Fit the stamp frame over the stamp stencil film and push it into place.
A Insert the stamp film holder straight into its cap. ☞ Be sure that the stamp is correctly covered in order to prevent ink spills.
SIZE & WIDTH FUNCTIONS The character size can be adjusted using both the Size and Width functions. Since the character size that can be used depends on the width of the tape, the following table shows the character sizes that can be used with each tape width. Tape widths Sizes (in points) 1/4” (6 mm) 6, 9, 12 3/8” (9 mm) 6, 9, 12, 18 1/2” (12 mm) 6, 9, 12, 18, 24 3/4” (18 mm) 6, 9, 12, 18, 24, 36 The default size setting is AUTO and the default width setting is OFF.
Size setting (in points) Width function OFF Width function ON 24 36 To change the size setting: Size 1 While holding down , press once, and keep held down to dis- play the current size setting. Size 2 While still holding down , continue pressing until the desired size set- ting is displayed and is shown by the size indicator. ☞ 3 50 The current character size setting is also shown by the size indicator above the display. Release to apply the selected size setting to the entire text.
EXAMPLE To select the 24 point size setting: 1 While holding down , Auto Size press once, and keep held down. Alt Caps Length Underline Frame SIZE AUTO Font 1 Font 2 2 While still holding down , Auto Size continue pressing until 24 is displayed. Alt Caps Length Underline Frame SIZE 24 Font 1 Font 2 3 Release . To turn on or off the Width function: Width 1 While holding down , press once, and keep held down to dis- play the current width setting.
EXAMPLE To turn on the Width function: 1 While holding down , Auto Width press once, and keep held down. Alt Caps Length Underline Frame WIDE OFF Font 1 Font 2 2 While still holding down , Auto Width continue pressing displayed. until ON is Alt Caps WIDE ON Font 1 Font 2 3 Release 52 .
STYLE FUNCTION You can choose from nine different character styles to apply to your text. ☞ Characters printed using the smaller sizes may be difficult to read if certain style settings (e.g., I+SHADOW) are selected. The following style settings are available: NORMAL I+BOLD (italic & bold) BOLD I+OUTLINE (italic & outline) OUTLINE I+SHADOW (italic & shadow) SHADOW VERTICAL ITALIC The default style setting is NORMAL.
2 While still holding down , Auto Style continue pressing I+SHADOW is displayed. until Alt Caps STYLE I+SHADOW Font 1 Font 2 3 Release 54 .
REFERENCE Font setting Style setting NORMAL BOLD OUTLINE HELSINKI BRUSSELS Font setting Style setting SHADOW ITALIC I+BOLD HELSINKI BRUSSELS Font setting Style setting I+OUTLINE I+SHADOW VERTICAL HELSINKI BRUSSELS 55
UNDERLINE FUNCTION You can emphasize your text by underlining it. The default underline setting is OFF. When the Underline function is set to ON, the Underline indicator on the right side of the display lights up. ON To turn on or off the Underline function: Underline 1 While holding down , press once, and keep held down to dis- play the current underline setting. Underline 2 While still holding down , continue pressing until the desired under- line setting is displayed.
FONT FUNCTION With the Font function, you can choose one of two fonts for your text. The following font settings are available: HELSINKI and BRUSSELS The default font setting is HELSINKI. The currently selected font setting is always shown by the Font indicators below the display. Refer to Reference at the end of this section for samples of the available settings. To change the font setting: Font 1 While holding down , press once, and keep held down to dis- play the current font setting.
REFERENCE REFERENCE Font setting 58 Font sample Display indicator HELSINKI Font 1 BRUSSELS Font 2
FRAME FUNCTION With the Frame function, you can choose from various frames and highlights to design a more decorative or emphasized label. The following Frame settings are available: OFF, ROUND, CANDY, POINTING, NAMEPLATE, DOT The default frame setting is OFF; however, other settings are also available. When any setting other than OFF is selected, the Frame indicator on the right side of the display lights up. Refer to Reference at the end of this section for samples of the available settings.
REFERENCE REFERENCE Frame setting Frame sample Frame setting OFF POINTING ROUND NAMEPLATE CANDY DOT 60 Frame sample
TAPE MARGIN FUNCTION The Tape margin function allows you to adjust the size of the margins on the left and right sides of your text. The default tape margin setting is FULL; however, three other settings are also available. FULL (1” (25 mm margins)) NONE (no margins) NARROW (1/6” (4 mm margins)) HALF (1/2” (12 mm margins)) ☞ After printing a label using the NONE tape margin setting, hold down press Feed and once to feed the tape before pushing down on the tape cutter lever to cut it.
EXAMPLE To select the HALF tape margin setting: 1 While holding down , Auto Tape press once, and keep held down. Alt Caps Length Underline Frame FEED FULL Font 1 Font 2 2 While still holding down , Auto Tape continue pressing until HALF Alt is displayed. Caps FEED HALF Font 1 Font 2 3 Release 62 .
HORIZONTAL ALIGNMENT FUNCTION You can choose to align the text in one of three ways. In addition, if the Length function was used to set the length of the label, the text will align within the label according to the selected horizontal alignment setting. Three settings exist, as follws. The default setting is LEFT. LEFT CENTER RIGHT To change the horizontal alignment setting: Align 1 While holding down , press once, and keep held down to dis- play the current horizontal alignment setting.
MIRROR PRINTING FUNCTION With this function, you can print your text so that the characters can be read from the tape side of the tape. If mirror-printed labels are attached to glass or some other clear material, they can be read correctly from the opposite side. ☞ When using the Mirror printing function, the text should be printed on clear tape. The default mirror printing setting is OFF.
LENGTH FUNCTION Although the length of the printed label automatically adjusts to fit the length of the entered text, there may be times when you will want to make a label with a specific length. The Length function allows you to set the label length between 1.6” and 11.8” (4.0 cm and 30.0 cm). The default length setting is OFF. When the Length function is set to ON, the Length indicator on the right side of the display lights up.
EXAMPLE To select a label length of 5”: Length 1 While holding down , press once, and keep held down. Auto Alt LENGTH Caps Auto Length Underline Frame inch 2.1 Alt LENGTH Caps Font 1 Font 2 inch OFF Length Underline Frame Font 1 Font 2 2 While still holding down , Auto Length continue pressing until ON is Alt displayed. LENGTH Caps Length Underline Frame inch ON Font 1 Font 2 3 Release . Auto Alt LENGTH Caps Length Underline Frame inch 3.
PRINT KEY & FEED FUNCTION After you have entered your text and chosen the desired format settings, you are ready to print. To print a label: Mirror ● Press once. The message “COPIES” followed by the number of the label being printed is displayed. ☞ If NONE tape setting is selected and the tape is immediately, some printed characters will be cut off. To feed the tape after printing, hold down and Feed once. To feed the tape: Feed ● Hold down and press once. 1” (25 mm) of tape is fed out.
NUMBERING FUNCTION This function can be used to print many copies of the same text while increasing a certain number in the text by 1 after each label is printed. To use the Numbering function: 1 Press , Home , or to position the cursor below the number that End you wish to increase. Number 2 Hold down and press . The message “NUMBER UNTIL 1–9?” appears in the display. Font 3 Press the number key ( ☞ M.Del to ) of the last number that is to be printed.
2 Hold down and press Auto Number . Alt Caps NUMBER UNTIL Length Underline Frame 1–9? Font 1 Font 2 Width 3 Press . Auto Alt Caps NUMBER UNTIL Length Underline Frame 3 Font 1 Font 2 Mirror 4 Press (or ).
REPEAT PRINTING FUNCTION This function allows you to print up to 9 copies of the same text. To use the Repeat printing function: Repeat 1 Hold down and press . The message “COPIES UNTIL 1–9?” appears in the display. Font 2 Press the number key ( ☞ M.Del to ) of the number of labels that you want. Repeat To cancel the Repeat printing, hold down and press (or press Clear just ). Mirror 3 Press (or ) to begin printing the labels.
Width 2 Press . Auto Alt Caps COPIES UNTIL Length Underline Frame 3 Font 1 Font 2 Mirror 3 Press (or ). Auto Alt Caps Auto Length Underline Frame COPIES 1/3 Font 1 Font 2 Alt Caps COPIES 2/3 Length Underline Frame Font 1 Font 2 Auto Alt Caps Length Underline Frame COPIES 3/3 Font 1 Font 2 4 Press down on the tape cutter lever to cut the tape, and then use scissors to ✂ ✂ cut along the cutting guide to separate the labels.
MEMORY FUNCTIONS You can use the memory to store your most frequently used text files. The text remains in the memory, even after all characters are removed from the display using the Clear funcClear tion (holding down and pressing ). When each file is stored, it is given a number to make recalling it easier. Up to 9 text files or about 300 characters can be stored in the memory. Each stored text file can have a maximum of 99 characters.
To overwrite the stored file with the new one: ● Press to delete the previously stored file and store the new one under the selected number. ☞ To go back and choose another file number without overwriting the text file, Clear press , and then press the key of a different file number. RECALLING TEXT To recall a text file: Recall 1 Hold down and press . The message “RECALL SELECT 1–9?” appears on the display. Font 2 Press the key ( M.
Font 2 Press the key ( M.Del to ) of the file number containing the text that you wish to delete. The text stored under the selected file number is shown. ☞ To see other parts of the selected text file, press . or or End , or To display the text stored under other file numbers, press the key of a different file number. To cancel the Memory delete function without deleting the text file, hold Home M.Del down 3 Press and press Clear (or press just ).
Style 2 Press . Auto Alt Caps Length Underline Frame RECALL [4]John Smit Font 1 Font 2 3 Press . Auto Length Underline Frame Alt Caps 1: J _ohn Smith Font 1 Font 2 To delete the text stored under file number 4: 1 Hold down and press Auto M.Del . Alt Caps CLEAR SELECT Length Underline Frame 1–9? Font 1 Font 2 Style 2 Press . Auto Alt Caps Length Underline Frame CLEAR [4]John Smit Font 1 Font 2 3 Press .
TROUBLESHOOTING Problem Remedy 1. The display stays blank after you have turned on the machine. • Check that the AC adaptor is connected correctly. • If you are using alkaline batteries, check that they are correctly inserted. • If the batteries are low, replace them with new ones. 2. The machine does not print or the printed characters are blurred. • Check that the tape cassette has been inserted properly. • If the tape cassette is empty, replace it with a new one.
ERROR MESSAGE LIST Error Message 3 LINE LIMIT! Cause Remedy • This message appears if three lines already exist • Limit the number of lines to three. when you press . BATTERIES WEAK! • This message appears when the installed alkaline batteries become weak. • Replace the batteries or use the AC adaptor. BUFFER EMPTY! • This message appears if • Enter some text before starting the function. you hold down Length and press , but no text has been entered in the display.
Error Message CAN’T HERE! Cause Remedy • This message appears if the cursor is at the end of the text when you hold • Move the cursor below a number before holding down down and press ing Number and press- Number . . CHANGE ADAPTOR • This message appears if a high-voltage adaptor is being used. • Remove the high-voltage adaptor and connect the adaptor designed exclusively for this machine.
Error Message Cause Remedy LINE LIMIT! • This message appears if the number of lines in the text is greater than the maximum number of lines possible for the installed tape. • Reduce the number of lines or install a tape of greater width. MEMORY FULL! • This message appears if you try to store a text file after 300 characters have already been stored in the memory. • Delete an unwanted file to make room for the new one.
Error Message Cause Remedy NO TAPE! • This message appears if you try to print a label or feed the tape when no tape cassette is installed. • Install a tape cassette and try again. TAB LIMIT! • This message appears if 50 tabs have already been added to the text when • Limit the number of tabs in the text to 50. Tab you press . TEXT TOO HIGH! • This message appears if the size of the text is larger than the width of the installed tape.
SPECIFICATIONS HARDWARE Input Device: Keyboard - 51 keys LCD: 7 × 5 dots 12 characters × 2 lines 17 indicators Print Tape: Pressure-sensitive, Adhesive-based 26’ 3” (8 m) long Four widths available: 1/4” (6 mm) 3/8” (9 mm) 1/2” (12 mm) 3/4” (18 mm) Power Supply: Six AA alkaline batteries (AM3, LR6) or optional AC adaptor Auto power-off if no key is pressed for 5 minutes Print Head: 128 dot / 180 dpi Dimensions: 7” (W) × 8 1/16” (D) × 2 23/63” (H) (178 × 205 × 60 mm) Weight: 1.
ACCESSORIES ● Supplies Obtain tape cassettes from your nearest authorized dealer. Use only Brother TZ tapes with this machine. Brother cannot be held responsible for trouble caused by the use of unauthorized supplies. Do not use tapes that do not have the mark. Stock No. Description QTY/ PACKAGE PRICE 1 1 1 1 1 1 1 1 1 1 1 1 1 1 1 1 1 $20.99 $20.99 $20.99 $20.99 $20.99 $24.99 $23.99 $20.99 $20.99 $23.99 $20.99 $20.99 $24.99 $20.99 $23.99 $23.99 $23.99 1 1 1 1 $16.99 $17.99 $17.99 $20.
Stock No. Description QTY/ PACKAGE PRICE 1 1 1 $12.99 $14.99 $17.99 QTY/ PACKAGE PRICE 1 1 $29.99 $24.99 QTY/ PACKAGE PRICE 1 $37.99 1 $24.99 QTY/ PACKAGE PRICE 1 $24.99 1/4” (6mm)-wide laminated tapes TZ-111 TZ-211 TZ-315 Black characters on clear tape Black characters on white tape White characters on black tape Special tapes Stock No. TZ-SE4 TZ-FA3 Description Black characters on 3/4” (18 mm) security tape Blue characters on 1/2” (12 mm) fabric tape Stamp kit Stock No.
84
P-TOUCH ACCESSORY ORDER FORM Dear Customer: This order form is provided for your convenience should your retailer not stock the item(s) needed. To order by mail, send this completed form along with proper payment to the address below OR credit card holders: Call toll-free 1-888-879-3232, fax completed order form to 1-800-947-1445, or visit our web site at http://www.brothermall.com. Please refer to the Accessories listing in your User's Guide for stock no. and price. Stock No.
P-TOUCH ACCESSORY ORDER FORM Dear Customer: This order form is provided for your convenience should your retailer not stock the item(s) needed. To order by mail, send this completed form along with proper payment to the address below OR credit card holders: Call toll-free 1-888-879-3232, fax completed order form to 1-800-947-1445, or visit our web site at http://www.brothermall.com. Please refer to the Accessories listing in your User's Guide for stock no. and price. Stock No.
GUIA DE INSTRUCCIONES
INTRODUCCIÓN Gracias por adquirir una P-Touch 1800. Su nueva P-Touch le permitirá diseñar y crear etiquetas y membretes para cualquier tipo de aplicación. Su versatilidad le permitirá crear etiquetas personales seleccionando distintos diseños de marcos y muchos tamaños y estilos de caracteres.
ÍNDICE PRECAUCIONES GENERALES ............................................................................. 1 PILAS ................................................................................................................... 2 ADAPTADOR DE CA OPCIONAL ....................................................................... 3 CASETES DE CINTA............................................................................................. 4 CABEZAL DE IMPRESIÓN Y RODILLOS....................................
ii
PRECAUCIONES GENERALES • Con esta máquina emplee sólo cintas TZ Brother. No emplee cintas que no tengan la marca . • No tire de la cinta que se alimenta desde la P-Touch. Podría dañar el casete de cinta. • No utilice la máquina en lugares polvorientos, y manténgala alejada de la luz solar directa y la lluvvia. • No exponga la máquina a altas temperaturas ni humedad. No la deje nunca en el tablero de instrumentos ni en la parte trasera de su automóvil.
PILAS Esta máquina ligera y portátil puede utilizarse en cualquier lugar instalando seis (6) pilas alcalinas AA. Cuando cambie las pilas, reemplace siempre las seis pilas al mismo tiempo. Para cambiar las pilas: 1 Extraiga la cubierta del compartimiento de las pilas de la parte posterior de la máquina. 2 Si ya hay pilas instaladas, extráigalas. 3 Inserte seis pilas alcalinas AA nuevas, asegurándose de que quedan orientadas en la dirección correcta. 4 Coloque la cubierta del compartimiento de las pilas.
ADAPTADOR DE CA OPCIONAL El adaptador de CA (modelo AD-60) le permite emplear esta máquina siempre que disponga de una toma de corriente eléctrica. Para conectar el adaptador de CA opcional: 1 Inserte la clavija del adaptador en el conector que tiene la marca DC IN 9.5V al lado derecho de la máquina. 2 Inserte la clavija del adaptador de CA en la toma de corriente más cercana. ☞ Emplee sólo el adaptador de CA diseñado exclusivamente para esta máquina.
CASETES DE CINTA Un casete de TZ se suministra con la unidad. Sin embargo, para esta máquina hay disponibles una amplia gama de casetes de cinta TZ de distintos colores y tamaños, es posible crear etiquetas diferentes codificadas por colores o tamaños. Para cambiar el casete de cinta: 1 Levante la cubierta del compartimiento de la cinta para abrirla. Se libera también entonces el casete instalado. 2 Si ya hay un casete instalado, extráigalo tirando del mismo recto hacia arriba.
CABEZAL DE IMPRESIÓN Y RODILLOS De vez en cuando, motas de polvo o suciedad se adhieren al cabezal de impresión y a los rodillos de la máquina. Suele suceder cuando se emplea la unidad en exteriores o en lugares con mucho polvo. Si alguna parte del cabezal de impresión está cubierta de polvo, es posible que aparezca una franja horizontal blanca por el texto de la etiqueta. Por lo tanto, al igual que con las grabadoras de cintas, el cabezal de la máquina deberá limpiarse de vez en cuando.
COLOCACIÓN DE ETIQUETAS CINTA LAMINADA La varilla suministrada permite que, en las cintas laminadas, usted pueda extraer facilmente el papel del dorso de la etiqueta. 1 Tome la cinta con la mano izquierda, con la superficie impresa arriba, y tome la varilla con la mano derecha. 2 Pase la mitad de la cinta por el orificio estrecho largo de la varilla. 3 Gire tres cuartos de vuelta la varilla hacia usted y separe la varilla de usted como se muestra abajo. 4 Pele el papel del dorso de la etiqueta.
TECLA DEL CURSOR El visualizador de LCD de esta máquina muestra dos filas de 11 caracteres; sin embargo, el texto que usted cree puede tener hasta 99 caracteres de longitud. Podrá revisar y editar el texto empleando las teclas del cursor para moverlo y que muestre las distintas partes en el visualizador. TECLA DEL CURSOR IZQUIERDA Para mover el cursor un carácter hacia la izquierda: ● Presione una vez.
TECLA DEL CURSOR HACIA ABAJO Para mover el cursor a la línea siguiente: ● Presione End una vez. ☞ Si el cursor está en la última línea del texto, se moverá al final de la línea. Para mover el cursor varias líneas hacia abajo: ● Mantenga presionado End hasta que el cursor se mueva a la posición deseada. Para mover el cursor al final de todo el texto: ● Mantenga presionado y presione 8 End .
TECLAS CODE, ALT Y SHIFT La mayoría de los caracteres pueden introducirse simplemente presionando sus teclas. Sin embargo, para emplear funciones especiales o para introducir letras en mayúsculas, caracteres acentuados y algunos símbolos, se requieren las siguientes teclas especiales. TECLA CODE Para emplear una función impresa encima de la tecla: ● Mantenga presionado y presione la tecla que está inmediatamente debajo de la función deseada.
TECLA DE RETORNO Al igual que en una máquina de escribir o procesador de texto, la tecla de retorno ( ) de esta máquina se emplea para poner fin a una línea de texto y empezar otra. Cuando haya terminado de introducir una línea, presione la tecla de retorno para hacer una línea nueva y mover al cursor a la misma. ☞ Un bloque sólo puede contener un máximo de tres líneas de texto. Si presiona cuando el cursor está situado en la tercero línea, aparecerá el mensaje de error “3 LINE LIMIT!”.
TABULACIÓN Esta función le permitirá separar secciones de una línea de texto añadiendo tabulaciones. Esto le permitirá crear columnas perfectamente alineadas sin tener que introducir varios espacios. Todas las tabulaciones tendrán la misma longitud y se medirán desde el comienzo de la línea, o de la tabulación anterior, si es que existe. La longitud de las tabulaciones podrá ajustarse entre 0,0” y 11,8” (0,0 y 30,0 cm). ☞ El texto no podrá contener más de 50 tabulaciones.
Se imprimirá la etiqueta mostrada a continuación.
TECLA DE BORRADO (DEL) Clear La tecla de borrado ( ) le permite eliminar caracteres situados a la izquierda de la posición actual del cursor. Se diferencia de la tecla del cursor izquierda ( ) que sólo mueve el cursor sin borrar ningún carácter. La tecla de borrado también puede utilizarse para abandonar la mayor parte de funciones y volver a la visualización anterior sin cambiar el texto.
FUNCIÓN DE BORRADO DE LÍNEA (LINE OUT) Con la función de borrado de línea, podrá sacar con facilidad una línea entera de texto. Para borrar una línea de texto: Presione , , Home , o texto que usted desee borrar. 1 End para situar el cursor dentro de la línea del Line Out 2 Mantenga presionado ☞ y presione una vez. Line Out Cada vez que se presione mientras se tiene presionado , se borrará una línea de texto.
FUNCIÓN DE ACENTOS La función de acentos también podrá utilizarse para añadir caracteres acentuados al Symbol texto. Muchos de estos caracteres podrán introducirse empleando . Los caracteres acentuados se agrupan de acuerdo con la letra mayúscula o minúscula con la que se combinan.
FUNCIÓN DE SÍMBOLOS Además de letras, de los símbolos y los números de las teclas, hay 126 marcas adicionales con la función de símbolos. Los siguientes símbolos están disponibles: Para escribir un símbolo: Symbol 1 Mantenga presionado y presione . Aparecerá una fila símbolos en el visualizador. 2 Presione o 3 Home o para visualizar distintas filas de símbolos y presione hasta que parpadee el símbolo deseado. Presione ☞ End . El símbolo aparecerá en el texto.
FUNCIÓN DE FORMATO AUTOMÁTICO Con la función de formato automático, podrá seleccionar gran variedad de formatos preajustados adecuados para su necesidad específica. Esta función ajustará automáticamente la longitud de la etiqueta y los márgenes de la cinta sin cambiar el texto ni ningún otro formato, permitiéndole crear etiquetas con mayor rapidez y facilidad.
Para seleccionar un formato preajustado: A.Format 1 Mantenga pulsada y presione una vez . El ajuste actualmente selec- cionado parecerá en el visualizador. 2 Pulse ☞ Home Feed 3 Presione ☞ 18 o End para seleccionar el ajuste deseado. El ajuste predeterminado (DEFAULT) podrá seleccionarse presionando . para aplicar el ajuste seleccionado. El indicador de longitud se encenderá cuando seleccione un ajuste que no sea DEFAULT.
FUNCIÓN DE MEMBRETE La función de membrete le permite crear con rapidez y facilidad sus propios clichés para membretes personalizados. Seleccione esta función para centrar automáticamente el texto y ajustar la longitud de la cinta y los márgenes a un formato perfecto para los soportes de películas de membrete entintados. Puesto que el soporte del membrete es reutilizable, haga un nuevo cliché de membrete y reemplácelo por el que hay en el soporte de películas.
FUNCIONES DE TAMAÑO Y DE ANCHURA El tamaño de los caracteres puede ajustarse empleando las funciones de tamaño (Size) y de ancho (Wide). Puesto que el tamaño de los caracteres que puede utilizarse depende del ancho de la cinta, la tabla siguiente indica los tamaños de caracteres que pueden utilizarse con cada ancho de cinta.
FUNCIÓN DE ESTILO Podrá seleccionar entre doce estilos de caracteres distintos que podrá aplicar a su texto. ☞ Los caracteres que se imprimen utilizando los tamaños más pequeños pueden resultar difíciles de leer si se seleccionan ciertos ajustes de estilos (por ejemplo, (I+SHADOW).
FUNCIÓN DE SUBRAYADO Podrá acentuar el texto subrayándolo. El ajuste de subrayado predeterminado es OFF. Cuando haya ajustado la función de subrayado a ON, el indicador de subrayado de la parte derecha del visualizador se encenderá. ACTIVADO Para cambiar el ajuste del subrayado: Underline 1 Manteniendo presionada , pulse una vez , y mantenga presionada para hacer que se visualice el subrayado actualmente ajustado.
FUNCIÓN DEL TIPO DE CARACTERES Con la función del tipo de caracteres podrá seleccionar una amplia variedad de tipos de caracteres para su texto. Los ajustes de tipos de caracteres siguientes están disponibles en la PT-1800/1810: HELSINKI, BRUSSELS El ajuste inicial del tipo de caracteres es HELSINKI. El ajuste actualmente seleccionado del tipo de caracteres siempre se muestra con los indicadores del tipo de caracteres de debajo del visualizador.
FUNCIÓN DE MARCOS Con la función de marcos, podrá seleccionar diversos marcos y funciones destacadas para hacer un diseño más decorativo o una etiqueta con más énfasis. Los ajustes de marcos siguientes están disponibles: OFF, ROUND, CANDY, POINTING, NAMEPLATE, DOT El ajuste inicial de marco es OFF, aunque hay también otros ajustes. Si se selecciona cualquier ajuste que no sea OFF, se encenderá el indicador de marco, situado a la derecha del visualizador.
FUNCIÓN DE CINTA La función de margen cinta le permite ajustar el tamaño de los márgenes de los lados izquierdo y derecho del texto. El ajuste inicial de margen cinta es FULL, aunque hay también disponibles otros tres ajustes.
FUNCIÓN DE LA ALINEACIÓN HORIZONTAL Podrá elegir alinear texto en una de las tres formas disponibles. Además, si utilizó la función de longitud para ajustar la longitud de la etiqueta, los texto se alinearán dentro de la etiqueta de acuerdo con el ajuste de alineación horizontal seleccionado. El ajuste inicial de la alineación horizontal es LEFT (izquierda), aunque también están disponibles otros dos ajustes.
FUNCIÓN DE IMPRESIÓN DE ESPEJO Con esta función, podrá imprimir el texto de modo que los caracteres puedan leerse desde el lado del adhesivo de la cinta. Si se adhieren etiquetas con impresión de espejo a un vidrio, o en otro material transparente, podrán leerse correctamente desde el lado opuesto. ☞ Cuando emplee la función de impresión de espejo, el texto se imprimirá en cinta transparente. El ajuste inicial para la impresión de espejo es OFF.
LENGTH FUNCTIÓN Aunque la longitud de la etiqueta impresa ajusta automáticamente dicha longitud de acuerdo con el texto introducido, es posible que usted desee hacer una etiqueta con una longitud específica. La función de longitud le permitirá ajustar la longitud de la etiqueta entre 1,6” y 11,8” (4,0 cm y 30,0 cm). El ajuste predeterminado de longitud es OFF. Cuando ponga la función de longitud en ON, se encenderá el indicador de longitud de la parte derecha del visualizador.
FUNCIÓN DE LA TECLA DE IMPRESIÓN Y AVANCE Después de haber introducido el texto y de haber seleccionado los ajustes del formato deseado, estará preparado para la impresión. Para imprimir una etiqueta: Mirror ● Presione una vez ☞ de etiquetas que van a imprimirse. Después de haber impreso utilizando el ajuste de margen de cinta NONE, man- tenga pulsada .
FUNCIÓN DE NUMERACIÓN Esta función podrá utilizarse para imprimir muchas copias del mismo texto aumentando en 1 cierto número en el texto después de haber impreso cada etiqueta. Para utilizar la función de numeración: 1 Presione , , Home , o End para colocar el cursor debajo del número que desee aumentar. Number 2 Mantenga pulsada y presione . En el visualizador aparecerá el mensaje “NUMBER UNTIL 1-9?”. Font 3 Presione una tecla numérica ( M.
FUNCIÓN DE IMPRESIÓN REPETIDA Esta función le permite imprimir hasta 9 copias del mismo texto. Para emplear la función de impresión repetida: Repeat 1 Mantenga presionado y presione . Aparecerá el mensaje “COPIES UNTIL 1-9?” en el visualizador. Font 2 Presione la tecla numérica ( M.Del a ) correspondiente al número de etiquetas que desee. ☞ Para abandonar la función de impresión repetida sin imprimir, mantenga pulRepeat sada y después presione Clear (o presione simplemente ).
FUNCIONES DE LA MEMORIA Usted podrá utilizar la memoria para almacenar sus archivos de texto más frecuentemente utilizados. El texto permanecerá en la memoria, incluso después de haberlo eliminado del visualizador utilizando la función de borrado (manteniendo presionada Clear y presionando ). Cuando almacena cada archivo, a éste se le asignará un número para poder invocarlo fácilmente. En la memoria podrá almacenar hasta 9 archivos de texto, o aproximadamente 300 caracteres.
Par reescribir un archivo almacenado con otro nuevo: ● Presione para borrar el archivo previamente almacenado y almacenar el nuevo con el número seleccionado. ☞ Para retroceder y elegir otro número de archivo sin reescribir el archivo de Clear texto, presione , y después presione una tecla numérica correspon- diente a un número de archivo diferente.
Font 2 Presione la tecla ( M.Del a ) correspondiente al número de archivo que desee borrar. En el visualizador aparecerá el texto almacenado con el número de archivo seleccionado. ☞ Para ver otras partes del archivo de texto seleccionado, presione o . Para hacer que se visualice el texto almacenado en otros números de archivos, presione Home o End , o la tecla correspondiente a otro número de archivo. Para abandonar la función borra de la memoria sin borrar el archivo de M.
SOLUCIÓN DE PROBLEMAS Problema Remedio 1. El visualizador se queda en blanco des- • Compruebe que el adaptador de CA pués de haber conectado la alimentaesté correctamente enchufado. ción de la máquina. • Si está empleando pilas alcalinas, compruebe que estén correctamente insertadas. • Si las pilas están gastadas, reemplácelas por otro nuevo. 2. La máquina no imprime o los caracte- • Compruebe que el casete de cinta se res impresos quedan borrosos. haya insertado correctamente.
LISTA DE MENSAJES DE ERROR Mensaje de error 3 LINE LIMIT! Causa Remedio • Este mensaje aparece si ya • Límite el número de líneas a existen cuatro líneas tres pretres. siona . BATTERIES WEAK! • Este mensaje aparece cuando • Reemplace las pilas o emplee las pilas alcalinas instaladas el adaptador de CA. están gastadas. BUFFER EMPTY! • Este mensaje aparece si man- • Introduzca algo de texto antes de iniciar la función.
Mensaje de error Causa Remedio CHANGE ADAPTOR • Este mensaje aparece si se • Extraiga el adaptador de alta está empleando un adaptador tensión y conecte el adaptade alta tensión. dor de 9,0V CA 1,2 A. CUTTER ERROR! • Este mensaje aparecerá si • Suelte la palanca del cortapresiona la palanca del cortador de cinta. dor de cinta mientras esté imprimiéndose una etiqueta. INVAL.
Mensaje de error Causa Remedio NO FILES! • Este mensaje aparece si • Almacene primero un intenta llamar o borrar un archivo de texto. archivo de texto de la memoria cuando realmente no hay ninguno almacenado. NUMBER TOO SMALL! • Este mensaje aparecerá si el número ajustado para imprimirse utilizando la función de numeración es inferior al situado sobre el cursor. • Presione la tecla correspondiente a un número superior al del texto.
Mensaje de error TEXT TOO LONG! Causa Remedio • Este mensaje aparece si la • Borre algo de texto, reduzca longitud del texto es mayor el ancho de los caracteres o que la longitud que se ha incremente la longitud ajusajustado para la etiqueta utilitada de la etiqueta. zando la función de longitud.
ESPECIFICACIONES HARDWARE Dispositivo de entrada: Teclado de 52 teclas LCD: 7 × 5 puntos 12 caracteres × 2 líneas 17 indicadores Cinta de impresión: Sensible a la presión, base adhesiva, 8 m (26´3”) de longitud Cuatro anchos disponibles: 6 mm (1/4”) 9 mm (3/8”) 12 mm (1/2”) 18 mm (3/4”) Alimentación: Seis pilas alcalinas AA (AM3, LR6) o adaptador de CA opcional Desconexión automática de la alimentación si no se pulsa ninguna tecla durante 5 minutos Cabezal de impresión: 128 puntos / 180 dpi Dimens
ACCESORIOS ● Accesorios de consumo Adquiera los casetes de cinta en el distribuidor autorizado que le quede más cerca. Emplee sólo cintas Brother TZ con esta máquina. Brother no puede hacerse responsable por los problemas causados por el empleo de accesorios de consumo no autorizados. No emplee cintas que no tengan la marca . N.º de producto Descripción CANT./ PAQUETE PRECIO 1 1 1 1 1 1 1 1 1 1 1 1 $20.99 $20.99 $20.99 $20.99 $20.99 $24.99 $23.99 $20.99 $20.99 $23.99 $20.99 $20.99 1 $24.
N.º de Descripción producto TZ-421 Caracteres negros sobre adhesivo rojo CANT./ PAQUETE 1 PRECIO $16.99 Cintas laminadas de 6 mm (1/4”) TZ-111 TZ-211 TZ-315 Caracteres negros sobre adhesivo transparente Caracteres negros sobre adhesivo blanco Caracteres blancos sobre adhesivo negro 1 1 1 $12.99 $14.99 $17.99 CANT./ PAQUETE PRECIO 1 $29.99 1 $24.99 CANT./ PAQUETE PRECIO 1 $39.99 1 $37.99 1 $27.99 1 $24.99 Cintas especiales N.
Printed in Japan LA0659001