Print Area Setting Tool Manual Version 01 © 2022 Brother Industries, Ltd. All Rights Reserved.
Important Notice Brother reserves the right to make changes without notice in the specifications and materials (including but not limited to the manuals) (hereinafter “materials”). We shall not be responsible for any damages (including consequential) caused by reliance on the materials presented, including but not limited to typographical and other errors relating to the publications.
About the Print Area Setting Tool “PJPrintAreaSetting.exe” 1. Tool overview “PJPrintAreaSetting.exe” (hereinafter “Print area setting tool”) is a tool that allows you to adjust the print area length (bottom margin) of A4, Letter, Legal, and A5 paper sizes (in portrait orientation) in the driver software. The “Print area setting tool” can be launched and operated on Windows as a Console app. The tool file structure is as follows. /PJPrintAreaSetting (folder where the tool is stored) PJPrintAreaSetting.
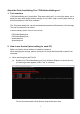
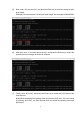
(2) “Maximum print area length that can be specified” and “Current print area length” are displayed in mm units on the right side of each paper size. Example) A4 (paper size) 294.460000 (maximum print area length) 279.474000 (current setting) (3) To change the print area length, enter “2 (2:modify Print Length)”, and press the Enter key. You will be prompted to select the paper size to change the print area length, so enter the number of the corresponding paper size, and press the Enter key.
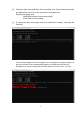
(4) The A4 size “Maximum print area length that can be specified” and “Current print area length” are displayed again, so enter a value that is equal to or less than the “Maximum print area length that can be specified”. Example) To specify 294 mm, enter “294.00”, and press the Enter key. If you want to continue to change the print area of another paper size, enter the number of the corresponding paper size, and specify the value as in the case of A4.
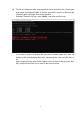
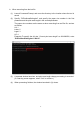
(5) Next, enter “3 (3:current info)”, and press the Enter key to check the newly set print area length. Example) You can see that “Current print area length” has changed to 294.000000. (6) After that, enter “1 (1:modify data to driver)”, and press the Enter key to reflect the specified print area length in the driver software. (7) Finally, enter “0 (0:exit)”, and press the Enter key to restart the Print Spooler and close the tool. Note) When closing the tool, always close it by entering “0 (0:exit)”.
b. When executing from the bat file (1) Launch Command Prompt, and move the directory to the location where the tool is saved. (2) Specify “PJPrintAreaSetting.bat”, and specify the paper size number in the first parameter and the print area length in the second parameter. The paper size numbers are the same as when executing from an Exe file, and are as follows. A4: 1 Letter: 2 Legal: 3 A5: 4 Example) To specify the A4 size “Current print area length” as 294.000000, enter “PJPrintAreaSetting.bat 1 294.
3. How to use the tool (when creating a bat file and performing automatic setting) (1) For example, if the IT administrator “wants to specify A4 as 294 mm” in the hard code, write the following two lines in a text file, and save it with an appropriate file name with the bat extension. --------@echo off call PJPrintAreaSetting.exe 1 294 --------(2) By saving in the same folder as PJPrintAreaSetting.exe, the setting change is completed if the user double-clicks the bat file from (1).