
User Manual
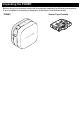


Table Of Contents
- User’s Guide P300BT
- Safety Precautions
- General Precautions
- Performing Routine Maintenance
- Accessories
- Specifications
- Important Information
- Unpacking the P300BT
- 1. Parts and Components
- 2. Installing Batteries or Connecting the AC Adapter
- 3. Inserting the Tape Cassette
- 4. Turning Your Machine On or Off
- 5. LED Indications
- 6. Pairing Your Machine with Your Mobile Device
- 7. Troubleshooting

Make sure your Tape Cassettes display the TZe mark ( ).
Use only tape widths of 3.5 mm, 6 mm, 9 mm, or 12 mm.
If there is a stopper on the TZe Tape Cassette, remove it before installation.
3. Inserting the Tape Cassette
1. Hold your machine as shown in the
illustration. Open the Cassette Cover
by pressing the mark on its side (1)
and pulling in the direction of the
arrow (2).
2. Insert the Tape Cassette following
the drawing marked inside the case.
Confirm that the tape is aimed at the
green Tape Outlet and gently press
the Tape Cassette into your machine
until it locks into place.
NOTE
• Make sure that there is no slack in the
tape. To fix any slack, pull the end of
the tape out of the Tape Guide.
• When inserting or removing the Tape
Cassette, make sure that the tape
does not catch on the silver pin (3) or
the Print Head.
3. Insert the two hooks at the rear of the
Cassette Cover into the slots on your
machine (4). Push the Cassette Cover
making sure it locks into place (5).
Cassette Cover
2
1
Print Head
Tape Guide
End of Tape
3
4
5