
Engine Manual


Not for
Reproduction
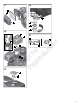
2. Remove the cover (B, Figure 11) and the filter (C).
3. To loosen debris, gently tap the filter (C, Figure 11) on a hard surface. If the filter is
excessively dirty, replace with a new filter.
4. Install the filter (C, Figure 11).
5. Install the cover (B, Figure 11) and secure with the fastener(s) (A). Make sure the
fastener(s) are tight.
Paper Air Filter
See Figure: 12
1. Loosen the fastener(s) (A, Figure 12).
2. Remove the cover (B, Figure 12).
3. Remove the fastener (E, Figure 12).
4. To prevent debris from falling into the carburetor, carefully remove the pre-cleaner
(D, Figure 12) and the filter (C) from the air filter base (F).
5. To loosen debris, gently tap the filter (C, Figure 12) on a hard surface. If the filter is
excessively dirty, replace with a new filter.
6. Remove the pre-cleaner (D, Figure 12) from the filter (C).
7. Wash the pre-cleaner (D, Figure 12) in liquid detergent and water. Allow the pre-
cleaner to throughly air dry. Do not oil the pre-cleaner.
8. Assemble the dry pre-cleaner (D, Figure 12) to the filter (C).
9. Install the filter (C, Figure 12) and the pre-cleaner (D) to air filter base (F) and onto
stud (G). Make sure the filter is properly assembled to air filter base and secure with
fastener (E).
10. Install the cover (B, Figure 12) and secure with the fastener(s) (A). Make sure the
fastener(s) is tight.
Service Fuel System
See Figure: 13, 14
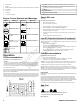
WARNING
Fuel and its vapors are extremely flammable and explosive.
Fire or explosion can cause severe burns or death.
• Keep fuel away from sparks, open flames, pilot lights, heat, and other ignition sources.
• Check fuel lines, tank, cap, and fittings frequently for cracks or leaks. Replace if
necessary.
• Before cleaning or replacing the fuel filter, drain the fuel tank or close the fuel shut-
off valve.
• If fuel spills, wait until it evaporates before starting engine.
• Replacement parts must be the same and installed in the same position as the original
parts.
Fuel Strainer, if equipped
See Figure: 13
1. Remove the fuel cap (A, Figure 13).
2. Remove the fuel strainer (B, Figure 13).
3. If the fuel strainer is dirty, clean or replace it. If you replace the fuel strainer, make
sure to use an original equipment replacement fuel strainer.
Fuel Filter, if equipped
See Figure: 14
1. Close the fuel shut-off valve (B, Figure 14) and let the engine run until it stops.
Otherwise, fuel can leak out and cause a fire.
2. Remove the bowl (C, Figure 14) with a wrench. Clean debris from the filter (A) and
the bowl.
3. Check the filter (A, Figure 14), gasket (D), and bowl (C) for cracks or other damage.
Replace if necessary.
4. Install the filter (A, Figure 14), gasket (D), and bowl (C). Tighten with a wrench.
5. Open the fuel shut-off valve (B, Figure 14) and check for leaks.
Service Cooling System
WARNING
Running engines produce heat. Engine parts, especially muffler, become extremely
hot.
Severe thermal burns can occur on contact.
Combustible debris, such as leaves, grass, brush, etc., can catch fire.
• Allow muffler, engine cylinder and fins to cool before touching.
• Remove accumulated debris from muffler area and cylinder area.
NOTICE
Do not use water to clean the engine. Water could contaminate the fuel
system. Use a brush or dry cloth to clean the engine.
This is an air cooled engine. Dirt or debris can restrict air flow and cause the engine to
overheat, resulting in poor performance and reduced engine life.
1. Use a brush or dry cloth to remove debris from the air intake grille.
2. Keep linkage, springs and controls clean.
3. Keep the area around and behind the muffler, if equipped, free of any combustible
debris.
4. Make sure the oil cooler fins, if equipped, are free of dirt and debris.
After a period of time, debris can accumulate in the cylinder cooling fins and cause the
engine to overheat. This debris cannot be removed without partial disassembly of the
engine. Have a Briggs & Stratton Authorized Service Dealer inspect and clean the air
cooling system as recommended in the
Maintenance Schedule.
Storage
WARNING
Fuel and its vapors are extremely flammable and explosive.
Fire or explosion can cause severe burns or death.
When Storing Fuel Or Equipment With Fuel In Tank
• Store away from furnaces, stoves, water heaters or other appliances that have pilot
lights or other ignition sources because they can ignite fuel vapors.
Fuel System
See Figure: 15
Store the engine level (normal operating position). Fill fuel tank (A, Figure 15) with fuel.
To allow for expansion of fuel, do not overfill above the fuel tank neck (B).
Fuel can become stale when stored over 30 days. Stale fuel causes acid and gum deposits
to form in the fuel system or on essential carburetor parts. To keep fuel fresh, use Briggs
& Stratton Advanced Formula Fuel Treatment & Stabilizer, available wherever Briggs
& Stratton genuine service parts are sold.
There is no need to drain gasoline from the engine if a fuel stabilizer is added according
to instructions. Run the engine for two (2) minutes to circulate the stabilizer throughout the
fuel system before storage.
If gasoline in the engine has not been treated with a fuel stabilizer, it must be drained into
an approved container. Run the engine until it stops from lack of fuel. The use of a fuel
stabilizer in the storage container is recommended to maintain freshness.
Engine Oil
While the engine is still warm, change the engine oil. See the
Change Engine Oil
section.
Troubleshooting
For assistance, contact your local dealer or go to BRIGGSandSTRATTON.com or call
1-800-233-3723 (in USA).
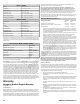
Specifications
Model: 100000
9.95 ci (163 cc)Displacement
2.677 in (68 mm)Bore
9