
- Buffalo Wireless Router Setup Guide


4
Perform the next step for Wired (Recommended) Router
Setup only :
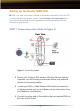
◗ Locate the provided Ethernet cable and connect one end to
any one of the four numbered SWITCH ports located on the
back of the router. Connect the other end of this cable to the
properly installed Ethernet (NIC) port on the PC you are using
for initial setup (Refer to Figure 1).
Perform the next step for both Wireless AND Wired Router
Setup:
◗ Locate Power adapter for the Wireless Router and Plug in to
the DC-IN port on the back of the router and the other end to a
wall outlet. (See Figure 1 for location of DC-IN Port).
Perform the next step for Wireless Router Setup only:
■ NOTE: You will need the SSID of your router to properly connect
your wireless adapter to your router. The default SSID for your Precon
-
figured Buffalo Router is “Buffalo” (case sens
itive).
◗ Refer to your Wireless Ethernet adapter Manufacture’s
documentation for proper setup of your Wireless adapter for
your appropriate Operating System and connect to the router.
The Remaining Steps apply to both Wired and Wireless
Setup:
◗ Power up you Cable or DSL Modem
◗ Power up your computer that you are using to configure the
Wireless Router.