
Use and Care Manual
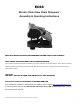


ECSS Electric Chain Saw Chain Sharpener Assembly & Operating Instructions
8
1. Do not use a grinding wheel if it is chipped, cracked or worn. You can check if the wheel has cracks not visible to
the human eye by hanging it up by the central hole and tapping it with a non-metal object (ie: screwdriver handle). If
it is in good condition it will produce a metallic sound. A dull sound indicates a crack or break.
2. Only use grinding wheels that fit the arbor (7/8"). Do not try to change or modify the mounting hole on a grinding
wheel to make it fit.
3. Do not over-tighten the Grinder Lock Cap. Hand-tighten only. Over-tightening may cause the wheel to break or
disintegrate.
4. Never use the chain saw sharpener without the Grinding Wheel Cover in place.
5. Always test the Grinding Wheel by running it for a minute prior to contact with a chain.
6. Keep away from the wheel when it is turning and make sure no one is standing close, in the line of the wheel
rotation trajectory.
7. lf the grinding wheel vibrates, turn off the machine and check that it is mounted securely, and that it is not
damaged.
8. Never try to stop the grinding wheel with your hands, even if you are wearing safety gloves. The wheel will cut
through gloves and your hand causing serious injury.
9. Never operate tool without the Grinding Wheel cover in place.
10. Replacement grinding wheel listed speed must meet or exceed RPM rating of the tool.
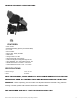
When installing the sharpener on a workbench, make sure that the lock wheel is accessible.
Bolt (bolts not included) the unit directly to the workbench through the two 1/4" holes on the base. The workbench
must have a solid surface capable of supporting the weight of this sharpener, the work-piece and assorted tools.
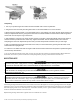
Mounting a Grinding Wheel
1. Raise the Top Housing and lock it in the up position by tightening the Lock Stop.
2. Remove the two screws holding the Grinding Wheel Cover. Set the cover aside.
3. Unscrew the Grinder Lock Cap that holds the Grinding Wheel in place.
4. Install the new wheel on the Grinding Wheel Base making sure it fits properly.
5. Replace the Grinder lack Cap.
6. Replace the Grinding Wheel Cover.
7. Release the Lock Stop and lower the Top Housing. Never operate tool without the Grinding Wheel Cover in place