INSTALLATION GUIDE Pre-Hung Interior Wood Doors © 2020 OrePac Building Products. All rights reserved.
INSTALLATION GUIDE Pre-Hung Interior Wood Doors HANDLING AND STORAGE OF WOOD DOORS 1. Deliver doors in a clean truck and under cover. 2. Do not deliver or install doors until foundations, concrete floors, and plaster or texture walls are completely dry. 3. Allow doors time to acclimate to the conditions at the job site prior to installation. Never subject doors to abnormal heat, dryness or humidity for prolonged periods (i.e. forced heat). 4.
READ ALL INSTRUCTIONS AND REVIEW DIAGRAMS BEFORE BEGINNING THE INSTALLATION TO GET A THOROUGH UNDERSTANDING OF THE PROCESS. THANK YOU FOR CHOOSING BUILDERS CHOICE PRODUCTS Attached are Builders Choice recommended installation instructions for interior pre-hung doors. Read these installation instructions thoroughly before beginning. They are designed to work in most existing applications. However, existing conditions may require changes to these instructions.
DOOR HANDLING • Make sure the door slab is secured to the frame prior to installation. • Do not put stress on joints, corners or frames. • Store door in dry, well-ventilated area in vertical, leaning position (jamb side to the wall) to allow air circulation; do not stack horizontally or drag on the floor • Protect from exposure to direct sunlight during storage. • Install only into vertical walls and when conditions are dry. REMOVE THE PACKAGING & INSPECT THE DOOR • Remove packaging.
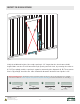
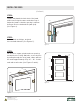
INSPECT THE ROUGH OPENING A B C E D Figure 1 Verify the width and height of the rough opening is 1/2" larger than the door frames width/ height. Make sure the floor/sill area and rough opening are both level, by ensuring the surfaces (C, D, E) are plumb, and the opening is square by measuring the diagonals (A, B). The measurement of (A) and (B) should be the same. Maximum allowable deviation from square is 1/4".
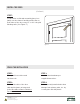
INSTALL THE DOOR STEP 1: Pre-hung door frames extend below the slab to allow for different floor heights. The jambs can be trimmed as needed before beginning installation, however make sure to leave adequate space to allow air to pass under the door according to ventilation codes. Rough Opening Jamb Door Slab STEP 2: Measure and trim additional door jam X2. Remove any nails, tacks or packaging that hold closed the door. Figure 2 STEP 3: Position the door unit into the rough opening.
INSTALL THE DOOR (Continued) STEP 4: Square and plumb the latch side of the jamb and secure using the same method as step 3. Adjust the jamb so that the spacing is uniform between the door slab and the jamb (red). (See Figure 4.) Wall Frame Latch Side STEP 5: Shim behind each hinge, and tack into stud with 4d nails. (See Figures 5.) Figure 4 STEP 6: Re-check for square, plumb and even spacing around the door.
INSTALL THE DOOR (Continued) STEP 7: Position trim or slide trim assembly (two piece jamb) onto the frame. Carefully nail the trim on both sides of the door every 12" to 16" using 4d finishing nails. (See Figure 7.) Trim Door Slab Figure 7 FINISH THE INSTALLATION STEP 1: STEP 3: Fill any nail/screw holes and sand smooth. Install lockset hardware per supplied instructions.
GLOSSARY DOOR SLAB: The door slab is the operational door component of a pre-hung door system. The door slab is typically a rectangular piece of material comprised of wood, composite, fiberglass or steel. JAMB: The door jamb consists of the vertical components of a door frame, which includes the studs and trim. One jamb has hinges for mounting the door slab, while the other jamb has a strike plate and slot for latching a closed door.
PREPARATION AND FINISHING Note: all six sides of the door, including the edges of any cut modifications in the door slab, must be properly sealed for warranty to apply Note: please follow your paint or stain manufacturer’s application instructions 1. Inspect door carefully for defects before finishing. 2. All wood doors supplied by OrePac require sanding and prep prior to finish. The amount of sanding will depend on the expected appearance after finish. 3.