
Instructions / Assembly


INSTALLATION INSTRUCTIONS (CONT.)
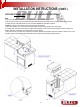
CONNECTING TO GAS SOURCE
Refer to the following instructions and illustrations for typical gas supply connections. We strongly suggest professional installation and hook-up of
the gas griddle.
IMPORTANT: Before connecting griddle to gas source, make sure griddle control knobs are in “OFF” position.
6
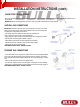
NATURAL GAS CONNECTIONS
IMPORTANT: Bull Outdoor Products does not recommend the use of any quick connect
fittings or lines to the unit. Use of these types of fittings or lines could cause low gas flow
and greatly reduce the performance of the unit.
- Pipe sealing compound or pipe thread tape of the type resistant to the
action of natural gas must be used on all male pipe thread.
- Apply compound or tape to at least the first three threads when making the connection.
- Remove plastic cap from regulator installed on griddle.
- Attach stainless steel flex line 3/8” flare-female end to the regulator.
- Attached the other end of flex line to shut-off valve through a nipple.
- Attach a shut-off valve to gas supply pipe.
PERFORM GAS LEAK CHECK – REFER TO PAGE 2
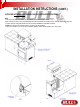
PROPANE GAS CONNECTIONS
- In the United States, the LP gas pressure regulator and hose assembly supplied with this
unit must be used without alteration. If this assembly needs to be replaced, use only the
type 1 specified in the parts list supplied with this unit. Use a LP tank with a type 1 cylinder
valve.
- Make sure the tank is firmly secured in an upright position.
- Turn the black coupling nut of the hose and regulator assembly in a clockwise direction.
- Make sure it is completely threaded onto the cylinder valve before turning gas supply on.
PERFORM GAS LEAK CHECK – REFER TO PAGE 2