Hot Water Dispensers Supercedes 10052.0000; 10010.0000; 10267.0000 10420.0000; 10889.0000; 39338.0000 39338.0001; 44306.0000 INSTALLATION & OPERATING GUIDE BUNN-O-MATIC CORPORATION POST OFFICE BOX 3227 SPRINGFIELD, ILLINOIS 62708-3227 PHONE: (217) 529-6601 FAX: (217) 529-6644 To ensure you have the latest revision of the manual or to obtain the illustrated parts catalog, please visit the Bunn-O-Matic website, at www.bunn.com.
BUNN-O-MATIC COMMERCIAL PRODUCT WARRANTY Bunn-O-Matic Corp. (“BUNN”) warrants equipment manufactured by it as follows: 1) Airpots, thermal carafes, decanters, GPR servers, iced tea/coffee dispensers, MCP/MCA pod brewers thermal servers and Thermofresh servers (mechanical and digital)- 1 year parts and 1 year labor. 2) All other equipment - 2 years parts and 1 year labor plus added warranties as specified below: a) Electronic circuit and/or control boards - parts and labor for 3 years.
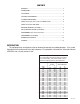
CONTENTS Warranty ����������������������������������������������������������������������������������������������������������� 2 Introduction ����������������������������������������������������������������������������������������������������� 3 User Notices ������������������������������������������������������������������������������������������������������ 4 Electrical Requirements ������������������������������������������������������������������������������� 5 Plumbing Requirements ���������������������
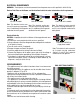
USER NOTICES The notices on this dispenser should be kept in good condition. Replace unreadable or damaged labels. NOTICE ALL COMPONENTS ARE 200 TO 240 VOLT A.C. Replace only with components listed in the accompaning literature rated for the same voltage 00824.0002 00824.0001 12537.0000 00833.0000 00657.
ELECTRICAL REQUIREMENTS WARNING - The dispenser must be disconnected from the power source until specified in Initial Set-Up. Refer to Data Plate on the Brewer, and local/national electrical codes to determine circuit requirements. WHITE NEUTRAL L1 BLACK NEUTRAL WHITE N L1 BLACK POWER CORD L2 RED L1 L1 BROWN GREEN G 120 volt ac models Note: This electrical service consists of 2 current carrying conductors (L1 and Neutral) and a separate conductor for earth ground.
PLUMBING REQUIREMENTS - ALL EXCEPT OHW This dispenser must be connected to a cold water system with operating pressure between 20 and 90 psi (138 and 620 kPa)from a ½˝ or larger supply line. A shut-off valve should be installed in the line before the dispenser. Install a regulator in the line when pressure is greater than 90 psi (620 kPa) to reduce it to 50 psi (345 kPa). The water inlet fitting is ¼˝ flare.
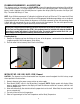
INITIAL SET-UP - H5M CAUTION - The dispenser must be disconnected from the power source throughout the initial set-up, except when specified in the instructions. 1. Remove the upper rear panel and rotate the control thermostat knob fully counterclockwise to the “OFF” position and replace the panel. 2. Connect the dispenser to the power source and turn-on the water supply. 3. Water will automatically flow into the tank to the proper level and shut-off. This will take approximately 10 minutes. 4.
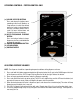
OPERATING CONTROLS - PORTION CONTROL ONLY d. (a) VOLUME SELECTOR BUTTONS Press and release the button corresponding to the Small, Medium, or Large volume, to select the desired amount of water to be dispensed. Pressing a different button after a cycle has been initiated does not change the volume in progress. (b) AUTO STOP/MANUAL DISPENSE BUTTON Press and release button to stop a dispense cycle. Press and hold button to dispense manually.
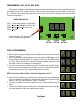
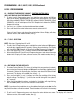
PROGRAMMING - H5-E, H5-PC, H5X, H10X When power is applied to the dispenser, the display located on the bottom of the main circuit board will show the software version for 5 seconds, and then it will show the model number (see chart below) it will then go to (-). While the tank is filling, the display will read (FIL). When the tank is full the display will show the model number and then go to (-).
PROGRAMMING - H5-E, H5-PC, H5X, H10X Continued LEVEL 2 PROGRAMMING H1 - DISPENSE TEMPERATURE LOCKOUT - PORTION CONTROL ONLY (WILL NOT DISPLAY ON OTHER MODELS) 1. To enter Level 2 Programming, press and hold the center button until H1 appears on the display (approximately 6 seconds) then release button. The display will either read noL (LOCKOUT DISABLED) or Loc (LOCKOUT ENABLED). When (ENABLED), unit will not dispense if the Tank Temperature is below the (READY) temperature setting. 2.
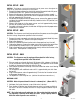
PROGRAMMING - H5-ELEMENT Adjusting temperature: The switch must be in the “SET” position in order to access the program modes. 1. Press and hold “TEMP” button until display flashes. 2. While display is flashing, press and release the (+) to increase or (-) to decrease temperature. NOTE: (Starting with software version 0.06) If unit is “E” model, temp will stop at 210°F (99°C). If unit is “X” model, temp display will jump from 210°F (99°C) to 212°F (100°C).
PROGRAMMING - H5-ELEMENT Continued 2. The display will now show the model number. (H5H) 5 Gallon High Voltage Unit (200-240V) (H5L) 5 Gallon Low Voltage Unit (100-120V) Now scroll with the (+/-) buttons through the models listed above until the display matches the model you are working with. 3. Press and release the upper hidden button once more. The display will show P2. Display will now show the “SET” temperature (ex: 200).
PROGRAMMING - H5-ELEMENT Continued LEVEL 2 PROGRAMMING H2 - F° OR C° SELECTION 1. To enter Level 2 Programming, press and hold the upper hidden button until H2 appears on the display. Release the upper hidden button. The display will show either FAH (Degrees in Fahrenheit) or CEn (Degrees in Centigrade). 2. Press and release the (+) or (-) buttons to alternate between FAH and CEn. 3. After setting FAH or CEn, to exit Level 2 Programming, press and release the upper hidden button twice.
DRAINING THE DISPENSER - OHW CAUTION - The dispenser must be disconnected from the power source throughout these steps. 1. 2. 3. 4. Disconnect the dispenser from the power source and allow dispenser to cool. Tilt dispenser forward over sink. Open faucet. Continue tilting dispenser forward over sink until water stops flowing. NOTE - The dispenser must be full using the INITIAL SET-UP steps before reconnecting to the power source.