C, CT, CWTF Series Including DV, APS/TC/TS, Single CW & Twins Supercedes Operating Manuals: 10690.####; 10737.####; 10841.0000; 28182.0000; 36102.0000 INSTALLATION & OPERATING GUIDE BUNN-O-MATIC CORPORATION POST OFFICE BOX 3227 SPRINGFIELD, ILLINOIS 62708-3227 PHONE: (217) 529-6601 FAX: (217) 529-6644 To ensure you have the latest revision of the Operating Manual, or to view the Illustrated Parts Catalog, Programming Manual, or Service Manual, please visit the Bunn-O-Matic website, at www.bunn.com.
BUNN-O-MATIC COMMERCIAL PRODUCT WARRANTY Bunn-O-Matic Corp. (“BUNN”) warrants equipment manufactured by it as follows: 1) All equipment other than as specified below: 2 years parts and 1 year labor. 2) Electronic circuit and/or control boards: parts and labor for 3 years. 3) Compressors on refrigeration equipment: 5 years parts and 1 year labor.
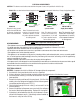
INTRODUCTION This equipment will brew one or two half-gallon batches of coffee simultaneously into awaiting dispensers (with just the press of a button). One side may include a hot water faucet for allied beverage use. It is only for indoor use on a sturdy counter. USER NOTICES ............................................................................................................................................ 4 ELECTRICAL REQUIREMENTS.................................................................
USER NOTICES Carefully read and follow all notices in this manual and on the equipment. All labels on the equipment should be kept in good condition. Replace any unreadable or damaged labels. As directed in the International Plumbing Code of the International Code Council and the Food Code Manual of the Food and Drug Administration (FDA), this equipment must be installed with adequate backflow prevention to comply with federal, state and local codes. For models installed outside the U.S.A.
ELECTRICAL REQUIREMENTS CAUTION - The brewer must be disconnected from the power source until specified in Initial Set-Up. Model 15 has an attached cordset and requires 2-wire grounded service rated 120 volts ac, 15 amp, single phase, 60 Hz. BLK WHI RED L1 N 120V. A.C. WHI BLK L2 N BLU 120V. A.C. 208 or 240V. A.C. 120V. A.C. RED BLK L1 BLK L3 L2 230V. A.C. 230V. A.C. 230V. A.C. RED L1 200 or 230V. A.C.
PLUMBING REQUIREMENTS-CURRENT SINGLES As directed in the International Plumbing Code of the International Code Council and the Food Code Manual of the Food and Drug Administration (FDA), this equipment must be installed with adequate backflow prevention to comply with federal, state and local codes. For models installed outside the U.S.A., you must comply with the applicable Plumbing /Sanitation Code for your area. MODEL C: This model is completely portable and requires no attached plumbing.
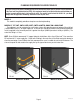
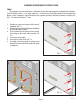
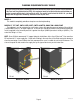
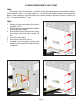
PLUMBING REQUIREMENTS-CURRENT TWINS TWINS These brewers must be connected to a cold water system with operating pressure between 20 and 90 psi (138 and 620 kPa) from a 1⁄2" or larger supply line. A shut-off valve should be installed in the line before the brewer. Install a regulator in the line when pressure is greater than 90 psi (620 kPa) to reduce it to 50 psi (345 kPa) . The water inlet fitting is 3⁄8" flare. 1. 2. 3. 4. 5. 6. Remove six screws securing rear utility cover (if equipped).
PLUMBING REQUIREMENTS-EARLY SINGLES As directed in the International Plumbing Code of the International Code Council and the Food Code Manual of the Food and Drug Administration (FDA), this equipment must be installed with adequate backflow prevention to comply with federal, state and local codes. For models installed outside the U.S.A., you must comply with the applicable Plumbing /Sanitation Code for your area. MODEL C: This model is completely portable and requires no attached plumbing.
PLUMBING REQUIREMENTS-EARLY TWINS TWINS These brewers must be connected to a cold water system with operating pressure between 20 and 90 psi (138 and 620 kPa) from a 1⁄2" or larger supply line. A shut-off valve should be installed in the line before the brewer. Install a regulator in the line when pressure is greater than 90 psi (620 kPa) to reduce it to 50 psi (345 kPa) . The water inlet fitting is 3⁄8" flare. TWINS 1. 2. 3. 4. 5. 6. Remove six screws securing rear utility cover (if equipped).
INITIAL SET-UP CAUTION - The brewer must be disconnected from the power source throughout the initial set-up, except when specified in the instructions. 1. 2. 3. Insert an empty funnel into the funnel rails. Place an empty dispenser under the funnel. Place the heater switch at the rear of the brewer in the “OFF” lower position and connect the brewer to the power source. 4. Fill the tank with water as directed: 4A. Model C Pour three pitchers of tap water into the screened area on top of the brewer.
the switch is pressed, two seconds are added to the brew time period. Allow the brew cycle to finish in order to verify that the desired volume has been achieved. To decrease a batch size, Press and release the START or BREW switch once for every two-second interval to be removed from the total brew time period; then immediately press and hold down the START or BREW switch until three clicks are heard. Release the switch.
OPERATING CONTROLS ON/LOWER SWITCH Placing the "ON/LOWER" switch in the "OFF" (lower) position stops brewing. Stopping a brew cycle after it has been started, will not stop the flow of water into the funnel until the tank siphons down to its proper level. Placing the switch in the "ON" (upper) position enables the brew circuit and on all (except APS/TC models) supplies power to the brew station warmer. START SWITCH Momentarily pressing and releasing the switch starts a brew cycle. DO NOT HOLD START SWITCH.
OPERATING CONTROLS MASTER ON/OFF SWITCH(S) The master ON/OFF switch disables power the entire brewer (including tank heaters). NOTE – TWINS with 2 power cords will have 2 power switches, (one left, one right). TANK HEATER ON/OFF SWITCH(S) The tank heater ON/OFF switch disables power to the tank heater circuits only. Power to brew timer and warmer circuits are not affected. All Twins have 2 tank heater switches. NOTE: Leaving the tank heater switch(s) off will result in brewing with cold water.
COFFEE BREWING 1. 2. 3. 4. 5. 6. Insert a BUNN® filter into the funnel. Pour the fresh coffee into the filter and level the bed of grounds by gently shaking. Slide the funnel into the funnel rails. Place an empty dispenser beneath the funnel. Place the "ON/OFF" switch in the "ON" upper position. Momentarily press and release the start switch. When brewing is completed, simply discard the grounds and filter. HOT WATER FAUCET The hot water faucet may be used to dispense a cup of hot water at any time.
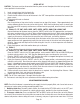
CLEANING 1. The use of a damp cloth rinsed in any mild, non-abrasive, liquid detergent is recommended for cleaning all surfaces on Bunn-O-Matic equipment. Use care when cleaning around the heater switch with a cloth, so as not to accidentally turn off the tank heater! 2. Clean out the sprayhead holes. A properly cleaned sprayhead will leave a dimple in the bed of coffee grounds for each hole. Example: 6 holes = 6 dimples. FIG 15-1/2 3.
TROUBLESHOOTING A troubleshooting guide is provided to suggest probable causes and remedies for the most likely problems encountered. If the problem remains after exhausting the troubleshooting steps, contact the Bunn-O-Matic Technical Service Department. • • • • • • • Inspection, testing, and repair of electrical equipment should be performed only by qualified service personnel. All electronic components have 120 volt ac and low voltage dc potential on their terminals.
TROUBLESHOOTING (cont.) PROBLEM PROBABLE CAUSE REMEDY Spitting or excessive steaming 1. Lime Build-up (A) Use deliming spring. (B) Clean sprayhead. (Page 11) Dripping from sprayhead 1. Syphon System The brewer must be level or slightly lower in front to syphon properly. Brew cycle starts when ON/ LOWER Switch is turned on. Auxiliary brew start switch on TWINS inadvertently activated. Move objects away from brewer. Weak beverage 1.