
Troubleshooting guide


Bunn-O-Matic Corporation
7
Setup
Product Preparation
Priortocalibratingthemachineyoumustrstloadproductandprimethepumps.Theproductmustbecompletely
thawed and be within the temperature range of 35º - 40º F. If the product is not within the acceptable temperature
range you will not be able to calibrate the machine to the product correctly.
Load Product
Step 1: Mix the product by vigorously shaking the product container.
Step 2: Wet or use a food grade lubricate on the container o-ring. This will ease removal of the container.
Step 3:Placetheproductinthecabinetandpressitrmlyintothebottleadapteropening.
Prime the Pumps
Step 1:Placealargecontainerunderdispensenozzleforthepumpyouwishtoprime.
Step 2: Press and hold the dispense button, (“Stop/Plus” button if using portion control option), until concentrate
dispensesfromthedispensenozzle.
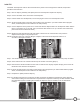
Ambient Conversion Kit (Optional)
The ambient conversion kit, (BUNN P/N: 33699.0001), allows remotely located ambient
concentrateproductstobeusedinplaceofdispensermountedfrozenconcentrate
products. One kit is required for each dispense station.
Step 1: Disconnect the dispenser from the power source.
Step 2: Remove the right side panel. Set the panel and screws aside for re-assembly.
Step 3: Open the dispenser door.
Step 4: Remove the decorative plugs from convenient openings at the right rear of the
refrigerated compartment and the dispenser’s rear panel.
Step 5: Feed the free end of the Convertible Tube Assembly’s concentrate tube through
the openings in the refrigerated compartment and dispenser rear panel. Take
care to route Tube Assemblies so they won’t kink or interfere with the condenser fan.
Step 6: Connect the concentrate container to the free end of the concentrate tube protruding
from the dispenser’s rear panel.
Step 7: Insert the Adapter end of the Convertible Tube Assembly into the desired bottle
interface.
Step 8: Close the dispenser door.
Step 9: Install the right side panel with the screws set aside in Step 2.
Step 10: Apply power to the dispenser and prime the dispense tubing.
Step 11: Open the dispenser door and check for any signs of air bubbles in the dispense
tubing. Any bubbles indicate the presence of a vacuum leak. When bubbles are
present, re-check the fastening of all clamped connections, and positioning of the Adapter into the bottle
interface.
Step 12: Close the dispenser door.
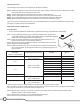
Calibrate the Machine
TocalibratetheJDFSilverSeriesmachinesyouwillneedtocompleteacoupleofprocedures.Therstprocedure
requiredduringcalibrationistodetermineyouwaterowrate.Thisisaccomplishedbyconductingthewaterowtest
to identify your known volume of water being dispensed. The next procedure in the calibration process would be to
conduct the total dispense test. You will then need to locate your product mix ratio, (usually found on the product con-
tainer). Using the total dispense ratio chart found in the “Installation and Operating Guide” you will need to determine
if your total dispense matches your ratio target, if it does not you will need to make a pump speed adjustment.