
Troubleshooting guide


Bunn-O-Matic Corporation
9
Total Dispense Ratio Set Up Procedure
Tools Required:
• 64 ounce pitcher (BUNN P/N: 04238.0000) or graduated measuring cup (BUNN P/N: 33095.0000).
Step 1: Reference recorded total dispense water for each dispense station.
Step 2: Place the Program switch in the ON position.
Step 3:Placeameasuringcontainerunderthedispensenozzle,pressandreleasetheDISPENSEbutton6times.
Step 4: Record the total ounces dispensed.
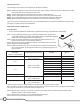
Step 5:RefertotheBrix/Ratiochartbelowtoconrmpropertotaldispensedamountforratiodesiredandwaterout
put previously recorded.
Step 6: To increase or decrease the product output, refer to Pump Speed Adjustment section.
Step 7: Place the Program switch back into the OFF position.
Ifthetotaldispensedliquiddoesnotmatchthedesiredtotalvolumebasedonyourmixratioandwaterowrate,you
will need to make a pump speed adjustment.
Pump Speed Adjustment
Tools Required:
• Standard screwdriver
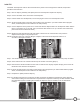
Step 1: Disconnect the machine from the power source.
Step 2: Remove the drip tray.
Step 3: Remove the two screws that secure the splash panel and remove the splash panel.
Step 4: Locate the adjustment knobs on the circuit board.
Step 5: The knob positions directly correspond to dispense station locations. Turn the adjustment knob
associated with the dispense station you wish to adjust, clockwise to increase the pump speed and counter
clockwise to decrease the pump speed. Increasing the pump speed will increase the amount of product
dispensed giving you a higher total dispense, decreasing the pump speed will have the opposite affect.
Note: Some 2-S models will have 4 adjustment knobs on the circuit board. For these models, use the two left most
knobs to make a pump speed adjustment.
Step 5: Reinstall the splash panel and drip tray, then reconnect the dispenser to the power source.
Set the Portion Control Option
The product dispense buttons, for machines using mechanical buttons or membrane buttons, can be set for a
portioned dispense. The mechanical buttons and the P/H membrane buttons have the option to be set with a single
portioned dispense on one or all of the dispense heads. Machines with the P/C membrane buttons are preset at the
factory but can be adjusted to meet the customers requirements. The P/C membrane switches can be set for push
and hold dispensing by programming the dispenser to dispense for less than two seconds.
Portion Control (P/C) Membrane Button
Portionsizesarepresetbutcanbeadjustedbyfollowingthestepsbelow.
Step 1: Set the program switch (near the main control board) to the ON position (on older models without the
program switch, set the dispense lockout switch to the OFF position.
Step 2: Press and hold the large and medium buttons on the left most (Station #1) dispense station until you hear
the machine “beep”.
Step 3: Place a measuring container under the station to be adjusted, then press and hold the appropriate dispense
switch until you reach the desired amount of product in the measuring container. The machine will record the
amount of time that the button is pressed continuously. If the button is released too soon, simply empty the
container and start over.
Step 4: Repeat step 3 for all stations as desired.
Step 5: Turn the program switch to the OFF position.