
User's Manual


Page 9
INITIAL SETUP
CAUTION – The brewer must be disconnected from the power source throughout the initial setup, except when
specified in the instructions.
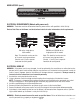
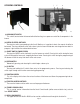
1. Insert an empty funnel into the funnel rails of the brew station.
2. Place an empty server under the funnel.
3. Connect the brewer to the power source. Water will begin flowing into the tank and stop when the tank is
filled to its capacity. Display will show PLEASE WAIT...TANK FILLING until tank is filled with water.
4. Wait approximately 20 mins for the water in the tank to heat to the proper temperature on 120V/208V ma-
chines. (Wait approximately 45 mins on 120V machines). Display will show READY TO BREW...WATER
TEMP: XXX˚ when tank is at operating temperature.
5. Place a small vessel beneath the faucet and open the faucet handle. Release it when you hear the tank refill-
ing.
6. Water volumes have been preset at the factory. Refer to adjustments for the Set Brew Volumes section of
this manual should the volume need to be increased or decreased.
7. The brewer is now ready for use in accordance with the coffee brewing instructions.
COFFEE BREWING
1. Insert a BUNN filter into the Smart Funnel.
2. If a grinder is not used to obtain the coffee grounds, pour the proper amount of fresh coffee grounds into
the funnel and level by gently shaking. Slide the funnel into the funnel rails and select batch size. Proceed to
step 5.
3. If a G9-2T DBC or MHG grinder is used with a compatible Smart Funnel, select the desired batch size on the
grinder. Grind the selected amount of fresh coffee into funnel and level grounds by gently shaking. It is not
necessary to select a size on the brewer.
4. Slide the funnel into the funnel rails. The brewer will read the size ground through the chip in the funnel
handle and will automatically select the correct size to brew.
5. Place an empty server under the funnel.
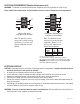
6 The ENABLE BREW switch must be ON (indicator lit). Momentarily press and release the BREW switch. If
the brewer has the funnel lock option and if it is activated, once a brew cycle has been started the funnel is
locked in place. There may be certain situations in which the brew cycle will not begin when BREW switch
is pressed:
a) ENABLE BREW must be ON.
b) BREW TEMPERATURE TOO LOW - wait until heated or cancel BREW LOCKOUT option.
c) FUNNEL NOT IN PLACE (or using a standard brew funnel) - cancel FUNNEL DETECT.
d) CHECK FUNNEL - remove funnel, empty previously brewed grounds and grind a new batch into the fun-
nel.
7. If none of the above messages are displayed, the display will read NOW BREWING and the time remaining
in the brew cycle.
8. Following the BREW will be a countdown DRIPPING time which shows the time remaining until the funnel
lock will release. Discard the grounds and filter only after visible dripping stops.
35879.1 062107