BURGcam REC 3511 FullHD Universalrekorder FullHD universal recorder r riff übe * Fernzug PRO Apps m a c BURG nes Smartpho und Apple * Android ets bl Ta und Kurzanleitung Quick installation guide www.burg.
BURGcam REC 3511 BNC 3,5“ HDD 2 video analysis ONVIF compatible BURGcam REC 3511
Language Deutsch . . . . . . . . . . . . . . . . . . . . . . . . . . . . . . . . . . . . . . . . . . . . . . . 4 English . . . . . . . . . . . . . . . . . . . . . . . . . . . . . . . . . . . . . . . . . . . . . . . 25 Download: www.burg.biz Download: www.burg.biz Download: www.burg.biz Stáhnout: www.burg.biz Download: www.burg.biz Letölthető: www.burg.biz Descărcare: www.burg.biz Download: www.burg.
Lieferumfang 1 x Rekorder 1 x 12V DC Netzteil 1 x LAN / Netzkabel 1 x Maus 1 x Kurzanleitung Hinweis: Eine Festplatte ist nicht im Lieferumfang enthalten.
Unterstützte BURG-WÄCHTER WIFI Kameramodelle B URGcam MOVE 301 BURGcam SMART 302 / SMART 3020 • BURGcam DOME 303 / DOME 3030 • • • • B URGcam BULLET 304 / BULLET 3040 BURGcam ZOOM 3060 / ZOOM 3061 Inbetriebnahme S tarten Sie Ihre BURG-WÄCHTER WLAN Kamera (Modelle siehe oben) Hinweis: Der Rekorder selbst ist kein WLAN-fähiges Gerät; er verwaltet die WLAN Geräte. • Schließen Sie den Rekorder mit dem beiliegenden Netzwerkkabel an Ihren Router (z. B. Fritzbox) an.
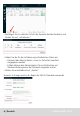
• estätigen Sie im nächsten Schritt die Auswahl der/des Geräte(s) und B klicken Sie auf „Initialisieren“. Geben Sie die für die Initialisierung erforderlichen Daten ein. - Passwort des Administrators, muss zur Sicherheit zweifach eingegeben werden. - E -Mail Adresse des Administrators für ein Rücksetzen auf Werkseinstellung wenn das Passwort vergessen wurde. • Klicken Sie anschließend auf „Weiter“ • Hinweis: In Europa wird in der Regel der PAL (P) Standard verwendet.
• eräte Initialisierung G Nach erfolgreicher Initialisierung erhalten Sie eine Statusmeldung. Beenden Sie diese mit „Ende“ • Geräte Webseite öffnen Um die Gerätewebseite zu öffnen klicken Sie auf das Explorer Symbol neben dem Gerätenamen • Loggen Sie sich in das Gerät mit dem bei der Initialisierung vergebenen Account ein Beschreibung des Rekorder-Menüs Hinweis: Die im Folgenden beschriebene Menü-Struktur bezieht sich auf den WebZugriff.
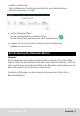
Einbindung der Kamera in den Rekorder Es gibt zwei Varianten, die Kameras in den Rekorder einzubinden: über das Web-Menü oder lokal über einen Bildschirm. 1. Web-Menü Um die Kamera in den Rekorder einzubinden, gehen Sie wie folgt vor: ffnen Sie den Menüpunkt Ö Verwaltung Kamera Anmeldung • Klicken Sie auf „Geräte suchen“, um die Liste mit allen im Netzwerk verfügbaren Geräten zu aktualisieren. • Wählen Sie die gewünschte Kamera aus und klicken Sie auf „Hinzufügen“.
• ach erfolgreichem Hinzufügen wird die „Status“ Anzeige grün N (bei nicht-eingebundenen Geräten ist sie rot). • itte beachten Sie, dass Sie nach einer Änderung des Kamera-Passwortes B dieses im Rekorder im dargestellten Menü unter „Bearbeiten“ ebenfalls eintragen müssen. Festplatteneinbau 1. Lösen Sie die 4 Schrauben des Rekorders auf der Rekorder Rückseite. Die weiße Gehäuse-Oberschale lässt sich nun abheben. 2. Bereiten Sie die 3,5“ SATA-Festplatte (max. 6TB) für den Einbau vor.
| Deutsch BURGcam REC 3511
Status-Anzeige LEDs Nr. Name Funktion 1 Festplatten Status Wenn die LED rot leuchtet, wurde ein Festplattenfehler festgestellt. 2 Betriebsspannung Leuchtet rot, wenn die Betriebsspannung anliegt. 3 Netzwerk Status Die rote LED geht an wenn ein Netzwerkproblem festgestellt wurde. Wiedergabe von Aufnahmen / Auslagern von Daten Wiedergabe: 1. Um Aufnahmen eines bestimmten Datums abzuspielen wählen Sie bitte rechts im Kalender das Datum der Aufnahme.
2. K licken Sie nun mit der Maus auf die Zeitlinie an die gewünschte Stelle. Zum Heranzoomen können Sie die Buttons unten rechts verwenden. 3. Benutzen Sie die Player Buttons um im Video zu navigieren. Auslagern/ Exportieren von Daten: 1. Stecken Sie einen USB Stick in den freien USB Slot am Rekorder. 2. Tragen Sie den gewünschten Zeitraum, der exportiert werden soll, in den Von – Bis Feldern unten rechts ein. 3. Klicken Sie auf das Diskettensymbol zum Speichern. 4.
Technische Daten Typ Digitaler Netzwerk-Rekorder Festplattenkapazität (maximal) 1 x 3,5", SATA, max. 6 TB (nicht enthalten) Ext. Anschlüsse (Videoformat) 4 x BNC (Analog/ AHD/TVI/CVI) Max. Auflösung AHD/CVI/TVI 5MP Max. Auflösung Analog 960H Automatische Videoformat-Erkennung Ja USB-Schnittstelle 2x USB 2.
Aufnahme Zeitplan Ja Live-Bild Wiedergabe Ja Erkennung Bewegung Ja Erkennung Signal verloren Ja Unterstützte Betriebssysteme Windows 10 DHCP Unterstützung Ja Zugriff Web-Interface, lokaler Monitor Fernzugriff P2P BURGcloud, BURGcam App Gehäusefarbe Weiß Leistungsaufnahme (Watt) 10 (ohne Festplatte) Betriebsspannung 12V DC, Netzteil im Lieferumfang enthalten Betriebstemperatur -10° bis +55° C Relative Luftfeuchtigkeit 95%, nicht kondensierend Abmessungen 205 x 211 x 45 mm Gewicht
Ausführliches Benutzerhandbuch Diese Kurzanleitung dient dazu, das Gerät einfach und unkompliziert in Betrieb zu nehmen. Weitere ausführlichere Erklärungen und Beschreibungen der einzelnen Funktionen finden Sie im Benutzerhandbuch, das Sie als pdfDatei herunterladen können: www.burg.
„Burg Cam“ App für P2P Anwendungen Sie können das Gerät auch über die „BurgCam PRO“ App von Ihrem Smartphone / Tablet aufrufen und steuern. Es steht die folgende App für Smartphones und für Tablets kostenlos zur Verfügung.
Sicherheitshinweise und Vorsichtsmaßnahmen Bitte lesen Sie vor Inbetriebnahme des Gerätes das Handbuch sorgfältig durch und heben Sie es als Nachschlagewerk für einen späteren Zeitpunkt auf. 1.1 Überlastung Setzen Sie Netzsteckdose und Netzkabel niemals einer Überlastung aus. Feuer und lebensgefährliche elektrische Schläge können die Folge sein. Eindringen von Flüssigkeiten oder Gegenständen Stochern Sie niemals mit metallischen Gegenständen in den Lüftungsschlitzen des Gerätes.
1.2 CE-Richtlinien Dieses Gerät entspricht den CE-Richtlinien. Wenn Sie eine EG-Konformitäts erklärung für dieses Gerät benötigen, schicken Sie bitte eine Anfrage an: info@burg.biz Änderungen und Modifizierungen, die nicht ausdrücklich durch die zuständige Genehmigungsbehörde genehmigt worden sind, können zum Entzug der Genehmigung zum Betreiben des Gerätes führen.
etzkabel und sonstige Kabel sollten so verlegt werden, dass man nicht N darauf tritt oder sie durch herabfallende Gegenstände beschädigt werden können. Beschädigte Kabel können zu Kurzschluss und Beschädigung des Gerätes sowie lebensgefährlichen elektrischen Schlägen führen. • Es darf nur die auf dem Typenschild angegebenen Stromquelle benutzt werden. Wenn Sie nicht sicher sind, ob die am Installationsort vorhandene Stromversorgung verwendet werden kann, dann fragen Sie Ihren Elektro-Installateur.
Achtung: Ein Öffnen des Gehäuses führt zwangsläufig zum Verlust der Garantie. Bitte nehmen Sie deshalb keine Arbeiten am Gerät selber vor, sondern wenden Sie sich an Ihren Fachhändler. • ei digitalen Videorekordern ist im Wesentlichen die Festplatte das Bauteil, B welches einem natürlichen Verschleiß unterliegt. Auch hier gilt, dass nach ca. 8.000 bis 10.000 Stunden Laufzeit Verschleißerscheinungen auftreten können und es zu Störungen kommen kann.
P rüfen Sie vor der Inbetriebnahme stromführende Teile auf Beschädigungen. Beschädigte Teile müssen ersetzt oder ausgetauscht werden. • Benutzen Sie keine Zusatzgeräte, die nicht vom Hersteller des Gerätes empfohlen wurden. Diese können die Funktionalität des Gerätes beeinflussen und schlimmstenfalls Verletzungen und einen elektrischen Schlag herbeiführen oder sogar Feuer auslösen. • Betreiben Sie das Gerät niemals in der Nähe von Wasser oder anderen Flüssigkeiten.
GNU GPL Lizenzhinweis Beachten Sie, dass dieses Produkt u.a. Open Source Software enthält, welche unter der GNU General Public License (GPL) lizensiert ist. Wir verweisen auf die Lizenzbestimmungen der GPL, um eine GPL-konforme Verwendung der Programme sicherzustellen. Der ausgedruckte Lizenztext der GPL V2 liegt diesem Produkt bei. Der Lizenztext der GPL kann auch von der Homepage unter https:/www.burg.biz/service-downloads/manuals/ #Videoueberwachung heruntergeladen werden.
Informationen zur Cyber Sicherheit BURG-WÄCHTER KG folgt der branchenüblichen Praxis beim Umgang mit der Softwareprüfung und gefundenen Schwachstellen von Produktsoftware und Produkten, um das Risiko für Kunden zu minimieren.
Entsorgung des Gerätes Sehr geehrter Kunde, bitte helfen Sie Abfall zu vermeiden. Sollten Sie zu einem Zeitpunkt beabsichtigen, dieses Gerät zu entsorgen, denken Sie bitte daran, dass viele Bestandteile dieses Gerätes aus wertvollen Materialien bestehen, welche man recyceln kann. Wir weisen darauf hin, dass derart gekennzeichnete Elektround Elektronikgeräte sowie Batterien, nicht über den Hausmüll, sondern getrennt bzw. separat gesammelt werden müssen.
Items included in the delivery 1 x Recorder 1x 12 V DC power supply / cord 1x Quick installation guide 1x LAN / network cable 1x Mouse Please note: A hard drive is not included in the delivery.
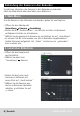
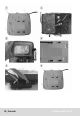
Description 1 2/6 3 4 5 Video In Audio In/Out VGA Monitor out Power cable fastener GND, Ground End 7 8 9 10 HDMI media interfacet Network port USB port 12VDC power input Supported BURG-WÄCHTER WIFI camera models B URGcam MOVE 301 BURGcam SMART 302 / SMART 3020 • BURGcam DOME 303 / DOME 3030 • • • • B URGcam BULLET 304 / BULLET 3040 BURGcam ZOOM 3060 / ZOOM 3061 Getting started S etup your BURG-WÄCHTER WIFI camera (see above for camera models) Connect the recorder to your router using the sup
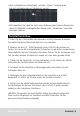
Device initialization using the BURGconfig tool • • • S tart the BURGconfig tool after successful installation Select the desired device(s) from the list. Place a tick next to the device you want to set up. Click on to "Initialize" to initialize the selected devices with a personal Password to be set up. I n the next step confirm the selection of the device(s) and click on "Initialize". E nter the data required for initialization. Administrator password must be entered twice for security reasons.
• evice initialization D After successful initialization you will receive a status message.
Description of recorder menu Note: The following menu structure is based on the web access. If you access your recorder locally via a monitor, the overall look and structure of the user interface is slightly different to the web access, however the functions are identical. You will find detailed explanations on the menu items in the user manual. How to add a camera There are two ways to add a camera in the recorder: either using the web menu or locally via your monitor. 1.
Locally via monitor • • ight-click to open the main menu R Select „Camera“ S tart searching for cameras withhin the network by clicking on „Device search“ • Select the cameras you wish to record / display and click on „Add“ • • aving successfully added a camera, its status will be indicated in green H (devices not added are marked in red). • P lease note that if you change the camera password, it has to be changed in the recorder as well. Click on “Modify” to change the password.
Installation HDD 1. Loosen the screws of the upper cover and side panel. 2. Fix four screws in the HDD (loosely) 3. Place the HDD in alignment with the four holes in the bottom. 4. Turn the device upside down and then turn screw in firmly. 5. Connect the HDD cable and power cable. 6. Place the cover in accordance with the clip and then place the upper cover back. Secure the screws in the rear panel and the side panel. NOTE: Please use HDD made for video surveillance only.
| English BURGcam REC 3511
Status indicator LEDs Nr. Name Funktion 1 HDD status indictor light The red light turns on when HDD is abnormal. 2 Power indicator light The red light turns on when the power connection is OK. 3 Network status indicator light The red light turns on when the network connection is abnormal. Recording playback / data export Playback: 1. Select an date on the upper right side of menu. A dot underneath a calendar day will be shown when there’s data recorded on that day.
2. N ow click on the timeline at the desired position by using the mouse. You can use the buttons at the bottom right to zoom in. 3. Use the player buttons to navigate the video. Data export: 1. Insert an USB Pendrive to recorders USB slot. 2. Enter the start- and end-time you want to download. 3. Press the disk icon to open export menu. 4. Select a folder on your USB pendrive and click the “Export” button than. 5. The download will start immediately. The process may need some time.
Technical specifications Type Digital network recorder HDD capacity (internal) 1 x 3,5" SATA, max. 6 TB (not included) External Ports (video) 4 x BNC (Analog/AHD/TVI/CVI) Max. resolution AHD/CVI/TVI 5 MP Max. resolution analog 960 H Auto. video format detection Yes External HDD possible No USB interface 2x USB 2.
Schedule recording Yes Live image Yes Motion detection Yes Lost signal detection Yes Supported OS Windows 10 DHCP support Yes Access Web interface, local monitor Remote access P2P BURGcloud, BURGcam App Housing colour White Power consumption (watt) 10 (without HDD) Voltage 12 V DC, power supply included Operating temperature -10° to +55° C Relative humidity 95%, non-condensing Dimensions 205 x 211 x 45 mm Weight 550g / 1.
Detailed user manual The purpose of this quick installation guide is to start the device in an easy and convenient way. Further detailed explanations and descriptions of the various functions are available in the user manual which you can download as pdf file from our website: www.burg.biz Service&Downloads instructions Video security User manual Assembly Alternatively, for quick access to the user manual, you can scan the QR-code below to view the user manual on your smartphone or tablet.
1. Safety instructions and precautions Please read the user manual carefully before starting to operate this device. Please retain the user manual for future reference. 1.1 Overcharge Never expose the power socket or the power cord to electrical overcharge. This may lead to fire and life-threatening shocks. Entry of liquids or items Never poke with metallic items in the ventilation slots of the device.
Important – Legal note Monitoring, recording and storage of video surveillance data (images, sound), is subject to strict legal regulations. Please respect the Data Privacy Act which applies to your country. The operator of the system is liable. 1.3 Important general note This recorder has been designed for indoor video surveillance applications. Please read the following instructions carefully. 1.3.1 Assembly and installation n-site installation must meet local specifications and regulations.
I mmediately shut off the equipment and promptly disconnect it from the operating voltage. The following damages must be handled by an authorized service centre: - Damage to the power supply cable - If a liquid spilled onto the equipment or an object penetrated the equipment - If the equipment was exposed to water or another liquid - If the equipment is not functioning properly despite observing the instructions in these operating instructions.
1.3.3 Spare parts and accessories nly use auxiliary devices which are recommended by the manufacturer. O Non-recommended devices may influence the functionality and may cause electric shocks or fire caused by short circuits. • Only use spare parts which are recommended by the manufacturer or which have identical characteristics. Non-approved spare parts may cause harm to people (electric shock) and may damage the device (fire). • Disposal Dear customer, Please help us avoid unnecessary waste.
General safety precautions and safety instructions Assistance and technical support: If you have questions regarding this product or the installation process, please contact: camera-service@burg.biz Safety instructions efore operating the appliance, please read this manual carefully and retain B it for further reference afterwards. • Before cleaning the appliance, it has to be switched off and unplugged from the power outlet. Wipe the appliance with a soft and slightly damp cloth.
hen replacement parts are required, be sure that the service technician W uses replacements parts specified by the manufacturer. • The appliance must only be installed by qualified service personnel and has to comply with local specifications and regulations. • Please respect the local legal regulations on waste if you need to dispose of discarded appliances.
GNU GPL License note Certain open source components are licensed pursuant to GNU General Public License. This establishes that the customers have the right to acquire, modify and redistribute the source code of said software in accordance with the terms of the GNU General Public License or Lesser General Public License. A printed copy of the license text GPL V2 is included in this product shipment. The license text can also be downloaded from our homepage at https://www.burg.
Information about cyber security BURG-WÄCHTER KG follows industry standard practices in software testing and vulnerabilities found in product software and products to minimize risk to customers. Unfortunately, for complete security of products, software and services that are created and verified to the best of our knowledge and belief, complete freedom from errors that can not be overcome by potentially malicious attackers can not be fully guaranteed.
Notes 46 BURGcam REC 3511
Notes BURGcam REC 3511 47
www.burg.