
Operation Manual


8
Installation of the hands-free car kit
Step 2:
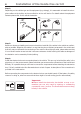
Depending on the vehicle type and its equipment (e.g. airbags), it is reasonable to install the micro-
phone either at the A-pillar, at the sun shield or at the roof interior. For details about the equipment
features please refer to the vehicle documents.
Step 3:
Remove or loosen up cladding and covers to be able to install all of the cables in the vehicle as comfort-
ably as possible. Please lay the cables in a way that they do not lie/hang unsecured in the vehicle and
that they may not influence the conducting of the vehicle. When laying a cable, please take care that
it is not under traction stress but that it has some tolerance. Avoid crushing the cable as damages of
the insulation can be caused by friction/rubbing.
Step 4:
Install the electronics box at a convenient place in the vehicle. This can e.g. be behind the radio, in the
glove box, or in the centre console. Please mind that you can access the connections of the box without
difficulty. It is possible that you will have to connect the components before attaching the electronics
box, if it isn’t possible to do this afterwards due to a lack of space. A description of the connections is
provided in the next section.
Before connecting the components to the electronics box you should branch off the battery for safety
reasons. In doing so, take into account that there might be a radio coding (confer radio manual).
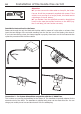
Important:
Please install the electronics box behind a cover or so- X
mewhere you can only reach by opening or unfastening
a protective cover / a cover. The terminal box must not hang
loosely in the vehicle.