
Specifications


VPM2 Operation Manual
4
Installation
After unpacking the unit, check for possible damage during
shipping or transport. Should there be any damage please
notify your dealer or Whip Mix immediately.
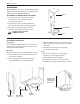
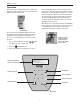
Installation on Column/Base Assembly
1. Connect the base to the stand column using the
two flat washers, two lock washers and two
1/4" x 1/2" bolts provided.
2. Assemble the column to the mixer using the four
1/4" bolts, flat washers and lock washers provided.
3. The power connector in the back of the mixer
should be open through the slot in the column.
CAUTION: DO NOT USE NEAR
FLAMMABLE LIQUIDS
Stand Column
Mixer
Base
Installation on Bracket
Preparation
The only hardware supplied with the unit is one #8-32 nut
and the bracket clip. See the instructions below for more
information regarding hardware.
Mounting
Make sure the wall can support 20.4 kg (45 lbs.) of weight.
1. Mount the bracket to the wall using four 1/4" bolts,
screws and lock washers.
2. Place the Bracket Clip on the back and bottom
of the VPM2 with the screw hole facing down.
3. Slide the VPM2 down onto the wall mount bracket.
(Make sure the place the unit is mounted can handle
the weight.)
4. Install the #8-32 nut onto the threaded stud.
See the illustrations below.
Note:
• Make sure the unit is anchored on wall studs,
either directly or using a plywood board.
• The drive shaft must point downward.
• Keep a minimum distance of 9" (23 cm) between
the bottom of the mixing ring and the bench or table.
Bracket
Clip Slot
Bracket Nut
(hardware included)
2 Vacuum
Filters
Mounting
Bracket
Bracket Clip
(hardware included)
Move the unit
down from top
of the bracket
until secure