
Specifications


VPM2 Operation Manual
5
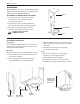
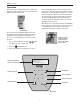
Hold the bowl and
paddle up until the
vacuum supports
both and the paddle
begins to turn.
Operation
The vacuum mixer is ready for immediate operation after
plugging the power supply cable into the back of the unit.
Switch the unit to “ON” position.
Once the Start/Stop button is pressed and the bowl is
placed on the chuck, the program begins and the vacuum
pump starts. The vacuum will rise until there is no need to
hold the bowl in place. Mixing occurs automatically from
this point until the end of the program. When a program
finishes, the VPM2 will play the program finished tune
repeatedly and the vacuum will continue to run until the
Start/Stop button is pressed.
Note: Make sure to support the bowl when the Start/Stop
button is pressed at end of mix cycle. Vacuum is released
once Start/Stop is pressed and cycle ends allowing
paddle/bowl assembly to separate from the unit.
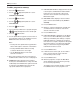
Liquid Crystal Display
(4 lines x 20 characters)
16-Button Keypad
Start/Stop Button
Menu Button
Up Arrow Button
Down Arrow Button
Enter Button
Prgm Name:
Program Number: 0
Mix Time: 5
Press MENU for Setup
On/Off Switch
The start-up message “Whip Mix VPM2 Ver. X.X” will
be displayed briefly followed by Program 0 (or the last
program run). Once Program 0 is displayed you can
choose to run that program or select another program
as follows:
1. Select a Program Number using the
Step
(Arrow) buttons or the number pad.
2. Press the
Start/Stop button.
3. Place the paddle/bowl assembly into the chuck.
Back Button