
User manual

Installing Your Gateway
16
SMCD3GN2 Wireless Cable Modem User Manual
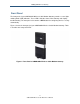
Finding a Suitable Location
The SMCD3GN2 Wireless Cable Modem Gateway can be installed in any location with
access to the cable network. All of the cables connect to the rear panel of the Gateway for
better organization and utility. The LED indicators on the front panel are easily visible to
provide you with information about network activity and status.
For optimum performance, the location you choose should:
y Be close to a working AC power outlet
y Allow sufficient air flow around the Gateway to keep the device as cool as possible
y Not expose the Gateway to a dusty or wet environment
y Be an elevated location such as a high shelf, keeping the number of walls and ceilings
between the Gateway and your other devices to a minimum
y Be away from electrical devices that are potential sources of interference, such as ceiling
fans, home security systems, microwaves, or the base for a cordless phone
y Be away from any large metal surfaces, such as a solid metal door or aluminum studs.
Large expanses of other materials such as glass, insulated walls, fish tanks, mirrors,
brick, and concrete can also affect your wireless signal
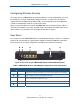
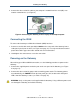
Connecting to the LAN
Using an Ethernet LAN cable, you can connect the Gateway to a desktop computer,
notebook, hub, or switch. Your SMCD3GN2 Wireless supports auto-MDI/MDIX, so you can
use either a standard straight-through or crossover Ethernet cable.
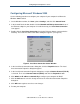
1. Connect either end of an Ethernet cable to one of the four ETH ports on the rear panel of
the Gateway (see Figure 3).
Figure 3. Connecting to an ETH Port on the Gateway Rear Panel