
Instruction manual


2
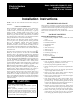
Table 1 – Electric Heater Usage Chart
CPHEATER
Agency
Approval
kW V PH
Circuit
Breaker
Air Conditioner Models (PAC) Heat Pump Models (PHP)
24 30 36 42 48 60 24 30 36 42 48 60
125 UL 5 208/240 1 N √ √ √ √ √ √ √ √ √ √
126 UL 5 208/240 1 Y √ √ √ √ √ √ √ √ √ √ √ √
127 UL 7.5 208/240 1 N √ √ √ √ √ √ √
128 UL 7.5 208/240 1 Y √ √ √ √ √ √ √ √ √ √ √ √
129 UL 10 208/240 1 N √ √ √ √ √
130 UL 10 208/240 1 Y √ √ √ √ √ √ √ √ √ √ √ √
131 UL 15 208/240 1 Y √ √ √ √ √ √ √ √
132 UL 20 208/240 1 Y √ √ √ √
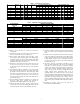
Table 2 – Minimum Airflow for Heater Operation
Air Conditioner
Unit Size
Minimum Airflow (CFM)
5kW 7.5 kW 10 kW 15 kW 20 kW
24 600 750 750 X X
30 600 750 750 X X
36 600 750 750 1050 X
42 600 750 750 1050 X
48 600 750 750 1050 1400
60 600 750 750 1050 1400
X= Not Approved Combination
Heat Pump Unit Size
Minimum Airflow (CFM)
5kW 7.5 kW 10 kW 15 kW 20 kW
24 750 800 800 X X
30 750 800 800 X X
36 750 800 800 1200 X
42 750 800 800 1200 X
48 750 800 800 1200 1700
60 750 800 800 1200 1700
X= Not Approved Combination
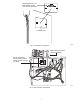
10. Remove unit front panel to access unit control box
compartment.
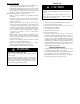
11. Open heater package and remove heater control panel; set
heater control panel on top of unit (See Fig. 4).
12. Heater control panel will have black and yellow power
wires ending in panel mounted plugs; reach through large
rectangular opening in control panel and snap these plugs
into mating openings in heater wiring plug attachment plate
installed in step 9 above (See Fig. 3).
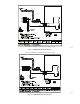
13. Rotate heater control panel into unit control box area and
locate it into top left corner of control box; secure heater
control panel to unit control box with (4) screws provided
(See Fig. 5).
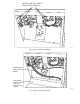
14. Open flexible “fishpaper” insulation cover provided with
unit control box and route heater low voltage wires along
the bottom of the unit control box. Route low voltage leads
from heater relay(s) through hole in unit control box and
into low voltage splice box. (See Fig. 5 and 6.) dress wires
and secure them to existing unit control wires with wire ties
provided (See Fig. 6).
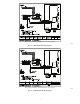
15. Re--close flexible “fishpaper” insulation cover; insure unit
black and yellow power “pigtails” from contactor are
properly routed through insulation cover (See Fig. 7).
16. Connect the black and yellow “pigtails” from the heater
control panel to the black and yellow pigtails from the unit
contactor using the connectors provided with the heater.
17. Attach the adhesive backed wiring label provided with the
heater to the back of the access panel near the unit wiring
label.
18. Return to blower compartment and locate black and yellow
power wires from heater module; these wires will terminate
in plug connectors that mate with the plug from the heater
control installed in Step 13 above. Snap these connectors
into place; dress and secure wires to fan wires with wire ties
provided (See Fig. 8).
19. The factory speed tap for electric heat operation is tap 2.
Refer to blower performance table in the unit installation
instructions or pre--sale literature to determine available
airflow at duct system external static pressure. Compare the
actual airflow with the minimum required airflow from
Table 2. If tap 2 airflow is lower than minimum required
airflow, recheck blower performance table to see if
minimum airflow can be achieved on tap 3. If tap 3 airflow
meets the minimum CFM requirement, change speed tap for
electric heat from tap 2 to tap 3 in unit control box. See unit
instructions and wiring diagram. If tap 3 airflow does not
achieve minimum CFM requirement, then another electric
heater that meets the minimum CFM requirement must be
used.
20. Reattach the blower access panel and proceed to
ELECTRICAL CONNECTION.