RDD401BT USER MANUAL DVD/VCD/CD/MP3/USB/SD/MMC PLAYER FM/AM TUNER
Safety Precautions Thank you for purchasing this product. Please read through these operating instructions so you will know how to operate your model properly. After you have finished reading the instructions, keep this manual in a safe place for future reference. Only connect the unit to a 12-volt power supply with negative grounding. Never expose this unit, amplifier, and speakers to moisture or water for preventing electric sparks or fires.
Safety Precautions Contents Warning Safety Precautions..........................................1 Operate the unit correctly according to the manual instruction to prevent unnecessary problem. Features..........................................................3 Caution Remote Controls.............................................5 This product is a CLASS 1 LASER PRODUCT.
Features DVD-R/RW compatibility Button Operation Explanations It is possible to playback DVD-R/RW discs recorded with the video format and Video Recording format. Touch panel key operation It is possible to operate this unit by using touch panel key. Video CDs featuring PBC compatibility Some frequent operations 1) Move cursor It is possible to playback Video CDs featuring PBC (playback control). WMA and MP3 compatibility It is possible to playback WMA and MP3 files.
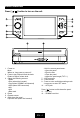
Panel Controls Press [ / ] button to turn on the unit. 1. - Power on - Mute - When on, long press to power off. 2. - Press to pop out/push back the knob. - Rotate to adjust volume level. 3. - Select the following sources: >Radio >Disc (when disc inserted) >Card (when SD/MMC card inserted) >USB (when USB connected) >AV1 >AV2 >Blue-tooth 4. - Reset 5. - Remote sensor 6.
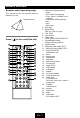
Remote Controls Remote control operating range The remote control can operate within a distance of 3~5m. Remote sensor 30˚ Press [ 30˚ ] to turn on/off the unit. 1 16 2 17 3 18 4 19 5 20 6 21 7 22 8 23 9 24 10 11 12 25 26 13 14 27 28 29 15 1. - Select the following sources: >Radio >Disc (when disc inserted) > C ard (when SD/MMC card inserted) >USB (when USB connected) >AV1 >AV2 >Blue-tooth 2. - Disc eject 3. - Menu (DVD) - PBC (for VCD 2.0 or up) 4.
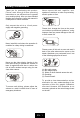
Remote Controls Basic Operations Replacing the lithium battery of remote control unit Turn on/off the power When the range of the operation of the card remote control becomes short or no functions while operating, replace the battery with a new lithium battery. Make sure the battery polarity replacement is correct. 1. Open the back cover of the remote control unit. 2. I nsert the button-type battery with the stamped (+) mark facing upward. Close the back cover. 1.
Basic Operations When parking brake applied Using an SD/MMC Card 1. I f 'PRK SW' cable is connected to hand brake switch, the video display of the TFT monitor will be controlled by driving status, system setup and input video sources. 2. W hen the car is moving ahead, if the video disc is played, the screen appears "WARNING!! Engage Parking Brake to View Video", and blank screen. The above warning screen will prevent the driver watching images. The passengers at the rear seats can watch normally. 1.
Disc Operation Insert a disc Press [ ] button to slide down the panel, insert a disc into the slot, and the unit will change to disc mode automatically. Note: • Please confirm whether there is a disc in the unit before you insert another one. • The unit will exit current playing source and enter DVD mode when one disc is inserted. • S ome recorded discs, such as CD-R, CD-RW, DVD-R, DVD+R, DVD-RW, DVD+RW cannot be played back because of different recording status.
Disc Operation location on the disc is saved, press [ ] to resume the playback from the saved disc location. 2. P ress [ ] twice to cease the playback. Press [ ] to start the playback from the very beginning the Title page of the DVD or the first track of VCD / CD. Select desired track - Press [ / ] to skip to the next track. - Use 1-9 and 0, 10+ buttons on the remote control to select desired track number.
Disc Operation DVD Title Select Video VCD Playback Menu Press [ TITLE ] to display title or chapter list, use [ / ] or [ / ] cursor or digit number to select, press [ OK ] to play. While playback touch the center of the screen: DVD Angle Select Press [ ANGLE ] to select different angle to view if the DVD has multiple-angle views. ZOOM Press [ ZOOM ] button, the picture will be zoomed accordingly.
Disc Operation Tuner Operation MP3/MP4/PHOTO Menu Press the [ SRC ] button on the front panel or remote control or select “Radio” on the source menu of TFT to switch to the radio source. USB Leave me alone When I’m gone 9. Previous/next page 10. Random play 11. Repeat play 12. Show audio file 13. Show photo file 14. Show video file 15. Back to up folder 16. Back to playback menu 1. - Touch to return source menu 2. - Time/Clock 3. - Touch to tune automatically.
Tuner Operation Band REG Mode Press [ / ] to power on, then press SRC repeatedly to select tuner. ] on the TFT or press [ BAND ] on Touch [ remote control repeatedly to select FM1 -> FM2 -> FM3 -> AM1 -> AM2 Display shows wave band on the top left, and preset stations on the middle. Tune Radio tune manually: Press [ / ] more than 2 seconds, then press briefly to select desired station. Radio seek automatically: Press [ / ] briefly. AMS: Auto Memory Store Touch [ ] on the TFT, scan the preset stations.
Tuner Operation Bluetooth Operation PTY Reception (Program Type) RDS FM stations provide a program type identification signal. Example: news, rock, info, sport, etc. Program Information To view available program information,touch [ ] to enter preset stations list, and then touch and hold [ ] to switch to PTY list. / ] to switch the previous/next Touch [ list page.
Bluetooth Operation Pairing Use this function to establish a connection between the unit and your mobile phone. • Long press the [SRC] button on the panel or top left of the screen to enter source menu. • Touch [SET] button on the screen to enter the unit system setting menu. • Touch [ ] button on the screen to enter Set/BT menu, sometimes you should press [ ] first. • Switch the “Pair: On/Off” options to “On”. the Pairlist. First touch [ ] on the BT menu.
Bluetooth Operation BT MENU General Operation Note: Some mobile phones will transfer audio from the unit to themselves once the incoming call is answered. BT Audio (if the mobile phone has the A2DP & AVRCP functions) After pairing successfully, in the mode of Bluetooth main menu, open the audio player of your mobile phone and set the transmit mode to Bluetooth. At this time, the unit screen will appear “Music Playing”, and the audio will be transferred from the mobile phone to the unit.
Bluetooth Operation Music Mode A2DP A2DP is short for Advanced Audio Distribution Profile. The mobile phones supporting this function can transmit stereo audio, whereas the ones not supporting this function can transmit mono audio only. AVRCP AVRCP is short for Audio/Video Remote Control Profile. The mobile phones supporting this function can control the playback of a Bluetooth audio player.
System Setup Audio/Video Setting Press the [ MENU ] button repeatedly to enter Audio/Video setting mode. Bass 00 Treble 00 Middle 6. 7. 8. 9. Touch to access language setting options Touch to access DVD setting options Touch to access radio setting options Touch to show next page of setting menu 00 User 1. [ ]: EQ setting menu. Touch [ / ] button on the TFT to adjust Bass/Middle/ Treble or select preset EQ. 2. [ ]: Fader/Balance menu.
System Setup Language Setting Rating: , Touch [ ] / [ ] to select a rating level. The rating of the disc is from 1 to 8: (1) with the most limits when playing. (8) with the least limits when playing. Original setting: 8 OSD Language Audio Language Subtitle Language Menu Language Touch the language to the right of the option to show all the optional languages, touch to select. Or touch [ ] to return to previous menu without any modification.
System Setup TA: On/Off Choose TA (Traffic Announcements Identification) on or off. TA Volume: 08-34 Choose TA-VOL level. Regional: On/Off Choose AF function to implement or ignore the regional code (of the PI) and only stations in the current region can be tuned automatically. Other Setting TS Setting When the touch operation is not sensitive or valid, you should calibrate the touch screen through “TS Calibrate” function.
Device Connections Notes of connection • T his unit is designed to be used in a vehicle with a 12-volt battery and negative grounding. Before installing this unit to a recreational vehicle, a bus, or a truck, make sure the battery voltage is appropriate for this unit to be used, otherwise, install a transformer by professional to convert the output voltage to 12V. • I f an external power amplifier is connected, please don't connect P.
Device Connections Parking Brake Cable Connections Reverse Driving Cable Connections EN - 21
Installation Electronic Connections Steering Wheel Control EN - 22 (Black)
Installation Electronic Connections 1. If your car is equipped with the ISO connector, then connect the ISO connectors as illustrated. 2. For connections without the ISO connectors, check the wiring in the vehicle carefully before connecting, incorrect connection may cause serious damage to this unit. Cut the connector, connect the colored leads of the power cord to the car battery, as shown in the colour code table below for speaker and power cable connections.
Installation with wire nuts or electrical tape. After completing the wiring connections, turn the unit on to confirm operation (vehicle ignition must be on). If the unit does not operate, re-check all wiring until the problem is corrected. 5. Make sure the player is right-side up, then carefully slide the radio into the mounting sleeve until it is fully seated and the spring clips lock it into place. 6. Secure the rear of the unit to the car body using the mounting bolt and rubber cushion. 7.
Anti-Theft System T his unit is d esign ed w it h a f lip- down detachable panel. The panel can be detached and taken with you, helping to deter theft. To detach the front panel, perform the following steps: Remove the unit 1. Remove the panel. 2. Remove the trim plate. 3. Insert the removal keys straight back until they lock, then pull the unit out. 4. Disconnect all electrical wires. Remove the panel 1. Switch off the power of the unit. 2. Press [ ] to flip down the panel. 3.
Troubleshooting If you suspect something is wrong, immediately switch power off. Immediately stop using it and call the store where you purchased it. Never try to repair the unit yourself because it is dangerous to do so.
Specifications General Power supply: 12VDC(11V-16V), Test voltage 14.4V, negative ground Maximum power output: 40W x 4 channels Continuous power output: 25W x 4 channels (4 10% T.H.D.) Suitable speaker impedance: 4-8ohm Pre-Amp output voltage: 2 . 0 V ( C D p l a y m o d e : 1KHz, 0dB, 10K load) Fuse: 15A Dimensions (WxHxD): - Chassis 178 x 50 x 166mm - Nose 172x72x18mm Weight: 1.92kg Aux-in level: 500mV 4.