640R AV receiver User’s manual 2 ENGLISH azur
Contents Introduction .................................................................................................3 Before connecting .......................................................................................3 Limited warranty ........................................................................................4 Safety precautions .....................................................................................4 Important safety instructions .........................................
640R Introduction Before connecting Thank you for purchasing this Cambridge Audio Azur range AV receiver. The 640R is designed for excellent multi-cchannel surround-ssound performance without compromising on music reproduction. The process of setting up the 640R is first to make all the connections to your speakers and source equipment and then set the unit up via its On-Screen Display (OSD), as there are various settings and adjustments that need to be made before the 640R can be used.
Limited warranty Safety precautions Cambridge Audio warrants this product to be free from defects in materials and workmanship (subject to the terms set forth below). Cambridge Audio will repair or replace (at Cambridge Audio's option) this product or any defective parts in this product. Warranty periods may vary from country to country. If in doubt consult your dealer and ensure that you retain proof of purchase.
azur 640R Please take a moment to read these notes before installing your 640R, as they will enable you to get the best performance and prolong the life of the unit. We advise you follow all instructions, heed all warnings and keep the instructions for future reference. Ventilation Overloading Do not overload wall outlets or extension cord as this can result in a risk of fire or electric shock.
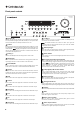
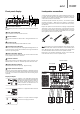
Front panel controls azur 640R Volume 6 5 Tuner FM/AM AV Receiver 21 7 8 9 10 11 12 13 14 20 DVD Video 1 Video 2 Recorder 1 Aux CD Recorder 2 7.1 Direct Analog Stereo Direct Mute 22 Standby / On 1 Phones 2 – Tuning 3 + Mode/Store 4 Digital Processing Options Audio Input Type Stereo Modes 15 16 1 Standby/On Switches the unit between Standby mode (indicated by dim power LED) and On (indicated by bright power LED). Standby is a low power mode.
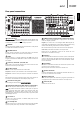
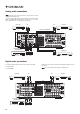
azur 640R Rear panel connections Composite Out In 3 In 1 4 1 R C L R C Cb/Pb Cb/Pb Cb/Pb Cb/Pb SL SR SW SL SR SW 7.1 Direct In 7.
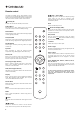
Remote control Tune / Left & Right The 640R is supplied with an Azur Navigator remote control. Insert the supplied AAA batteries to use. For full details of the various adjustment functions available from the remote, refer to the later sections of this manual. Press the right arrow to increase tuner frequency/change preset. Press the left arrow to decrease tuner frequency/change preset. Also used to scroll left/right in the OSD setup menus. Standby/On Switches the unit between Standby mode and On.
azur 1 2 Loudspeaker connections 3 6 4 7 To avoid damaging the speakers with a sudden high-level signal, be sure to switch the power off before connecting the speakers. Check the impedance of your speakers. Speakers with an impedance of between 4 and 8 ohms (each) are recommended. 5 8 9 1 Tuner mode indicators Shows Memory/Store active, Stereo mode active, AutoScan active and RDS On.
Analog audio connections Note: Do not plug in the mains power lead or turn the unit on until all connections have been made. Connect to source equipment using stereo phono cables (stereo 2RCA2RCA). Tape/MD/CDR recorder/players require two sets of stereo phono/RCA cables, one for recording, one for listening. Out Out Video player CD player Phono cable (2RCA-2RCA) In Out In Out In Out In 3 In 2 Digital Co-axial In 1 DVD CD In In Recorder 1 Video 1 7.1 Direct In 7.
azur 640R Three types of video connections can be made to the 640R: 3. Component - connect with 75 ohm Component video cables (3RCA3RCA). 1. Composite - connect with single 75 ohm video phono cable (RCARCA). For best picture quality we recommend making Component video connections, then in declining order of quality, S-Video connections and then Composite video connections. 2. S-Video - connect with S-Video cable.
5.1/6.1/7.1 Direct in 7.1 Preamp out DVD-A or SACD players can be connected to the 640R via its 5.1/6.1/7.1 Direct inputs allowing multi-channel music playback from these new sources. To connect external power amplifiers, use Phono/RCA leads connected to the 7.1 Preamp Outputs on the rear panel. For 5.1/6.1/7.1 use set the ‘Pre Out’ setting in the ‘Output Setup’ OSD menu to 'Pre Out' rather than 'Normal'. This mutes all the internal power amplifiers as they are not being used.
Front input connections Aerial connections The front panel Video 3 input is for temporary connections to video games consoles etc. Remove the cap to access the Video 3 inputs, and connect to a video game console or video camera’s outputs using stereo phono cable (RCA-RCA) and either (1) Composite or (2) S-Video cable, depending on what your unit supports (S-Video preferred).
640R setup The setup of the 640R is a 5 stage process as follows: 2. Speaker delay 2 3. Level calibration - Source audio type - Source video type 5. Assigning any HDMI sources 3 First decide what kind of speaker package you would like to use. The options are 5.1, 6.1 or 7.1. The 640R can support up to a 7.1 speaker setup which means 7 speakers (Front Left, Front Right, Centre, Surround Left, Surround Right, Surround Back Left, Back Right) plus a mains powered Subwoofer (the .1).
azur 640R Set the package as 5.1, 6.1 or 7.1 by highlighting the Decode Mode item and using the Left and Right arrows to scroll through the options: Speaker Config Menu Decode Mode :7.1 Front L/R :Large Centre :None Surr. L/R :None Surr. LB/RB :None Subwoofer :Off [FL/R Must Set Large When Sub.
3. Level calibration 4. Source setup The 640R allows level calibration to match the acoustic level between different types/sizes or even manufacturers of speaker that may be being used for each channel. This is achieved by adjusting the relative level of each speaker through the ‘Level Calibration’ menu in the OSD.
azur 640R Video connection type The 640R provides transcoding or conversion between Composite, SVideo or Component video formats. This function is very useful in that it allows for a single analog connection type to be made to the TV/Monitor even if different input video connection types are used for different source inputs. As with the video inputs, the best output connection type to make to the TV/Monitor is (in declining order of quality) Component, then S-Video then Composite.
Surround sound modes The 640R has several music and home-cinema listening modes available. The output from the 640R will depend both on the source signal present, the speaker setup selected and the decode mode selected on the 640R. Before we describe how to operate the 640R, below is a brief guide to the Surround Sound formats that the 640R is compatible with: Dolby Digital Known also as DD (3/2) or DD 5.1, provides (up to) 5.
azur 640R To activate the 640R, switch the Power button on the rear panel to On then press the Standby/On button on the front panel. Selecting the source 1. Select the desired source by pushing the corresponding source button on the front panel or remote control. DVD Video 1 Video 2 Recorder 1 Aux CD Recorder 2 7.1 Direct 2.
Decode modes - 5.1 speaker setup Pro Logic/Neo/ DSP Surround Modes Dolby Digital/ DTS Surround Modes Incoming audio format Native channel resolution Modes (button cycles round) Output channels Modes (button cycles round) Output Channels PCM 2 (5.1/7.1 if PLII/PLIIx encoded) PCM + PLII Movie PCM + PLII Music PCM + PLII Game PCM + Neo:6 Cinema PCM + Neo:6 Music PassThru Movie Music Room Theatre Hall >5.1 >5.1 >5.1 >5.1 >5.1 >5.1 ! >5.1 ! >5.1 ! >5.1 ! >5.1 ! >5.
azur 640R Pro Logic/Neo/ DSP Surround Modes ENGLISH Decode modes - 6.1 speaker setup Dolby Digital/ DTS Surround Modes Incoming audio format Native channel resolution Modes (button cycles round) Output channels Modes (button cycles round) Output Channels PCM 2 (5.1/7.1 if PLII/PLIIx encoded) PCM + PLIIx Movie PCM + PLIIx Music PCM + PLIIx Game PCM + Neo:6 Cinema PCM + Neo:6 Music PassThru Movie Music Room Theatre Hall >6.1 >6.1 >6.1 >6.1 >6.1 >6.1 ! >6.1 ! >6.1 ! >6.1 ! >6.1 ! >6.
Decode modes - 7.1 speaker setup Pro Logic/Neo/ DSP Surround Modes Dolby Digital/ DTS Surround Modes Incoming audio format Native channel resolution Modes (button cycles round) Output channels Modes (button cycles round) Output Channels PCM 2 (5.1/7.1 if PLII/PLIIx encoded) PCM + PLIIx Movie PCM + PLIIx Music PCM + PLIIx Game PCM + Neo:6 Cinema PCM + Neo:6 Music PassThru Movie Music Room Theatre Hall >7.1 >7.1 >7.1 >5.1 >5.1 >7.1 ! >7.1 ! >7.1 ! >7.1 ! >7.1 ! >7.
azur 640R Dynamic Range Control This setting controls the dynamic range of Dolby Digital or DTS movie soundtracks by compressing the dynamics in four stages to limit the difference in level between loud and quiet passages in the movie. This can be a useful feature when watching movies late at night for instance. Four settings are possible: In automatic tuning mode the unit scans to the next strong station. In manual tuning mode the user can step manually through the frequencies.
Audio split mode The 640R is able to allow the user to listen to one source whilst viewing another. For instance this can be useful if it is desired to watch a sports channel from say a set-top/satellite video source whilst getting audio commentary from the Radio Tuner. Another example might be to listen to a CD whilst watching a video channel, perhaps waiting for a TV programme to start. First select the Video channel you wish to watch in the normal way.
Use the Vol Up, Vol Down, Left and Right buttons to move around the character edit screen to select the required characters, press enter to move to the next character. Selecting the <- and -> arrows at the bottom of the screen and pressing Enter also moves the currently edited character left or right. Character Edit Rec 1 Character :AREC1 ----+ [ABCDEFGHIJKLM] [NOPQRSTUVWXYZ] [abcdefghijklm] [nopqrstuvwxyz] [OSD]: [0123456789-.
Multi-room connections The 640R features Incognito ReadyTM / A-BUSTM Ready outputs, allowing multi-room capability. One or two amplified keypads can be plugged into the 640R (using Cat5/5e cable and RJ45 plugs) to provide multi-room audio in one or two secondary rooms or zones. The keypads are powered by an external PSU (also required) through the Cat5/5e cables and no mains connection is required in the secondary rooms.
azur Control Bus In In Out Emitter Troubleshooting The 640R features Control Bus inputs and outputs that allow un-modulated remote control commands (positive logic, TTL level) to be received electrically by the unit. These control commands are typically generated by custom installation (multi-room) systems or remote IR receiver systems. The Control Bus sockets are colour-coded orange. A low hum or buzz sound can be heard ENGLISH Custom installation (C.I.
Technical specifications Audio Power Output 2 x 120 watts rms per channel, 8 ohms (two channels driven) Recording Video Outputs 1 Composite, 1 S-Video Other connections 1 1/4" / 6.35mm Headphone Output (32 To 600 ohms recommended) 1 Control Bus Input / Ouput 1 IR Emitter In 1 RS232C 1 IEC type mains inlet 7 x 100 watts rms per channel, 8 ohms (all 7 channels driven) THD <0.
DTS Neo:6 Music 5.1/6.1/7.1 Neo:6 matrix decode (6.1 source material, 5.1 decode has phantom rear centre, 7.1 decode has mono back surrounds) DTS Stereo (2/0) + DTS Neo:6 Cinema 5.1/6 .1/7.1 Neo:6 matrix decode of DTS Stereo material (7.1 has mono back surrounds) DTS Stereo (2/0) + DTS Neo:6 Music 5.1/6 .1/7.1 Neo:6 matrix decode of DTS Stereo material (7.1 has mono back surrounds) DTS Stereo (2/0) + PLIIx Movie 5.1/6 .1/7.1 PLIIx matrix decode of DTS Stereo material DTS Stereo (2/0) + PLIIx Music 5.1/6 .
Cambridge Audio Gallery Court Hankey Place London SE1 4BB England © 2007 Cambridge Audio Ltd AP20060/2-A www.cambridge-audio.