ASSEMBLY INSTRUCTIONS SWING IT-130228 Scan me for assembly video Please email us at for assembly tips, report damage, or request parts. For faster response, please write down item number, code for missing parts, attach the purchase receipt and picture of damaged parts.
GENERAL INFORMATION & TIPS 1. Please read the assembly instructions prior to assembling the swing. 2. To avoid damage, assemble the swing on a non-abrasive surface such as carpet. 3. Make sure all bolts and nuts tightly fastened before the chair is used. 4. This swing is not for commercial use. Please make sure you have all parts before beginning assembly. Please wait until all steps are completed before tightening bolts and nuts. TOOLS REQUIRED 1. 8 Philips screwdriver (Not provided).
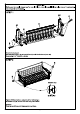
WARNING ! Swing are inherently dangerous for small children, never let small children play around it untended. Do not stand on the swing. STEP 1 Install on level ground. Attach the back support (B) and seat (C) into right and left side frames (Al & A2). Secure using 1 1/4" bolts (D). as shown. STEP 2 Only half in Tighten all bolts completely using screwdriver and tipping in the wooden caps (H). to cover bolts head using rubber mallet. Attention : Please tap carefully to avoid damaging the wood frame.
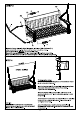
Secure the hanger bolts with chain (1) into prevailed holes of right side frame (A1), using washers (E), dowel rings (K}, nuts (F) and head nuts (G) as shown. (The hanger bolt with long chain must be install in front). Repeat the same procedure to install the hanger bolts (I) into left side frame (A2). Make sure all parts are correctly connected and tighten all nuts completely using wrench.
CARE MAINTENANCE Our collections are meticulously crafted by artisans using sustainably harvested wood, cultivated under rigorous governmental regulations. This approach not only promotes the sustainability of future wood harvests but also guarantees adherence to legal trade practices. Our collections are designed to withstand the elements. However, as even the best-mads furniture is not Indestructible, normal wear and tear will reflect use and care.
WEATHERED TEAK Our weathered teak finish is hand applied to our teak frames using a wire brush to distress the wood before applying a multilayered painted finish to create a weathered appearance for our teak furniture. Similar to all painted finishes, our weathered teak finish will fade and wear when exposed to outdoor elements. As the finish gradually wears away, the underlying natural teak wood will become exposed and start to tum Grey.
1 Year Limited Warranty This warranty is a limited warranty. Regular care and maintenance are required to maintain the warranty. Warranty is to the original purchaser when items are purchased from one of our authorized retailers and is not transferable. If a product fails and is under the terms of our limited warranty, the item will be replaced with a small fee when applicable. In the case of discontinued models, an item of similar quality and style will be offered to the customer.