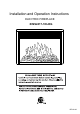
Installation and Operation Instructions ELECTRIC FIREPLACE XINS2417-1DLOG REV18-02
Important Safety Instructions Listing Approvals 2-3 4 Operating Instructions 5 Control Buttons/FunctionS 6 Remote Control 7 Troubleshooting 8 Installation 9 Inserting firebox 10 1
CONSUMER SAFETY INFORMATION Read this manual before installing and operating this appliance. Failure to follow these instructions may result in electric shock, fire property damage, personal injury and will void the warranty. Requires the use of Fireplace Mantel. Do not store or use gasoline or other flammable liquids or vapors in the vicinity of this appliance.
12. All electrical heaters have hot and arcing or sparking parts inside. Do not use in areas where gasoline, paint, or flammable liquids are used or stored or where the appliance will be exposed to flammable vapors. 13. Avoid using the appliance with an extension cord. Extension cords may overheat and cause a risk of fire. If an extension cord MUST be used, the cord must be No.16 AWG minimum size and rated not less than 1875 Watts.
LISTING APPROVALS This heater has been tested in accordance with the CSA Standards. Model Number: XINS2417-1DLOG Description: Electric Fireplace Voltage: 120V AC, 60Hz Watts: MAX 1500W Length: Height: 23.0 7.0 Depth: 17.
OPERATING INSTRUCTIONS Read all instructions and warnings prior to operating the appliance. Ensure that all control are in the "OFF" position before plugging the appliance into a properly grounded electrical outlet.
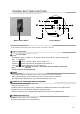
CONTROL BUTTONS/FUNCTIONS 1 2 5 3 4 Master Power Button Control Buttons Power ON\OFF:(The master power switch must be "on")Power to the unit. 1 DISPLAY WINDOWS 2 HEATER SETTINGS This fireplace insert consists of a fan forced electric heater with two heater settings, 800 W(L) or 1,500W(H). Press the button once (the digital screen shows ‘Lo’ ). Pressthe button a second time (the digital screen shows ‘HI ’ ). Press the button a third time to turn the heater off.
REMOTE CONTROL * Remote Control Requires Two AAA Batteries not included. A master button is located on the top left hand side of the insert. This button must be turned ‘On’ to operate remote control. Turn button to ‘Off’ to disable the use of the remote control. 3 1. Press the power button once to turn on the power. Press the button again to turn off all functions. 2 2.Press the button to change the flame brightness, there are 5 levels from High to Low( L5 to L1).
Care and maintenance: Turn heater OFF and unplug from electrical outlet before any cleaning or maintenance is performed. Keep combustible materials such as furniture, pillows, bedding, papers, clothing, and curtains at least 3feet (0.9meter) away from fireplace. Use a vacuum or duster to keep heat and vent area clean from dust and dirt. The exterior of the fireplace should be cleaned with a damp cloth or duster. Do not use abrasive cleaners or liquid sprays.
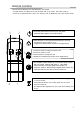
INSTALLATION PLANNING INSTALLATION To avoid scratching the finish, assemble the product on a soft,non-abrasive surface,such as carpet or cardboard. Assembly of this product may require more than one person. TOOLS REQUIRED Safety GogglesPhillips screwdriver HARWARE INCLUDED Note: Hardware not shown to actual size.
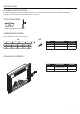
Assembly (continued) I □ Attach the metal brackets(S) to all three sides of the firebox and two sides of the mantel to ensure that your firebox does not move around as you use it. Insert and tighten the 2 (PP) screws. Attach the left and right side trim by inserting and tightening 2 (PP) screws. 1 spare (PP) screw included. x3 PP S □ Insert the firebox insert(P) into the mantel from the rear. Be careful not to scratch the base(B). □ Viewing from the front check that the insert is centered.