
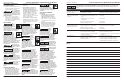
Use and Care Manual

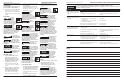

20-Sp
Manual de Instrucciones de Operación Pistola Pulverizadora Alimentada por Gravedad
Preparación
1. Mezcle y diluya bien la pintura,
siguiendo las instrucciones del
fabricante de la pintura. La mayoría
de materiales se pueden rociar
fácilmente si están bien diluídos.
2. Utilice un colador de telo o un
colador, para colar la pintura.
3. Llene el envase hasta alcanzar
3/4 de su capacidad y encienda el
compresor de aire.
4. Utilice un cartón u otro material
desechable para probar y ajustar el
patrón.
5. Para probar la consistencia del
material, pinte varias veces en
el cartón. Si la pintura luce estar
muy espesa, añádale un poco de
thinner (aguarrás). DILUYALA
CON CUIDADO! No exceda las
recomendaciones del fabricante de
la pintura al diluirla.
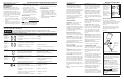
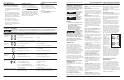
DIRECCION DEL MOVIMIENTO
La dirección del movimiento (horizontal
o vertical) se puede cambiar con solo
aflojar el anillo de retención y girar 90
grados la tapa de aire (Vea la Figura 3).
Apriete el anillo de retención con la
mano después de ajustarlo.
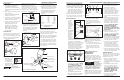
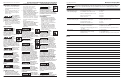
PARA AJUSTAR EL PATRON SISTEMAS
DE SIFON
1. Ajuste la presión
de aire de la pistola
pulverizadora
según las
recomendaciones suministradas
con el material que va a rociar. Esta
presión generalmente es entre
2,76 bar - 4,14 bar.
No exceda la
presión máxima de
la pistola pulverizadora.
Para ajustar la presión de aire oprima
el gatillo y abra completamente la
perilla de control de aire (de haberla).
Si desea reducir la presion del aire para
pinta ciertas areas, use el regulador del
compresor de aire o la perilla de control
de aire para reducir la presion al nivel
deseado (Vea la Figura 4).
2. Seleccione la forma del patrón. Si
desea cubrir una superficie amplia,
gire la perilla de control en sentido
contrario a las agujas del reloj. Si
desea un patrón circular, gírela en el
mismo sentido de las agujas del reloj
(Vea la Figura 6).
3. Gire la perilla de control totalmente
en el mismo sentido de las agujas del
reloj, para cerrarlo (Vea la Figura 6).
4. Oprima el gatillo rápidamente
mientras gira la perilla de control
en sentido contrario al de las agujas
del reloj. Observe el patrón en la
pieza de prueba y ajuste la perilla de
control de fluído hasta que obtenga
el patrón (atomización) deseado
(Vea la Figura 7).
Si el rocío es demasiado fino (malgasto
excesivo), debido al exceso de aire
para la cantidad de pintura que se está
rociando, reduzca la presión del aire o
abra el control de fluído para rociar más
material.
Figura 3
Anillo
Movimiento
Horizontal
Movimiento
Vertical
Tapa de Aire
Figura 4 - Para Ajustar el Suministro de
Aire a la Pistola Pulverizadora
Para
Disminuir el
Flujo de Aire
Perilla de
Control
de Aire
Para
Aumentar el
Flujo de Aire
Figura 6 - Tamaño del Patrón
Perilla de Control
de Patrón
Perilla de
Control de
Fluído
PRESENCIA DE AGUA / ACEITE EN
EL AIRE COMPRIMIDO
Todos los cabezales expulsan cierta
cantidad de agua condensada,
aceite o contaminantes con el aire
comprimido.
IMPORTANTE: Esta condensación
ocasiona un acabado disparejo al
pintar. Le recomendamos que instale
el equipo y controles necesarios para
remover agua/aceite. Ubique el filtro
lo más cerca posible de la pistola
pulverizadora.
Si no instala el
equipo adecuado
para remover agua / aceite podría
dañar la maquinaria o superfi cie que
esté pintando.
2,76 bar
Min.
7,58 bar
Max.
Pintura
Muy Espesa
CorrectoPintura
Muy Clara
Figura 7 - Consistencia del patrón
(Atomización)
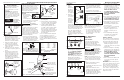
Figura 5 - Pistola Pulverizadora con Sistema de Alimentación de Gravedad
Tapa de Aire
Tuerca del empaque
de fluido
Boquilla
Envase
Orificio de Ventilación
Perilla de Control de
Patrón (la ubicación
depende del modelo)
Tuerca del empaque
de la válvula de aire
Perilla de Control
de Patron
Gatillo
Conexion de 6,4 mm (1/4
inch) NPS Entrada de Aire
Figura 2 - Conexión del sistema de
gravedad
Fuente de
suministro de
aire filtrado,
regulado
Operating Instructions Gravity Feed Spray Gun
5
www.campbellhausfeld.com
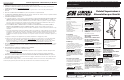
Operation
1. Begin
spraying.
Always keep
the gun at
right angles
to the work
(See Figure 8).
2. Keep the
nozzle about
6 to 9 inches
from the
work surface
throughout
the stroke
and always
keep the gun
in motion while spraying. Stopping
gun movement in mid-stroke will
cause a build up of paint and result
in runs. Do not fan the gun from
side to side while painting. This
will cause a build-up of paint in
the center of the stroke and an
insufficient coating at each end (See
Figure 9).
3. Trigger the gun properly. Start the
gun moving at the beginning of
the stroke BEFORE SQUEEZING
THE TRIGGER and release the
trigger BEFORE STOPPING GUN
MOVEMENT at the end of the
stroke. This procedure will feather
(blend) each stroke with the
next without showing overlap or
unevenness (See Figure 10).
4. The amount of paint being applied
can be varied by the speed of the
stroke, distance from the surface
and adjustment of the fluid control
knob.
5. Overlap strokes just enough to
obtain an even coat (See Figure 11).
NOTE: Two thin coats of paint will yield
better results and have less chance of
runs than one heavy layer.
6. Use a piece of cardboard as a shield
to catch overspray at the edges of
the work to protect other surfaces.
Use masking tape to cover other
areas if needed.
User - Maintenance
Instructions
DAILY CLEAN-UP
Local codes may require specific
cleaning methods and equipment.
Follow local codes and paint
manufacturer’s recommendations for
the use and disposal of spray materials
and solvent.
Clean spray gun
immediately after
use. Paint and other materials dry
quickly in the small passages rendering
gun useless due to the diffi culty of
removing hardened paint from the
passages inside the gun.
NOTE: In the instructions below, the
use of the word “solvent” refers to the
specific solvent for the material used
(example: lacquer thinner for lacquer,
etc.).
1. Remove and empty the canister;
then rinse with a solvent
recommended for the paint or other
material used.
2. Refill canister with clean solvent
and attach to the gun. Spray solvent
through the gun while shaking
the gun vigorously. Wipe the gun
exterior with a solvent soaked rag.
Repeat until the gun is clean.
3. Remove the air cap and soak in
solvent until clean. Use a small brush
for stubborn stains if necessary.
Toothpicks or small brushes may be
used to clean air passages; however,
NEVER USE METAL OBJECTS
TO CLEAN PRECISELY DRILLED
PASSAGES. DAMAGED PASSAGES
WILL CAUSE IMPROPER
SPRAYING.
4. Clean gaskets with a solvent soaked
rag. To prevent equipment damage,
DO NOT IMMERSE GASKETS OR
SPRAY GUN BODY IN SOLVENTS.
5. After using water to clean out water
based paints or materials, spray
mineral spirits through the gun to
prevent corrosion.
6. Use a non-silicone oil on all moving
parts when reassembling. Use
Vaseline
®
or light grease on all
threaded connections prior to
storage.
7. Clean and flush gun thoroughly
to neutralize any contaminants
corrosive to the spray gun.
PERIODIC CLEAN-UP
Due to improper cleaning and paint it
may be necessary to inspect and clean
the internal parts and the gun body.
1. Examine openings in air cap and
fluid tip. If clogged, remove any
o-rings and soak the air cap or fluid
tip in solvent.
2. A brush or toothpick or something
similar may be used to dislodge the
dried paint from holes and passages.
NEVER USE METAL OBJECTS
TO CLEAN PRECISELY DRILLED
PASSAGES. DAMAGED PASSAGES
WILL CAUSE IMPROPER
SPRAYING.
3. Remove and check the fluid needle
for excessive wear at the tip and
straightness.
IMPORTANT: If the needle tip is worn
more on one side than the other, either
the needle is bent or the gun body
has been dropped or knocked out-of-
line. There are no adjustments that
can be made to a bent gun body. Test
the needle by rolling on a flat surface.
Replace if necessary.
Figure 8
6 - 9
inches
Thin
coat
Heavy
coat
Thin
coat
Figure 9
INCORRECT
INCORRECT
End
Stroke
Release
Trigger
Start
Stroke
Figure 10
Pull
Trigger
6 - 9
inches
Figure 11