
Product Manual


BELT DRIVE FAN
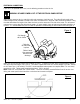
Belt drive fans are equipped with an automatic belt tensioner and cogged v-belt. The rotary tensioner will compensate
for any wear or stretching of the belt. No adjustments should be necessary. Belt will however wear after extensive use.
Fan performance will be sacrificed if worn belt is used. Listen for belt “squeeling” on startup. This would indicate that
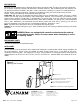
the belt requires changing or tightening. Tightening can be done by moving the screw location on the tensioner
bracket. (see figure 3) (Although we recommend replacing the belt).
Lubrication: Belt drive fans are provided with bearing blocks that are pre-lubricated & sealed. They have a double
contact seal and steel slinger that prevents most contamination. However, since the bearings are to operate in very
damp and dirty conditions, re-lubrication is recommended. The grease fitting of the unit should be carefully cleaned
before use and the grease should be introduced slowly. Under normal conditions, the bearings only need re-lubrication
every 3 years. Nonetheless, we recommend that each bearing receive one pump from a grease gun (or until fresh
grease is pushed out), every time the unit is washed down (especially if detergent is used.)
Note: Use NLGI2 lithium base grease to ensure compatibility with original grease.
Caution: Do not use pneumatic grease guns. Slowly introduce grease with manual gun otherwise bearing seals will be
destroyed.
REPLACEMENT PARTS
See attached appendices for replacement parts.
ACCESSORIES
Canarm provides a full line of controls from simple on/off thermostats to sophisticated multiple staging controllers and
PC based controllers. Winter covers are available for colder climates where the fan is shut down for the winter.
Performance enhancing cones are available for 24" to 48" sizes that boosts air moving performance and efficiency by
approximately 8% for PLF48, 10% for PLF36 fans, and 15% for PLF24 fans. Weather Hoods are available for 9” to 24”
models.
WARNING
Moving parts,
disconnect power
before servicing.
!
WARNING
Moving parts,
disconnect power
before servicing.
!
WARNING: Motors are equipped with automatic overload protection and may
restart without warning. Always disconnect power before attempting to service,
or removing shutter
1 Remove bolt
3 Use screw from step 2 as pin location for
tensioner. Reassemble bolt from step 1.
Note: Remove belt before making adjustments.
CANARM LTD. CANARM LTEE.
2157 PARKEDALE AVENUE 8500 RUE GRENACHE
BROCKVILLE, ONTARIO K6V 5V6 ANJOU, QUEBEC H1J 2B1
TELEPHONE: (613) 342-5424 TELEPHONE: (514) 353-2255
FAX: 1-800-263-4598 FAX: (514) 353-2522
E-MAIL: agsales@canarm.ca E-MAIL: agsales@canarm.ca
Figure 3
Adjusting Belt Tensioner
M0017 - Rev.5-Rev Date: 22/04/03
Page 5 of 5
2 Change screw hole placement. Moving screw
towards belt will increase tension.