
Owner's Manual


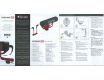


Table Of Contents
- Quick Reference Guide
- Basic Instruction Manual
- Introduction
- Compatible Memory Cards
- Instruction Manual and CD-ROMs
- Table of Contents
- Using This Manual
- Quick Start Guide
- Supplied Accessories
- Parts & Controls
- Getting Started
- Attaching the Strap / Eyepiece Cover
- Charging the Battery
- Installing / Removing the Battery
- Installing / Removing the Memory Card
- Using the LCD Monitor
- Turning On the Power
- Setting the Date, Time and Time Zone
- Selecting the Interface Language
- Attaching and Detaching a Lens
- Lens Image Stabilizer
- Basic Operation
- Quick Control
- Menu Operations
- Using the Touch Screen
- Formatting the Card
- Switching the LCD Monitor Display
- Displaying the Grid
- Feature Guide
- Basic Shooting and Image Playback
- Fully Automatic Shooting
- Full Automatic Techniques
- Disabling Flash
- Creative Auto Shooting
- Shooting Portraits
- Shooting Landscapes
- Shooting Close-ups
- Shooting Moving Subjects
- Special Scene Mode
- Shooting Children
- Shooting Food
- Shooting Candlelight Portraits
- Shooting Night Portraits
- Shooting Night Scenes (Handheld)
- Shooting Backlit Scenes
- Quick Control
- Image Playback
- Setting the AF and Drive Modes
- Image Settings
- Advanced Operations
- Shooting with the LCD Monitor (Live View Shooting)
- Shooting Movies
- Image Playback
- Viewing the CD-ROM Instruction Manuals / Downloading Images to Your Computer
- Instruction Manual
- About Instruction Manual and CD-ROMs
- Memory Card Compatibility
- Using This Manual
- Table of Contents
- Quick Start Guide
- Supplied Accessories
- Parts & Controls
- Introduction
- Getting Started
- Charging the Battery
- Installing and Removing the Battery
- Installing and Removing the Card
- Using the LCD Monitor
- Turning on the Power
- Setting the Date, Time, and Zone
- Selecting the Interface Language
- Attaching and Detaching a Lens
- Lens Image Stabilizer
- Basic Operation
- Quick Control for Shooting Functions
- Menu Operations
- Using the Touch Screen
- Formatting the Card
- Switching the LCD Monitor Display
- Displaying the Grid
- Displaying the Flicker Detection
- Feature Guide
- Basic Shooting and Image Playback
- Fully Automatic Shooting (Scene Intelligent Auto)
- Full Auto Techniques (Scene Intelligent Auto)
- Disabling Flash
- Creative Auto Shooting
- Shooting Portraits
- Shooting Landscapes
- Shooting Close-ups
- Shooting Moving Subjects
- Special Scene Mode
- Shooting Children
- Shooting Food
- Shooting Candlelight Portraits
- Shooting Night Portraits (With a Tripod)
- Shooting Night Scenes (Handheld)
- Shooting Backlit Scenes
- Quick Control
- Shoot by Ambience Selection
- Shoot by Lighting or Scene Type
- Image Playback
- Setting the AF and Drive Modes
- Image Settings
- Setting the Image-Recording Quality
- Changing the Image’s Aspect Ratio
- Changing the ISO Speed to Suit the Light
- Selecting a Picture Style
- Customizing a Picture Style
- Registering a Picture Style
- Matching the Light Source
- Adjusting the Color Tone for the Light Source
- Auto Correction of Brightness and Contrast
- Setting Noise Reduction
- Correction of Lens Peripheral Illumination and Aberrations
- Reducing Flicker
- Setting the Color Reproduction Range
- Advanced Operations
- Flash Photography
- Shooting with the LCD Monitor (Live View Shooting)
- Shooting Movies
- Handy Features
- Image Playback
- Searching for Images Quickly
- Magnified View
- Playing Back with the Touch Screen
- Rotating the Image
- Setting Ratings
- Quick Control for Playback
- Enjoying Movies
- Playing Back Movies
- Editing a Movie’s First and Last Scenes
- Slide Show (Auto Playback)
- Viewing Images on a TV Set
- Protecting Images
- Erasing Images
- Shooting Information Display
- Post-Processing Images
- Printing Images
- Customizing the Camera
- Reference
- Viewing the CD-ROM Instruction Manuals / Downloading Images to Your Computer
- Troubleshooting
- Specs
- Index
- Wi-Fi / NFC Function Basic Instruction Manual
- Wi-Fi / NFC Function Instruction Manual
- Table of Contents
- Introduction
- Getting Started
- Easy Connection
- Advanced Connection
- Wireless LAN Function Flowchart (Advanced Connection)
- Using a Wi-Fi Access Point
- Wi-Fi Connection to a Smartphone
- Wi-Fi Connection to a Wi-Fi Printer
- Viewing Images Using a Media Player
- Wi-Fi Connection to a Web Service
- Connecting to a Wireless LAN from a Playback Screen
- Managing Settings
- Troubleshooting Guide
- Reference
- Troubleshooting
- Specs
- Index
- Microphone Quick Start Guide
- Scans of Supplied CD-ROMs
- Do More with Macro Booklet
- Flash Classroom Booklet
- Lens Warranty
- Camera Warranty

quickstart
guide
VideoMic
GQ
1
M
Blitzstart
VideoMic
GQTM
Prise en main
Guia de lnicio rilpido
de
VideoMic
GQTM
Guida Veloce
del
VideoMic
GQTM
VideoMic
G0
1
""
tRliAfl
VideoMicGO'""
-?-f'Y-?A-9-
1--
•
15.-f
t.::
VideoMic
G0
1
""
~~E~.§.
7~01£
RODE
.
MICROPHONES
•
5
VIDEOMIC
~
·
Parts
Guide
VideoMk
GO'"'
- Parts. Guide
Guida al Component!
del
VideoMic GO' M
1.
Foam
windshield
1.
Fittro antivento in spugna
2.
Camera shoe mount
2.
lnnesto videocamera (shoe mount)
3.
Integrated Rycote
Lyre
Suspension
3.
Sos::>ensione
elastica Rycote
lyre
integrata
4.
3.5mm microphone output
4.
Uscita microfono 3,Smm
5.
3.5mm dual mono
output
cable
S.
Cavo di uscita
doppio
mono 3,Smm
BestUckung des
VideoMic
G0
1
"'
VideoMic GO'M
li:f*iiWJ
1.
Windschutz aus Schaumstoff
1.
i!!l*illilfll
2. HalterungsfuB
fUr
Blitzschuh
2.
IIW.lMI.lli\l?ll
3.
Eingebaute Rycote Lyre-Aufhiingung
3.
•nt
Rycote
Lyre
IW•*
4. Mikrofonausgang (3,5mm)
4.
3.Smmi5~.flitlj
5.
Doppelmono-Anschlusskabel (3,5mm)
5.
3.SmmJI)(.,J!'!IIII!l<@!l!
Description
des elements
du
VideoMic
GO™
VideoMic GO™
J\-'Y
·'jj.-f
J.:
1.
Bonnene en mousse
1.
:J;;t-b.Zl~.-f::....t.:::--JL-t.:
2.
Sabot pour griffe
de
camEra
2.
:t.J.X5::-.:t.
- · ';(''J/,....
3.
Suspension Rycote
Lyre
integree
3. Rycote
Lyre'!:t.AX/3'.-3:::.-t!tt
4.
Sortie micro 3,5mm 4.
3.Smm
';('.-f?tl:ttl
5.
Cable de double sortie mono a fiche de
3,Smm
5. 3.5mm T.:t.J"Jl-=E.Jte1J?--:1JL-
Guia
de
piezas
de
VideoMic GO™ VideoMic
GOTM
¥§
'fOIE.
1.
Protector de hule espuma
1.
~:!;.~
All~£1
~E.~E.
2.
Base
para instalaci6n en cilmara
2.
:>"fiJI2.J'
;1:-
O
f
~§.
3.
SuspensiOn Rycote
Lyre
integrada
3.
*W~
Rycote
lyre
A1.~~~
4. Salida de micr6fono de 3,5mm
4.
3.Smm
OfOI.3.
~~
5.
Cable
de
salida monoaural dual
de
3,5mm
5.
3.Smm
*iii
.2.~
'i'~
~Oil'
Mounting
to
camera
1.
Turn
the tightening ring counter-clockwise to
loosen the camera shoe connection, before
attaching
to
camera.
2.
Slide the camera-shoe
into
place on the camera
mount.
Once the mic
is
in place, secure it by
tightening the ring clockwise.
3.
Connect one end
of
the VideoMic
GOTM's
3.5mm
output
cable
into
the
output
socket on
the rear
of
the microphone.
4.
Connect the other end
of
the
3.Smm
output
cable to the camera's 'Microphone In' socket
and secure the cable using the in-built cable
clip.
Montage
auf
der
Kamera
1.
Drehen
Sie
die Randelschraube gegen den
Uhrzeigersinn, um die Fu6klemme
zu
IOsen,
bevor
Sie
letztere in den Blitzschuh schieben.
2. Schieben Sie den HaherungsfuB
in
den
Blitzschuh
der
Kamera. Drehen
Sie
die
Riindelschraube behutsam im Uhrzeigersinn, um
den
HalterungsfuB
zu
arretieren.
3.
Verbinden
Sie
das eine Ende des 3,Smm-
Ausgangskabels
mit
der Buchse auf der
MikrofonrUckseite.
4. Schliel3en
Sie
das andere Ende des 3,Smm-
Ausgangskabels
an
den Mikrofoneingang der
Kamera
an
und arretieren
Sie
das Kabel
mit
dem
zugeh6rigen
clip.
®
~
~
Montage
sur
camj ra
1.
Tournez
Ia
molette dans le
sens
antihoraire pour
liberer le sabot a fixer
sur
Ia
camera.
2. lnserez le sabot dans
Ia
griffe de
Ia
camera.
Ouand le micro est installe, fixez-le en serrant
Ia
molette dans le sens horaire
3.
Branchez une fiche 3,Smm du
dible
du
VideoMic
GO""
a
Ia
sortie a l'arriE!re du
microphone.
4. Branchez I' autre fiche
3,Smm
du
<:Sble
de
sortie
a
I'
entree micro de
la
camera et fixez le cable a
l'aide
de
Ia
pince de cable integree.
Montaje
en
Ia
dmara
1.
Gira el aro de fijaci6n en sentido antihorario
para afiojar
Ia
conexi6n con
Ia
base
de
Ia
cilmara, antes de instalarlo en
Ia
camara.
2.
Desliza
Ia
base para
c.:\
mara
en el soporte de
Ia
cilmara. Cuando el micro
se
encuentre en
su
posiciOn, fijalo apretando el aro en sentido
horario.
3.
Conecta un extrema del cable de salida
de
3,Smm del VideoMic
GOTM
al
conector de
salida
de
Ia
parte posterior del micr6fono.
4.
Conecta el otro extrema del cable
de
salida
de 3,Smm
al
conector
~Microphone
In~
de
Ia
c3mara, y fija el cable con el clip integrado.
Montagg
lo 1ulla videoca
mera
1.
Prima dell'installazione sulla videocamera,
ruotate in sensa antiorario
i'anello di fissaggio,
per allentare l'aggancio all'innesto.
2.
Fate scorrere
l'agganci~
nell'innesto
de~a
video camera. Quando
tl
microfono e inserito,
fissatelo stringendo
l'anello in sense orario.
3.
Collegate il minijack
3,Smm
che
si
trova ad una
estremita
del cavetto di uscita del VideoMtc
GO""
al connenore di uscita che
si
trova nel
retro del microfono.
4.
Collegate il minijack da 3,Smm dell'altra
estremita
del cavetto di uscita
al
connettore
'Microphone
In' della videocamera e fissate il
cavo con
I' apposite gancio.
!i<
lO
JJ
IIIIlfl.t
1.
!Ul\!illlii!!i~JIIW.liL:ZDlJ
·
~!I!O)Itll:nlliii)E
>f·l'i'llliiW.liLil'JII.llti!!i·
2.
~IIW.liLII.lltiltA!lJIIIIliLII.llltl!l!'l>
·
!!!\!illli!i<
a~JUIFc
·
liii!O)ItnroJIH!I'1~Iill"lf
•
3.
*iVideoMic
GO""
a9
3.Smm
Wltt:ll:@f:!lHIAi!111
Fcna<JIIIIli!Ht
•
4.
~
3.5mm
llll!l<@!l!il'J§l-•i!!ii'HIIlllil'J\!illli
Ji[J . #lll,.il'J<@!I!"'f'liii)Eiif<@!l!.
b.)(5"a>llllo:Ji'llt
1.
:t.J)J.5~:L-tilfti8lkDill~t-:Htt)>.,~~Jt
&M1Jiol"'IIDL..-c•N.>r/J'S, 1J)I..5,_ga
G;<T.
2.
1JY.'5-::..-.:t.-l!:t.J.)(5X'?/H7:>4rrti~L..i6.
ih;<T. x-1'?1i'liWGI>ill<l. llld.llM'
J'-
?1i'li!ltnroJ"--IDG clilllt'G;<T,
3.
VideoMic GO'"
(])
3.5mm
l:l::ttl?--:1Jt..0)-
*1i'x-1'?il~lllb*1'"~G~ih,.T.
4.
3.5mmlllb?'-
:1Jl<l.lo:>-1;0)*1i'b>'
5o.YM
icrophone
In'l!lf-/'\.li!L..i6#,
•.::t
i'llto»--
:1!"? 'J "':11Ciilllt'G;<T (J;(T
.,I'll) •
•1012101
DI~.!!.•PI
1.
:>"tQG~fOM
¥:!f~PI
~01.
~~
~~API
~qj
'1/W££
1021
•101'-f
'F>
~'i!li
•DI<;OtJA
I
£.
2.
•I
DI•I
'F;.
•101'-f
Ol~"
¥1"1
>1'1"101
'1101
'O§Lict.
010
1
3.71
'ICII"-
l;l<l£1~.
~·AI
'I
'IIW££
1021
<101
ii!Li
ct
.
3.
VideoMic
G0""21
35mm
Q-~
7101.
~Of
lilli
01013.
~~
..
'lllo
~"1
±~01
~'i!~Lict
.
4.
3.Smm
~"1
'10
1
*21
<li"
~Of
llli
•101'-f"i
'OIDI3.
'11"1'
±;!~I
~'i!~
~
4'11<!
'IOI.
~tlli
OI*OH
'IOI.li
~~~~AI£.