kitchen think Instructions for Installation and Use Model 10460G The Recipe Book Cannon has come up with a small recipe book - which is practical, full of helpful tips and easy to use - to help you rediscover the delights of cooking. It contains a wide variety of handy tips to keep in mind to try out new dishes effortlessly. It also has 9 recipes preprogrammed into the oven, so thanks to the interactive display, once you have done the preparation all you have to do is make one simple selection.
CANNON COOKERS Design and power Cannon's attention to both the quality and design of its cookers has led to it being to the N°1 cooker manufacturer within the UK. Cannon works hard to ensure that your cooker offers a quality finish with reliable cooking flexibility. We have developed a system that offers you 9 different cooking methods - each providing the perfect combination of humidity level, air (ventilated or not)and positioning af heat sources for your specific cooking needs.
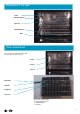
Description of cooker Raised rear edge hob Control panel Multifunctional oven with catalytic self-cleaning system Storage drawer Description of the hob [clockwise, from left to right] Rear left burner: Semi-rapid - 1.65 kW Central burner external: Central burner internal: DC-DR - 4.10 kW DC-DR - 0,90 kW Rear right burner: Semi-rapid - 1.
Using the burners To ignite a burner, proceed as follows: • Press in and turn the relative knob anti-clockwise until the pointer is on the high-flame symbol; • press the knob down fully and activate the automatic gas ignition ; • keep the knob pressed down for about 10 seconds with the flame lit to allow the safety thermocouple to be heated; • release the knob, checking that the flame is stable. If it is not, repeat the operation. For minimum power, turn the knob towards the low flame symbol.
Description of the oven Shelf Halogen lighting Spit unit Enamelled tray Door Oven accessories Your oven has 3 racks that slide in and out on rollers for easy access.
Oven control panel Clock Indicator light Temperature selector Cooking mode selector Programmer Auto-timer Cooking time End time of cooking +/manual mode Knob selects «M» the cooking mode Turn knob «M» to select the temperature required. Note The oven will begin to heat up as soon as the temperature is selected. Knob «T» selects the temperature Turn knob «T» to select the temperature required. Note 6 The indicator light comes on when you have selected the temperature.
Electric Timer The electronic programmer has the function of automatically switching on the oven (at the required time) and switching it off at the end of the set cooking time. The 4 figure luminous display showing the actual time and the programming times, also shows the current state of the oven by means of the following symbols: Oven on Minute minder Automatic programme AUTO Point • (this divides the hour from the minutes on the display).
Comments from our cookery consultant Your oven’s various cooking modes were devised in consultation with the Cannon cookery consultant. He is a professional chef and is an integral member of Cannon research and development team. The cooking modes, temperatures and oven shelf levels reflect our expert’s own experience in the kitchen, and will allow you to achieve the best cooking results with a variety of dishes.
Defrosting Care must be taken when defrosting food so that the outer parts, which defrost first, do not develop harmful bacteria. Food is generally defrosted in the refrigerator: this is known as slow defrosting. You can halve the defrosting time by using the oven. This is suitable for: - foods to be eaten raw/uncooked (strawberries, etc.), - foods to be cooked - i.e. a chicken will defrost in half the normal time. Defrosted foods should be eaten soon after defrosting.
Pastry cooking This cooking mode is particularly suited to tarts, quiches, etc. The pastry case bakes perfectly, while the filling does not overcook. Use a shelf at level 1. We recommend that you preheat the oven. 1 - Turn knob «M» to select the symbol . 2 - Select the temperature with knob «T». Recommended temperature: 220°C Note Wait until the oven has heated up and the indicator light has gone out before placing the dish in the oven.
Spit-roasting The spit unit supplied with your oven consists of: 4 spit forks 1 handle 2 supports 1 spit rod • • The 2 supports should be attached to the enamelled tray, which must be placed at level 1 so that the spit rod can be attached to the motor bracket inside the oven on the right. The meat is skewered by the spit rod and held in place with the four sliding forks which are then tightened onto the spit rod with thumbscrews.
Barbecue cooking Keep young children away from the oven when using the Barbecue mode as some exposed parts of the oven will be hot. This mode is particularly suitable for cooking ribs of beef, grilling meat and au gratin dishes or similar. We recommend that you start with a cold oven. Use the enamelled tray at level 1 to catch the cooking juices. Place the meat on a shelf; the level of the shelf will depend on the thickness of the meat. 1 -Turn knob «M» to select the symbol .
Forced air cooking This mode is particularly suitable for cooking identical or different dishes on several levels. If you are cooking different types of dish at the same time, their flavours will not mingle. To use this function, all dishes must require cooking at the same temperature. We recommend that you preheat the oven. 1 -Turn knob «M» to select the symbol . 2 - Select the temperature with knob «T». Recommended temperature: 200 °C.
Self-decreasing by catalysis In this process, the interior walls of the oven are coated with a self-degreasing catalytic enamel. This enamel oxydizes and destroys all grease particles which splash on to the oven walls. The temperature of the walls must be over 170° for oxydization to occur. The porosity of the catalytic enamel increases the surface exchange required for oxydizing the grease particles by catalysis.
Installation The air must be taken directly from the outside, from an area far from sources of pollution. The ventilation aperture must have the following characteristics (fig.
Installation Gas supply connection • Check that the appliance is set for the type of gas available and then connect it to the mains gas piping or the gas cylinder in compliance with current regulations and standards. • This appliance is designed and set to work with the gas indicated on the label situated on the actual hob.
Installation For models supplied without a plug, fit a standard plug, suitable for the load indicated on the rating plate, onto the cable and connect to a suitable socket. To connect directly to the mains supply, a double-pole switch with a contact separation of at least 3 mm suitable for the load and complying with current standards and regulations, must be fitted between the appliance and the mains supply outlet. The yellow-green earth wire must not be interrupted by the switch.
After Sales Service As part of our commitment to you, all Cannon appliances have the added benefit of a fully inclusive parts and labour guarantee for the first 12 months. In addition to this you also have the advantage of free replacement parts for the first 5 years when fitted by a Cannon engineer. When the 12 months parts and labour guarantee expires we offer the following after sales service options: Repair Service and Information Help Desk UK: 08709 066066 www.theservicecentre.co.