
Owner's Manual
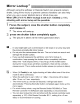
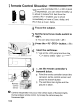

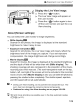
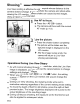
Table Of Contents
- Pocket Guide
- Owners Manual
- Conventions Used in This Manual
- Table of Contents
- Quick Start
- Supplied Accessories
- Parts & Controls
- Getting Started
- Attaching the Strap
- Charging the Battery
- Installing / Removing the Battery
- Power On
- Installing & Removing a CF Card
- Mounting & Detaching a Lens
- Lens Image Stabilizer
- Basic Operation
- Using the Quick Control Screen
- Menu Operations
- Setting the Language
- Date & Time Set
- Formatting a CF Card
- Auto Power-Off
- Restore Default Settings
- Basic Shooting
- Image Settings
- Setting the Auto Focus & Drive Modes
- Advanced Operations
- Live View Shooting & Movies
- Image Playback
- Sensor Cleaning
- Printing Images & Transferring Images to a Computer
- Customizing the Camera
- Checking Camera Settings
- Checking Battery Information
- Optional Accessories
- Replacing Date / Time Battery
- Function Availability Table
- Menu Settings
- Troubleshooting
- Error Codes
- System Map
- Specs
- Index
- Software Information
- Note - Playback Movies from the Computer on the Camera
- Accessory Brochure
- Warranty

RC-5
RC-1
i Remote Control Shooting
With Remote Controller
RC-1
or RC-5 (both
sold separately), you can shoot remotely up
to about 5 meters/16.4 feet from the
camera.
RC-1
enables you to shoot
immediately or have a 2-sec. delay, and
RC-5 has a 2-sec. delay.
Set the lens focus mode switch to
<MF>.
•
You
can also shoot with
<AF>.
1 Focus the subject.
2
Press the <
AF
•
DRIVE>
button.
(06)
Select the self-timer.
• Look at the LCD panel and turn the
<0>
dial to select
<~&>
or
<~&2>·
[
J
D
~
li~J
Remote
-I-&::=~
~~
control
sensor
5 Press the remote controller's
transmit button.
• Point the remote controller toward the
camera's remote control sensor and
press the transmit button.
~
The self-timer lamp lights and the
picture is taken.
--
Camera misoperation may occur near certain types
of
fluorescent lights.
During wireless remote control, try to keep the camera away from
fluorescent light.
102