
Owner's Manual

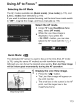
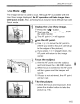
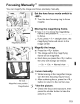
Table Of Contents
- Pocket Guide
- Owners Manual
- Conventions Used in This Manual
- Table of Contents
- Quick Start
- Supplied Accessories
- Parts & Controls
- Getting Started
- Attaching the Strap
- Charging the Battery
- Installing / Removing the Battery
- Power On
- Installing & Removing a CF Card
- Mounting & Detaching a Lens
- Lens Image Stabilizer
- Basic Operation
- Using the Quick Control Screen
- Menu Operations
- Setting the Language
- Date & Time Set
- Formatting a CF Card
- Auto Power-Off
- Restore Default Settings
- Basic Shooting
- Image Settings
- Setting the Auto Focus & Drive Modes
- Advanced Operations
- Live View Shooting & Movies
- Image Playback
- Sensor Cleaning
- Printing Images & Transferring Images to a Computer
- Customizing the Camera
- Checking Camera Settings
- Checking Battery Information
- Optional Accessories
- Replacing Date / Time Battery
- Function Availability Table
- Menu Settings
- Troubleshooting
- Error Codes
- System Map
- Specs
- Index
- Software Information
- Note - Playback Movies from the Computer on the Camera
- Accessory Brochure
- Warranty

Focusing Manually'*
You can magnify the image and focus precisely manually.
AE lock
Magnified area position
Magnification
5
I
Take the picture.
Check the focus and exposure, then
press the shutter button to take the
picture
(p.11
0).
Focus manually.
• While looking at the magnified image,
turn the lens focusing ring to focus.
• After achieving focus, press the <
~
>
button to return to the normal view.
C 5x
-+
10x
-+
Normal view J
1 Set the lens focus mode switch to
<MF>.
• Turn the lens focusing ring to focus
roughly.
2 Moving the magnifying frame.
Use <
~f:
> to move the magnifying
frame to the position where you want
to focus.
If you press <
~f:
> straight down, the
magnifying frame will return to the
image center.
Magnify the image.
• Press the <
~
> button.
• The image within the magnifying
frame will be magnified.
Each time you press the
<~
> button,
the view will change as follows:
4
.3
Magnifying frame
119