
Owner's Manual

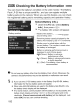
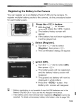
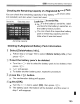
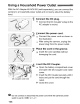
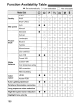
Table Of Contents
- Pocket Guide
- Owners Manual
- Conventions Used in This Manual
- Table of Contents
- Quick Start
- Supplied Accessories
- Parts & Controls
- Getting Started
- Attaching the Strap
- Charging the Battery
- Installing / Removing the Battery
- Power On
- Installing & Removing a CF Card
- Mounting & Detaching a Lens
- Lens Image Stabilizer
- Basic Operation
- Using the Quick Control Screen
- Menu Operations
- Setting the Language
- Date & Time Set
- Formatting a CF Card
- Auto Power-Off
- Restore Default Settings
- Basic Shooting
- Image Settings
- Setting the Auto Focus & Drive Modes
- Advanced Operations
- Live View Shooting & Movies
- Image Playback
- Sensor Cleaning
- Printing Images & Transferring Images to a Computer
- Customizing the Camera
- Checking Camera Settings
- Checking Battery Information
- Optional Accessories
- Replacing Date / Time Battery
- Function Availability Table
- Menu Settings
- Troubleshooting
- Error Codes
- System Map
- Specs
- Index
- Software Information
- Note - Playback Movies from the Computer on the Camera
- Accessory Brochure
- Warranty

Using a Household Power Outlet
With the AC Adapter Kit ACK-E6 (sold separately), you can connect the
camera to a household power outlet and not worry about the battery
level.
1 Connect the DC plug.
• Connect the DC Coupler's plug to the
AC adapter's socket.
Connect the power cord.
• Connect the power cord as shown
in
the illustration.
• After using the camera, unplug the
power plug from the power outlet.
----~)
DC
coupler cord hole
Place the cord
in
the groove.
• Insert the cord carefully without
damaging the cord.
Insert the DC Coupler.
• Open the battery compartment cover
and open the
DC
Coupler cord notch
cover.
• Insert the
DC
Coupler securely until
it
locks and put the cord through the
notch.
• Close the cover.
o Do not connect or disconnect the power cord while the camera's power
switch is set to
<ON>
or
<.,J>.
196