
Owner's Manual
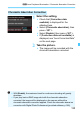
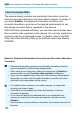
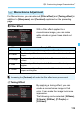

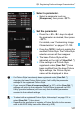
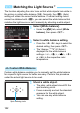
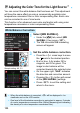
Table Of Contents
- Camera Quick Reference Guide
- Camera Basic Instruction Manual
- Introduction
- Compatible Memory Cards
- About Supplied Instruction Manuals
- Table of Contents
- Supplied Accessories
- Using This Manual
- Quick Start Guide
- Parts & Controls
- Getting Started
- Attaching the Strap
- Charging the Battery
- Installing and Removing the Battery and Card
- Turning On the Power
- Setting the Date, Time and Time Zone
- Selecting the Interface Language
- Attaching and Detaching a Lens
- Basic Operation
- Quick Control
- Menu Operations
- Formatting the Card
- Switching the LCD Monitor Display
- Feature Guide
- Using the Touch Screen
- Basic Shooting
- Fully Automatic Shooting
- Fully Automatic Techniques
- Disabling Flash
- Creative Auto Shooting
- Shooting Portraits
- Shooting Landscapes
- Shooting Close-ups
- Shooting Moving Subjects
- SCN: Special Scene Mode
- Shooting Children
- Shooting Food
- Shooting Candlelight Portraits
- Shooting Night Portraits
- Shooting Night Scenes
- Shooting Backlit Scenes
- Quick Control
- Shooting with the LCD Monitor (Live View Shooting)
- Shooting Movies
- Image Playback
- Viewing the CD-ROM Instruction Manuals / Downloading Images to Your Computer
- Camera Instruction Manual
- Introduction
- Table of Contents
- Supplied Accessories
- Parts & Controls
- Getting Started
- Attaching Camera Strap
- Charging the Battery
- Installing and Removing the Battery and Card
- Turning On the Power
- Setting the Date, Time, and Zone
- Selecting the Interface Language
- Attaching and Detaching a Lens
- Basic Operation
- Quick Control for Shooting Functions
- Menu Operations
- Formatting the Card
- Switching the LCD Monitor Display
- Feature Guide
- Using the Touch Screen
- Quick Reference Guide
- Basic Shooting and Playback
- Fully Automatic Shooting (Scene Intelligent Auto)
- Full Auto Techniques (Scene Intelligent Auto)
- Disabling Flash
- Creative Auto Shooting
- Shooting Portraits
- Shooting Landscapes
- Shooting Close-ups
- Shooting Moving Subjects
- Special Scene Mode
- Shooting Children
- Shooting Food
- Shooting Candlelight Portraits
- Shooting Night Portraits
- Shooting Night Scenes
- Shooting Backlit Scenes
- Quick Control
- Shoot by Ambience Selection
- Shoot by Lighting or Scene Type
- Image Playback
- Creative Shooting
- Advanced Shooting
- Conveying the Subject’s Movement
- Changing the Depth of Field
- Manual Exposure
- Changing the Metering Mode
- Setting Exposure Compensation
- Auto Exposure Bracketing
- Locking the Exposure
- Locking the Flash Exposure
- Auto Correction of Brightness and Contrast
- Setting Noise Reduction
- Lens Peripheral Illumination / Chromatic Aberration Correction
- Customizing Image Characteristics
- Registering Preferred Image Characteristics
- Matching the Light Source
- Adjusting the Color Tone for the Light Source
- Setting the Color Reproduction Range
- Mirror Lockup to Reduce Camera Shake
- Shooting with the LCD Monitor (Live View Shooting)
- Shooting Movies
- Handy Features
- Disabling the Beeper
- Card Reminder
- Setting the Image Review Time
- Setting the Auto Power-off Time
- Adjusting the LCD Monitor Brightness
- Creating and Selecting a Folder
- File Numbering Methods
- Setting Copyright Information
- Auto Rotation of Vertical Images
- INFO. Checking Camera Settings
- Reverting the Camera to the Default Settings
- Preventing the LCD Monitor from Turning Off Automatically
- Changing the Shooting Settings Screen Color
- Setting the Flash
- Automatic Sensor Cleaning
- Appending Dust Delete Data
- Manual Sensor Cleaning
- Image Playback
- Searching for Images Quickly
- Magnified View
- Playing Back with the Touch Screen
- Rotating the Image
- Setting Ratings
- Quick Control for Playback
- Enjoying Movies
- Playing Movies
- Editing a Movie’s First and Last Scenes
- Slide Show (Auto Playback)
- Viewing the Images on TV
- Protecting Images
- Erasing Images
- INFO. Shooting Information Display
- Post-Processing Images
- Printing Images
- Customizing the Camera
- Reference
- Viewing the CD-ROM Instruction Manuals / Downloading Images to Your Computer
- Troubleshooting
- Error Codes
- Specs
- Index
- EF-S18-55mm Lens Instructions
- Notes On Prolonged Use
- Scans of CD-ROMs
- Lens Warranty
- Camera Warranty

141
A Registering Preferred Image CharacteristicsN
5
Select a parameter.
Select a parameter such as
[Sharpness], then press <0>.
6
Set the parameter.
Press the <Y> <Z> keys to adjust
the parameter as desired, then press
<0>.
For details, see “Customizing Image
Characteristics” on pages 137-139.
Press the <
M
> button to register the
modified Picture Style. The Picture Style
selection screen will then reappear.
X The base Picture Style will be
indicated on the right of [User Def. *].
X If the settings in a Picture Style
registered under [User Def. *] have
been modified from the base Picture
Style settings, the Picture Style’s
name will be displayed in blue.
If a Picture Style has already been registered under [User Def. *],
changing the base Picture Style in step 4 will nullify the parameter
settings of the registered Picture Style.
If you execute [Clear all camera settings] (p.227), all the [User Def. *]
settings will revert to their defaults. Picture Styles registered via EOS
Utility (provided software) will have only their modified parameters
reverted to their default settings.
To shoot with a registered Picture Style, follow step 2 on page 101 to
select [User Def. *], then shoot.
Regarding the procedure to register a Picture Style file to the camera,
refer to the EOS Utility Instruction Manual (p.368).