
User Guide


DIP switch 1
Use this switch to change the horizontal print position according to the
size of your paper. If you are using letter-size paper or envelopes, set
this switch OFF; the left margin will be 0.25 inch (6.4 mm) and the
maximum print width will be 10.5 inches. If you are using A4-size paper,
set this switch ON; the left margin will be 0.13 inch (3.4 mm) and the
maximum print width will be 11.4 inches.
DIP switch 2
If you are using a software application that assumes 66 lines will fit on
each page, set this switch to ON. The printer will reduce the line spacing
by a factor of 14/15 which is from 63 lines per page to 66 lines per page
if line spacing is set to 6 lines per inch (lpi).
DIP switch 3
Use this switch to turn on reduction mode. In this mode, the printer
reduces characters and graphics to two-thirds of their normal size. When
the printer is in envelope mode, reduction mode is disabled.
DIP switch 4
If you are using letter-size paper, set this switch OFF; this sets the page
length to 11 inches. If you are using A4-size paper, set this switch On;
this sets the page length to 12 inches.
DIP switch 5
When this switch is OFF, the printer uses Character Set 1. When this
switch is ON, the printer uses Character Set 2. See Appendix C for
information on the character sets.
DIP switch 6
When this switch is OFF, the printer performs a normal line feed. Set
this to On if you want the printer to perform a carriage return after each
line feed.
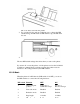
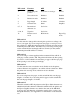
DIP switch7
5
Ch
aracter set
S
et
1
S
et
2
6 Automatic carriage
return (CR)
Normal line feed (LF) LF with CR
7 Alternate Graphics
Mode (AGM)
Disabled Enabled
8 Not used
9 Code page 437 850
10 Buffer size
Input: 41.2 KB
Download: 0 KB
Input: 1.2 KB
Download: 40 KB
11 Not used
12 Printer control mode BJ-10 mode Epson LQ mode