Windows E INSTRUCTION MANUAL
Contents About This Manual ................................................................................................ 3 Main Features and Structure................................................................................. 4 Operation Flow...................................................................................................... 5 System Requirements........................................................................................... 8 Supported Image Formats ...................
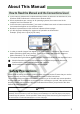
About This Manual How to Read the Manual and the Conventions Used In this manual, Windows XP Professional/Home Edition is referred to as Windows XP, and Windows 2000 Professional is referred to as Windows 2000. Where explanations are common to all operating systems, the screens used in the examples are from Windows XP. In this document, square brackets [ ] are used to indicate items such as button names and icon names that appear on the computer screen.
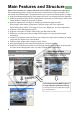
Main Features and Structure Digital Photo Professional is software dedicated for EOS DIGITAL images that has high-speed processing/editing functions, which meet the needs of professional or high-end amateur users who mainly shoot RAW images. This software allows you to perform the following edits on images. High-speed displaying/processing RAW images with Canon’s own high-performance algorithm.
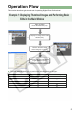
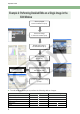
Operation Flow This section describes typical methods of operating Digital Photo Professional. Example 1: Displaying Thumbnail Images and Performing Basic Edits in the Main Window Start up Digital Photo Professional (2-2). Display an image in the main window (2-5). Perform the basic edits on the image (2-14, 2-17). Convert and save images in a single operation (2-31).
Operation Flow Example 2: Performing Detailed Edits on a Single Image in the Edit Window Start up Digital Photo Professional (2-2). Select an image in the main window (2-6). Display the image in the edit window (3-2). Edit the image (3-7, 3-12). Transfer the image to Photoshop (2-34). Compare the edited image with the original (3-6). Convert and save the image (2-29).
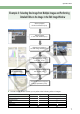
Operation Flow Example 3: Selecting One Image from Multiple Images and Performing Detailed Edits on the Image in the Edit Image Window Start up Digital Photo Professional (2-2). Select images in the main window (2-6). Display the images in the edit image window (4-2). Edit the image (2-14, 2-17, 3-7, 3-12). Transfer the image to Photoshop (2-34). Compare the edited image with the original (3-6). Convert and save images in a single operation (2-31).
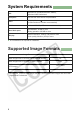
System Requirements OS Windows XP (Professional/Home Edition), Windows 2000 Professional Computer PC with one of the above OS preinstalled CPU 750 MHz Pentium or better (2 GHz Pentium 4 or better recommended) RAM Minimum 256 MB (1 GB or more recommended) Hard disk space At installation: 20 MB or more During operation: 256 MB or more Display Screen resolution: 1024 by 768 pixels or more Color quality: Medium (16 bit) or more A CD-ROM drive is required for installation.
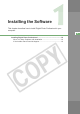
Installing the Software This chapter describes how to install Digital Photo Professional in your computer. 1 Installing Digital Photo Professional .......................................................1-2 When You Have Problems with Installation............................................1-6 If the Installer Panel Does Not Appear ...................................................
Installing Digital Photo Professional Check that your computer complies with the system requirements for the software (8), and then install Digital Photo Professional as you follow the installation procedure. 1 2 Start up your computer. Exit any programs that are running. Insert the CD (Digital Photo Professional Disk). The Installer panel appears. If the Installer panel does not appear, see (1-6). 3 1-2 Click the [English] button. The display switches to the next step.
Installing Digital Photo Professional 4 Click the [Install] button. The [Welcome to the InstallShield Wizard for Canon Utilities Digital Photo Professional X.X] dialog box appears. “x.x” represents the version of Digital Photo Professional. If the dialog box that prompts you to restart your computer appears, restart your computer. After the computer restarts, the software installation process continues automatically. 5 Click the [Next] button.
Installing Digital Photo Professional 7 Check the folder in which the software will be installed and then click the [Next] button. 8 Click the [Finish] button. 9 Click the [Exit] button. 1-4 The installation begins. When the installation finishes, the [InstallShield Wizard Complete] dialog box appears. The Installer panel appears. The Installer panel closes to end the installation.
Installing Digital Photo Professional 10 Remove the CD.
Installing Digital Photo Professional When You Have Problems with Installation If you have problems with installation, check the items listed below. If you are using Windows XP Professional or Windows 2000, are you using the computer under a user setting other than [Computer administrator] or [Administrator]? You cannot install software if a user setting other than [Computer administrator] or [Administrator] is selected.
Displaying Thumbnail Images and Performing Basic Edits in the Main Window This chapter describes the functions of the main window, and how to display images and perform basic edits on them. Starting up Digital Photo Professional .. 2-2 Displaying Images........................... 2-5 Selecting Images ............................. 2-6 Selecting All Images ...................... 2-6 Selecting Images According to Conditions......................................
Starting up Digital Photo Professional Click the [Start] button select [All Programs] ([Programs] in Windows 2000) [Canon Utilities] [Digital Photo Professional] [Digital Photo Professional]. Alternatively, you can start up Digital Photo Professional by double-clicking the [Digital Photo Professional] icon on the desktop. Main Window Toolbar Menu bar Displays the [File], [Edit], [View], [Bookmark], [Adjustment], [Tools], and [Help] menus.
Starting up Digital Photo Professional Menu Bar File menu Edit menu Pastes images on the clipboard. 3-2 2-28 2-28 2-29 2-31 Copies images to the clipboard. Moves images to the clipboard. 2-33 2-33 2-9 2-12 2-6 2-6 View menu 2 2-7 2-7 2-25 2-25 2-26 4-2 Displaying Thumbnail Images and Performing Basic Edits in the Main Window 2-2 2-25, 2-26 2-13 2-13 2-10 2-10 2-10 2-10 2-12 Bookmark menu 2-7 2-8 Tools menu Adjustment menu Sets a check mark for images.
Starting up Digital Photo Professional Toolbar Batch save button (2-31) Clear check button Removes a check mark. Rotate right button (2-14) Clear all button (2-6) Click (RAW) button (2-22) Click button (2-15) Folders button (2-13) Edit image window button (2-11, 4-2) Check button Brightness adjust button (2-16) Sets a check mark. Select all button (2-6) Brightness (RAW) button (2-23) Rotate left button (2-14) White balance button (2-18) * The above toolbar shows all the information at once.
Displaying Images You can display images saved in your computer on the main window. Click the folder in which images are saved. You cannot display images saved on a memory card in the camera. You must save images to your computer using other software supplied with the camera or a third-party card reader. See “Supported Image Formats” (8) for image formats that you can display. Images that cannot be displayed appear as [].
Selecting Images Click the target image. The frame around the selected image is colored. To select multiple images, hold down the key and click the images. To select sequential images, click the first image and then hold down the key and click the last image. Selecting All Images Click the [Select all] button. Alternatively, you can select images by selecting the [Edit] menu [Select All]. Clicking the [Clear all] button deselects all the images.
Selecting Images Selecting Images According to Conditions Select [Edit] menu [Select RAW photos only]. If you select [Edit] menu [Select check marked photos only], you can select only the images for which the check mark (2-4) is specified. Registering Frequent Use Folders with the Menu You can register frequent use folders with the [Bookmark] menu. 2 Select [Bookmark] menu [Add].
Selecting Images Organizing Frequent Use Folders You can change the name of the folder or delete the folder that was registered with the [Bookmark] menu. 1 2 Select [Bookmark] menu [Organize]. The [Sort bookmarks] dialog box appears. Change the folder name or delete the folder. The folder name that is selected in the bookmark folder display area is displayed. The folder path that is selected in the bookmark folder display area is displayed.
Deleting Images You can move unnecessary images to the Recycle Bin on your computer and delete them. 1 2 Select images and then select [File] menu [Delete]. 3 Select [Empty Recycle Bin] from the menu that appears by rightclicking [Recycle Bin] on the desktop. The [Confirm File Delete] dialog box appears. If you select multiple images, the [Confirm Multiple File Delete] dialog box appears. Click the [Yes] button. The images are moved to the Recycle Bin. The images are deleted.
Selecting the Image Display Mode You can change the display size or method and sort images according to conditions. Selecting the Thumbnail Size The available image sizes are [Large thumbnail], [Middle thumbnail], and [Small thumbnail]. Various information (2-4) is displayed in the display area. Select [View] menu [Large thumbnail], [Middle thumbnail], or [Small thumbnail]. Image with Information Display You can display the brightness histogram and the shooting information for images.
Selecting the Image Display Mode Displaying the Edit Window You can enlarge the image and perform detailed edits. Double-click an image. The edit window appears. See Chapter 3 “Performing Detailed Edits in the Edit Window” for the information on the edit window. Displaying the Edit Image Window You can select one image from multiple images and perform detailed edits. Select multiple images and then click the [Edit image window] button. The main window switches to the edit image window.
Selecting the Image Display Mode Displaying Image Information You can check various information for images. Select images and then select [File] menu [Info]. The image information appears. Clicking the [Close] button closes the dialog box. Sorting Images You can sort images according to conditions. Select [View] menu [Sort] [File name], [RAW priority], [Check mark], or [Shooting Date/Time]. The images are sorted according to the selected condition as shown below.
Selecting the Image Display Mode Hiding the Tree View Area Click the [Folders] button. Alternatively, you can hide the Tree View Area by selecting [View] menu [Folders]. Performing the same operation again shows the Tree View Area. Hiding the Toolbar Displaying Thumbnail Images and Performing Basic Edits in the Main Window 2 Select [View] menu [Toolbar]. Performing the same operation again shows the toolbar.
Editing Images You can perform various edits on the RAW, JPEG, and TIFF images that are supported by Digital Photo Professional. 1 2 Select an image (2-6). Edit the image (2-14 to 2-16). Alternatively, you can apply edits to other images by copying and pasting the edit data to the other images (2-26). You can also revert edited images to the last saved settings or shot settings (2-27). 3 Save the image (2-28). Before exiting Digital Photo Professional, you must save the edited images (2-28).
Editing Images Click White Balance Function You can automatically adjust the white balance simply by clicking a point in a neutral part of the image. 1 Click the [Click] button. 2 Click a point in a neutral part of the image. When you move the cursor over the image, the cursor [ ] changes to [ ]. If you finish this operation, click the [Click] button or right-click.
Editing Images Adjusting the Brightness You can adjust the brightness of an image in the range of –100 to +100 in 1-stop increments. 1 Click the [Brightness adjust] button. The [Brightness adjustment] dialog box appears. Alternatively, you can display this dialog box by selecting [Adjustment] menu [Brightness adjustment]. 2 Adjust an image while viewing it. Restores the image to its original condition. Drag the slider left or right to adjust the brightness. 3 2-16 Click the [Close] button.
Editing RAW Images You can perform various edits on the RAW images that are supported by Digital Photo Professional. 1 2 Select a RAW image (2-6). Edit the RAW image (2-18 to 2-24). Alternatively, you can apply edits to other images by copying and pasting the edit data to the other images (2-26). You can also revert edited images to the last saved settings or shot settings (2-27). Convert and save the image (2-29, 2-31).
Editing RAW Images Adjusting the White Balance You can adjust the white balance using the mode settings, color temperature settings, color wheel, and click white balance function. 1 Click the [White balance] button. The [White balance adjustment] dialog box appears. Alternatively, you can display this dialog box by selecting [Adjustment] menu [White Balance]. 2 3 2-18 Adjust the white balance by making each setting (2-19 to 2-22). Click the [Close] button.
Editing RAW Images Selecting the White Balance You can select white balance from the list box. Select the white balance. White Balance shot settings Auto Details To apply the white balance setting used when the shot was taken. Automatically adjusts the white balance. Color Temp. K (Kelvin) — Approx. 3000 to 7000 Daylight For sunny daylight outdoors. Approx. 5200 Shade For shaded areas outdoors. Approx. 7000 Cloudy For cloudy or hazy days and during sunset. Approx.
Editing RAW Images Specifying the Color Temperature You can specify the color temperature in the range of 2800 to 10000K (in 100K increments) to adjust the white balance. 1 Select [Color temp.]. 2 Adjust an image while viewing it. The adjusted value appears. Drag the slider left or right to adjust the color temperature.
Editing RAW Images Adjusting the Color Wheel You can select a desired color from the color wheel to adjust the white balance. You can also specify the hues in the range of 0 to 359 (in 1-stop increments), and the saturation in the range of 0 to 255 (in 1-stop increments). 1 Click the [Tune] button. The color wheel appears. 2 Adjust an image while viewing it. Drag [ ] to adjust an image. Enter a value in a range of 0 to 359 or click the [ ] / [ ] buttons to specify the hues.
Editing RAW Images Click White Balance Function You can automatically adjust the white balance simply by clicking a point in a neutral part of the image. 1 Click the [Click (RAW)] button. 2 Click a point in a neutral part of the image. When you move the cursor over the image, the cursor [ ] changes to [ ]. If you click on another point over the image, the white balance is adjusted again. If you finish this operation, click the [Click (RAW)] button or rightclick.
Editing RAW Images Adjusting the Brightness You can adjust the brightness in the range of –2.0 to +2.0 (in one-sixth-stop increments for the slider, and in 0.01-stop increments when entering a value). 1 Click the [Brightness (RAW)] button. The [Brightness adjustment] dialog box appears. Alternatively, you can display this dialog box by selecting [Adjustment] menu [Brightness adjustment (RAW)]. Restores the image to its original condition. Drag the slider left or right to adjust the brightness.
Editing RAW Images Specifying Color Space You can apply the color space different from the setting selected when you specify the preferences (2-38), to the selected RAW images. Select [Adjustment] menu [Work color space] [sRGB], [Adobe RGB], or [Wide Gamut RGB]. The specified color space is added to the ICC profile that is embedded in TIFF images that have been converted from RAW images and saved (2-29, 2-31). A color space is the reproducible color range (the characteristics of color gamut).
Using Edits (Recipe Data) Editing data that has been applied to JPEG, TIFF, and RAW images (2-14 to 2-16, 3-7 to 3-11) or editing data that has been applied to RAW images (2-17 to 2-24, 3-12 to 3-18) can be copied and applied to other images. Editing data can also be saved as a separate file containing editing data only. These files can be loaded into other images. In Digital Photo Professional, editing data is referred to as “recipe data”. Saving the Recipes The [Save As] dialog box appears.
Using Edits (Recipe Data) Copying Recipes and Applying to Other Images 1 2 Select the image from which a recipe will be copied and then select [Edit] menu [Copy recipe to clipboard]. The recipe is copied. Select the image to which the recipe will be applied and then select [Edit] menu [Paste recipe to selected photo]. The recipe is applied to the image. Image rotations (2-14) are not included in recipe data.
Reverting Edited Images to Their Original Condition You can cancel all the edits for images, and revert the edited images to their original condition before being edited or when shots were taken. Reverting to Last Saved Settings Select an image and then select [Adjustment] menu [Revert to last saved settings]. If you select multiple images, all the edited images that you selected are reverted to the last saved settings.
Saving Edited Images You can apply edits to one or more images and save the edited images. Saving without Renaming You can apply edits to an image and overwrite the existing image. Select an image and then select [File] menu [Add recipe and save]. Saving and Renaming You can apply edits to images and save the new images with another name. 1 2 2-28 Select an image and then select [File] menu [Add recipe and save as]. The [Save As] dialog box appears.
Saving Edited Images Converting and Saving RAW Images while Renaming Them You can convert edited RAW images to the TIFF or JPEG format and save them with another name. Select an image and then select [File] menu [Convert and save]. The [Save As] dialog box appears. Specify the drive or folder to which the image will be saved. Displays the contents of the drive or folder. Saves images. Restores the settings to their original ones and closes the [Save As] dialog box.
Saving Edited Images Enter a file name for saving images. Specify the resolution for saving images in a range of 1 to 60,000 dpi. Select this checkbox to embed an ICC profile in images when [Exif-TIFF 8bit] / [TIFF 16bit File] is selected from the [Save as type] list box. Specify the image quality (compression ratio) in 10 levels ([1] to [10]) when [JPEG File] is selected from the [Save as type] list box. Higher values give higher quality of the JPEG image.
Saving Edited Images Converting and Saving Images in a Single Operation (Batch-processing) You can save and rename multiple edited images in a single operation. You can also convert edited RAW images to JPEG and TIFF formats and save them in a single operation. Edit an image (2-14 to 2-24). Select images to be converted and saved in a single operation (2-6). 2 Click the [Batch save] button. The [Batch settings] window appears.
Saving Edited Images Select [JPEG], [Exif-TIFF(8bit)] or [Exif-TIFF(16bit)] for the image format used when the image is saved. Specify the folder in which the formatconverted images will be saved. The name of the destination folder is displayed next to the [Browse] button. Specify the image quality (compression ratio) in 10 levels when [JPEG] is selected from the [File format] list box. Higher values give higher image quality.
Printing Images Images can be automatically adjusted and printed within the print range. 1 2 Select an image and then select [File] menu [Print]. Select a printer to be used and then click the [Print] button. Printing begins. Printing with Easy-PhotoPrint Select an image and then select [File] menu [Print with EasyPhotoPrint]. Easy-PhotoPrint starts up. Follow the instructions displayed on the Easy-PhotoPrint window to print images.
Transferring Images to Photoshop You can transfer images to Adobe Photoshop. The descriptions given here use Adobe Photoshop 7.0, as an example. 1 2 Select an image (2-6). Select [Tools] menu [Transfer to Photoshop]. Photoshop starts up and displays the transferred image. RAW images are converted to TIFF format before being transferred. In order to transfer images, you will need Adobe Photoshop. The versions of Photoshop for transferring images are 6.0 to 7.0.
Specifying the Preferences You can specify various settings for Digital Photo Professional. The [Preferences] dialog box appears. Select the desired tab, specify the settings, and then click the [OK] button. The settings are applied and the [Preferences] dialog box closes. Allows you to select whether the edited image is saved automatically, or the confirmation dialog box is displayed when you exit Digital Photo Professional or change images displayed in the main window to the ones in another folder.
Specifying the Preferences Allows you to specify the grid spacing in a range of 8 to 256 pixels used when the grid is displayed on the edit window or the edit image window. Removing the check mark hides the [Click] button and the [Brightness adjust] button from the main window. If you select this checkbox, the image that has been displayed on the edit window is selected on the main window when you close the edit window.
Specifying the Preferences Allows you to select whether the histogram for the original image is displayed or the histogram for the edited image is displayed, in the [RGB image adjustment] tab sheet on the tool palette. Allows you to select whether points on the tone curve are connected with a straight line or a curve. Allows you to select whether the tone curve is expressed in RGB or Brightness in the [RGB image adjustment] tab sheet on the tool palette.
Specifying the Preferences Select sRGB or Monitor profile for the color space of the monitor. If you select the [Monitor profile] radio button, click the [Browse] button and specify the profile for the specified monitor. Select the color matching method for printing with Easy-PhotoPrint from [Perceptual] and [Colorimetric]. Select sRGB, Adobe RGB, or Wide Gamut RGB for the color space that is applied when RAW images are converted to TIFF format and saved.
Performing Detailed Edits in the Edit Window This chapter describes the functions of the edit window, and how to display images and perform detailed edits on them. Displaying the Edit Window......................................................................3-2 Selecting the Image Display Mode...........................................................3-5 Selecting the Display Size ......................................................................3-5 Displaying the Grid ...............................
Displaying the Edit Window You can enlarge a single image and perform detailed edits on it in the edit window. You can display multiple images in the edit window and edit them while comparing each of them. Up to 36 images can be displayed in the edit window. This chapter describes the functions that you can operate in the edit window only. For instructions on operating the functions common to those in the main window, refer to the page described with each function. Double-click a thumbnail image.
Displaying the Edit Window Menu Bar File menu Adjustment menu 2-28 2-28 2-29 2-33 2-12 3-2 2-14 2-14 2-27 2-24 2-27 Edit menu Tools menu 2-25 2-25 2-26 2-34 2-35 Performing Detailed Edits in the Edit Window 3 2-25, 2-26 View menu Help menu Shows/hides the tool palette. 3-5 3-6 3-6 3-5 3-5 3-5 3-5 Displays the version information of Digital Photo Professional.
Displaying the Edit Window Tool Palette RGB image adjustment tab sheet (3-7) RAW image adjustment tab sheet (3-12) * 3-4 The above tool palette shows all the information at once. In actual use, only the information needed is displayed.
Selecting the Image Display Mode You can change the size and method in which images are displayed. Selecting the Display Size You can select the image size from [Fit to window] (Fitting to the image display area), [50% view], [100% view] (actual size), and [200% view]. Select [View] menu [Fit to window], [50% view], [100% view], or [200% view]. When you display an image in a larger size, you can change the display position by dragging the image.
Selecting the Image Display Mode Displaying the Edited Image and the Original at the Same Time You can display the edited image and the original at the same time. Select [View] menu [Before/after comparison]. The images are displayed as shown on the right (2-36). Changing the Display Position You can also tile images vertically. Select [View] menu [Change up/down/left/right]. Performing the same operation again tiles images horizontally.
Editing Images You can perform various edits on the RAW, JPEG, and TIFF images that are supported by Digital Photo Professional. 1 2 Display the image on the edit window (3-2). 3 Edit the image (3-8 to 3-11). When multiple images are displayed, click the image for which you wish to specify the parameters, to place it on the top window. Select the [RGB image adjustment] tab on the tool palette. The [RGB image adjustment] tab sheet appears.
Editing Images Adjusting the Image Tone You can use the tone curve, highlight/shadow points, brightness, and contrast to adjust the image tone. A tone curve shows the brightness and color saturation for the original image (input) and the adjusted image (output) in the form of a line graph. You can use the tone curve to adjust the image brightness and color saturation values that were set by the camera automatically when the shot was taken.
Editing Images Adjusting the Tone Curve You can switch the tone curve display values between RGB and Brightness (2-37). 1 Click the button to select a channel. The settings are used for the B channel. The same settings are used for all RGB channels. The settings are used for the R channel. Adjust the tone curve. Clicking the tone curve shows [ place. ] on the tone curve. Drag [ You can specify up to 8 points [ ]. Double-clicking [ ] to your desired 3 ] deletes it.
Editing Images The minimum number of steps between the shadow point and the highlight point is 8. You can change tone curve interpolation methods or tone curve modes from the menu that appears by right-clicking on a tone curve. You can change tone curve interpolation methods or tone curve modes (2-37). Click White Balance Function You can automatically adjust the white balance simply by clicking a point in a neutral part of the image. 1 Click the [Click] button.
Editing Images Adjusting the Brightness and Contrast You can adjust the brightness and contrast in the range of –100 to +100 (in 1-stop increments). Adjust an image while viewing it. Enter a value to adjust the brightness and contrast. Drag the slider left or right to adjust the brightness and contrast.
Editing RAW Images You can perform more detailed edits on RAW images that are supported by Digital Photo Professional, than in the main window. 1 2 Display the RAW image in the edit window (3-2). 3 Edit the RAW images (3-13 to 3-18). When multiple images are displayed, click the image for which you wish to specify the parameters, to place it in the top window. Select the [RAW image adjustment] tab on the tool palette. The [RAW image adjustment] tab sheet appears.
Editing RAW Images Adjusting the Brightness You can adjust the brightness in the range of –2.0 to +2.0 (in one-sixth-stop increments for the slider, and in 0.01-stop increments when entering a value). Adjust an image while viewing it. Restores the image to its original condition. Drag the slider left or right to adjust the brightness. Enter a value to adjust the brightness. Adjusting the White Balance Selecting the White Balance You can select white balance from the list box (2-19).
Editing RAW Images Click White Balance Function You can automatically adjust the white balance simply by clicking a point in a neutral part of the image. 1 Click the [Click] button. 2 Click a point in a neutral part of the image. When you move the cursor over the image, the cursor [ ] changes to [ ]. If you click on another point over the image, the white balance is adjusted again. If you finish this operation, click the [Click] button or right-click.
Editing RAW Images Adjusting the Color Wheel You can select a desired color from the color wheel to adjust the white balance. You can also specify the hues in the range of 0 to 359 (in 1-stop increments), and the saturation in the range of 0 to 255 (in 1-stop increments) (2-21). Registering Adjusted White Balance (Personal White Balance) You can register up to three adjusted white balance data as personal white balance settings. 1 2 Adjust the white balance (3-13 to 3-15). Click the [Register] button.
Editing RAW Images Adjusting the Dynamic Range You can adjust the highlight and shadow points of images, and select the characteristics of the tone curve. Adjusting the Shadow and Highlight Points You can specify the shadow point (the darkest point) and highlight point (the brightest point) in the range of 0 to 255 (in 1-stop increments) to adjust the gradation of images. Adjust an image while viewing it. When you move the cursor to the left edge of the graph, the cursor [ ] changes to [ ].
Editing RAW Images Changing the Characteristics of the Tone Curve You can select the characteristics of the tone curve from five types. 1 Select [Custom]. 2 Adjust an image while viewing it. The slider appears. The slider has 5 levels. Drag the slider left or right to select the characteristics.
Editing RAW Images Adjusting the Color You can adjust the image tone. 1 Select [shot settings], [Faithful settings], or [Custom]. Restores the image to its original condition. Applies the color used when shots were taken, to the image. Applies faithful color reproduction to images. The [Hue] and [Saturation] sliders appear. Use the next step to adjust the hue and saturation in images. 2 Adjust an image while viewing it. Drag the slider left or right to adjust the hue and saturation.
Performing Detailed Edits in the Edit Image Window This chapter describes the functions of the edit image window, and how to display images and perform detailed edits on them. The functions of the edit image window are the same as those of the main window (chapter 2) and of the edit window (chapter 3). For detailed instructions on operating these functions, refer to the page described with each function. Displaying the Edit Image Window ..........................................................
Displaying the Edit Image Window In the edit image window, you can select one image from multiple images and perform detailed edits on the selected image. The functions of the edit image window are the same as those of the main window (chapter 2) and of the edit window (chapter 3). For detailed instructions on operating these functions, refer to the page described with each function. 1 2 Select multiple images in the main window (2-6). Click the [Edit image window] button.
Displaying the Edit Image Window Edit Image Window Toolbar Menu bar Displays the [File], [Edit], [View], [Adjustment], [Tools], and [Help] menus. Path display Displays the path of the drive and folder that contain the currently displayed image. Tool palette Displays the coordinates of the cursor position and the RGB values (8-bit conversion) of an image. Displays the operation mode (2-35). Displays the color space for working (2-24, 2-38).
Displaying the Edit Image Window Menu Bar File menu Adjustment menu 2-14 2-14 2-28 2-28 2-29 2-31 2-33 2-33 2-24 2-27 2-27 2-12 2-2 Removes the set check mark. Deletes the images from the thumbnail image display area. Sets a check mark for images. Tools menu Edit menu 2-34 2-34 2-35 2-25 2-25 2-26 2-25, 2-26 Help menu The copied recipe data is pasted to all images. Displays the version information of Digital Photo Professional. View menu Returns to the main window.
Displaying the Edit Image Window Toolbar 50% view button Scales down the image 50%. 100% view button Displays the image as an actual size. Fit to window button Previous photo button Fits the image in the window. Select the previous image. Batch save button (2-31) Main window button The edit image window switches to the main window. Rotate left button (2-14) Grid button (3-5) Rotate right button (2-14) Next photo button Tool button Select the next image. Shows/hides the tool palette.
Reference This chapter provides troubleshooting, the instructions on uninstalling Digital Photo Professional, and shortcut key list to allow you to use Digital Photo Professional easily. Troubleshooting ........................................................................................5-2 Uninstalling the Software..........................................................................5-3 Shortcut Key List .......................................................................................
Troubleshooting If you have problems such as “Could not complete installation correctly” or “Digital Photo Professional does not work”, check the items described below. Could not complete installation correctly. If you are using Windows XP Professional or Windows 2000, are you using the computer under a user setting other than [Computer administrator] or [Administrator]? You cannot install software if a user setting other than [Computer administrator] or [Administrator] is selected.
Uninstalling the Software Follow the procedure below to uninstall Digital Photo Professional. Exit any application other than Digital Photo Professional before uninstalling Digital Photo Professional. For Windows XP Professional or Windows 2000, log in using computer Administrator privileges. To prevent computer malfunctions, always restart your computer after you have uninstalled Digital Photo Professional.
Shortcut Key List Main Window Operation Key Operation Open in Edit window Ctrl + O Clear All Add recipe and save Ctrl + S Select RAW photos only Add recipe and save as Shift + Ctrl + S Key Shift + Ctrl + A Select check marked photos only Alt + Ctrl + A Ctrl + Y Convert and save Ctrl + D Edit in Edit image window Ctrl + Right Arrow Batch save Ctrl + B Large thumbnail Ctrl + 1 Print Ctrl + P Middle thumbnail Ctrl + 2 Print with Easy-PhotoPrint Ctrl + E Small thumbnail Ctrl + 3 DEL
Shortcut Key List Edit Window Operation Key Key Ctrl + S Rotate Right Ctrl + R Shift + Ctrl + S Fit to window Ctrl + 0 Add recipe and save Add recipe and save as Operation Convert and save Ctrl + D 50% view Ctrl + 1 Print Ctrl + P 100% view Ctrl + 2 Info Ctrl + I 200% view Ctrl + 3 Close Ctrl + W Preferences Ctrl + K Rotate Left Ctrl + L – – Key Operation Key Edit Image Window Add recipe and save Add recipe and save as Ctrl + S Shift + Ctrl + S Rotate Right Ctrl + R Ad
5 Reference Index A Information Displayed with Images ........... 2-4 Adjusting the Brightness ................ 2-16, 3-11 Installing the Software .............................. 1-2 Adjusting the Brightness (RAW) .... 2-23, 3-13 L Adjusting the Color ................................. 3-18 Adjusting the Color Wheel ............. 2-21, 3-15 Adjusting the Contrast ............................ 3-11 Adjusting the Dynamic Range ................ 3-16 Adjusting the Hue ...................................
Index Specifying the Color Temperature .. 2-20, 3-13 Specifying the Preferences .................... 2-35 Starting up Digital Photo Professional ...... 2-2 Supported Image Formats ........................... 8 System Requirements ................................. 8 T Tool Palette RAW image adjustment tab sheet .. 3-4, 4-5 RGB image adjustment tab sheet .. 3-4, 4-5 Transferring Images to Photoshop ......... 2-34 Troubleshooting ........................................ 5-2 U Uninstalling the Software .....
CANON INC. 30-2, Shimomaruko 3-chome, Ohta-ku, Tokyo, 146-8501, Japan U.S.A. CANON U.S.A. INC. One Canon Plaza, Lake Success, N.Y. 11042-1198 For all inquiries concerning this camera, call toll free in the U.S. 1-800-OK-CANON CANADA CANON CANADA INC. HEADQUARTERS 6390 Dixie Road, Mississauga, Ontario L5T 1P7, Canada CANON CANADA INC. MONTREAL BRANCH 5990, Côte-de-Liesse, Montréal Québec H4T 1V7, Canada CANON CANADA INC. CALGARY OFFICE 2828, 16th Street, N.E.