
Service manual


1 - 17
<Media sensor correction procedures>
In the media sensor correction mode, using the reference white PET paper and reference plain paper of the
calibration media kit (QY9-0064), press the Resume/Cancel button the specified number of times in the
table below, and press the Power button. The media sensor correction operation must be performed once
each with the reference white PET paper and the reference plain paper.
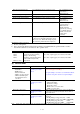
Time(s) of
Resume/Cancel button
LED Operation
1 time Orange Not used in servicing
(In this mode, the set reference paper will be fed, and may be
damaged. Please be careful not to select this mode.)
2 times Green Reference white PET paper correction value operation
*1
3 times Orange Reference plain paper correction value operation
*2
4 times or more Return to the menu selection
Note: - After each correction value operation, the mode returns to the service mode menu selection. After
finishing either of the correction value operations, re-select the media sensor correction mode to
perform the other correction value operation.
- After performing the media sensor correction, confirm the values of the media sensor in service
test print or EEPROM information print. (See Section 3.5 Verification Items, (1) Service test
print, or (2) EEPROM information print.)
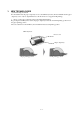
*1: Reference white PET paper correction value operation
Set the A5-sized reference white PET paper (packed in the calibration media kit) in the sheet feeder in
the landscape orientation. Then, press the Resume/Cancel button 2 times, and the Power button.
Note: There is no printing on the reference white PET paper. It can be placed with either side facing
up, and with either edge at the top.
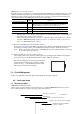
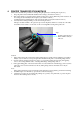
*2: Reference plain paper correction value operation
After setting a sheet of the A5-sized reference plain paper (packaged in the calibration media kit) in
the sheet feeder, press the Resume/Cancel button 3 times, and the Power button.
The reference plain paper should be placed in the sheet
feeder with the print side facing up, with the + marks
printed area at top, so that it will feed in the direction
indicated by the blue arrow in the figure.
(7) Flash ROM upgrade
Refer to the applicable Service Information (SI) bulletin announcing the upgrade.
3.5 Verification Items
(1) Service test print
<EEPROM information contents>
On the service test print (sample on the following page), confirm the EEPROM information as shown
below. (The information is given in the upper portion of the printout.)
Destination (model name)
ROM Version
Ink absorber waste ink amount (%)
N
umber of times the print head is installe
d
Initial print date after installation
(Default: 1970/01/01)
* See Reference