
Service manual


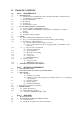


II. TABLE OF CONTENTS
Page Part 1: MAINTENANCE
1-1 1. MAINTENANCE
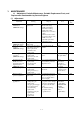
1-1 1.1 Adjustment, Periodic Maintenance, Periodic Replacement Parts, and Replacement
Consumables by Service Engineer
1-2 1.2 Customer Maintenance
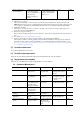
1-3 1.3 Product Life
1-3 1.4 Special Tools
1-3 1.5 Serial Number Location
1-4 2. LIST OF ERROR DISPLAY / INDICATION
1-4 2.1 Operator Call Errors (LED Blinks in Orange)
1-6 2.2 Service Call Errors (LED Blinks in Orange and Green Alternately, or Lights in
Orange)
1-6 2.3 Warnings
1-7 2.4 Troubleshooting by Symptom
1-9 3. REPAIR
1-9 3.1 Disassembling / Reassembling flow for main units
1-10 3.2 Notes on Service Part Replacement (and Disassembling / Reassembling)
1-11 3.3 Special Notes on Repair Servicing
(1) Flexible cable and harness wiring, connection
(2) Notes on after repair for trouble concerning printing or re-installation of the
print head
1-12 3.4 (1) Paper feed motor adjustment
(2) Gear phase adjustment
1-13 (3) Grease application
1-14 (4) Waste ink counter setting
1-15 (5) User mode
1-15 (6) Service mode
1-17 (7) Flash ROM upgrade
1-17 3.5 Verification Item
(1) Service test print
1-20 (2) EEPROM information print
1-22 4. PRINTER TRANSPORTATION METHOD
Part 2: TECHNICAL REFERENCE
2-1 1. NEW TECHNOLOGIES
2-4 2. CLEANING MODE AND AMOUNT OF INK PURGED
2-5 3. PRINT MODE
3.1 Resolution
(1) Standard color printing
2-6 (2) Standard gray scale printing (Paper types different than those for color printing
only are listed.)
2-7 (3) Borderless printing
(4) Duplex printing
2-8 (5) Camera Direct Printing
2-9 4. FAQ (Specific Problems and Solutions)
2-10 5. SPECIFICATIONS
2-10 5.1 Printer Specifications
2-11 5.2 Printer Head Specifications
5.3 Comparison with PIXUS 9100i / i9100
Part 3: APPENDIX
3-1 1. BLOCK DIAGRAM
3-2 2. CONNECTOR LOCATION AND PIN LAYOUT
3-2 2.1 Logic Board Ass’y
3-6 2.2 Carriage Board (print head connection terminals)